Industry
The Industry feature pulls four tools into one rail entry. A Jobs tab tracks running and finished industry jobs, a Blueprints tab lists your blueprint library, a Planner works out what a build costs and what it needs, and an Extractions tab shows corporation moon-mining timers. Switch between the four tabs from the row at the top of the window.
A scope picker sits above the tabs. It defaults to All, which combines every authorized pilot and every corporation you own into one view. You can narrow it to a single character or a single corporation. When a character is missing the ESI scopes that a tab needs, that character drops out of the combined view and a banner names the pilots you still need to re-authorize.
Jobs
The Jobs tab lists the industry jobs Pod has synced from ESI for the current scope. It covers every activity EVE runs through the industry system: manufacturing, time research, material research, copying, invention, and reactions. Each job carries a short activity tag: MANUF for manufacturing, TE for time research, ME for material research, COPY for copying, INVENT for invention, and REACT for reactions.
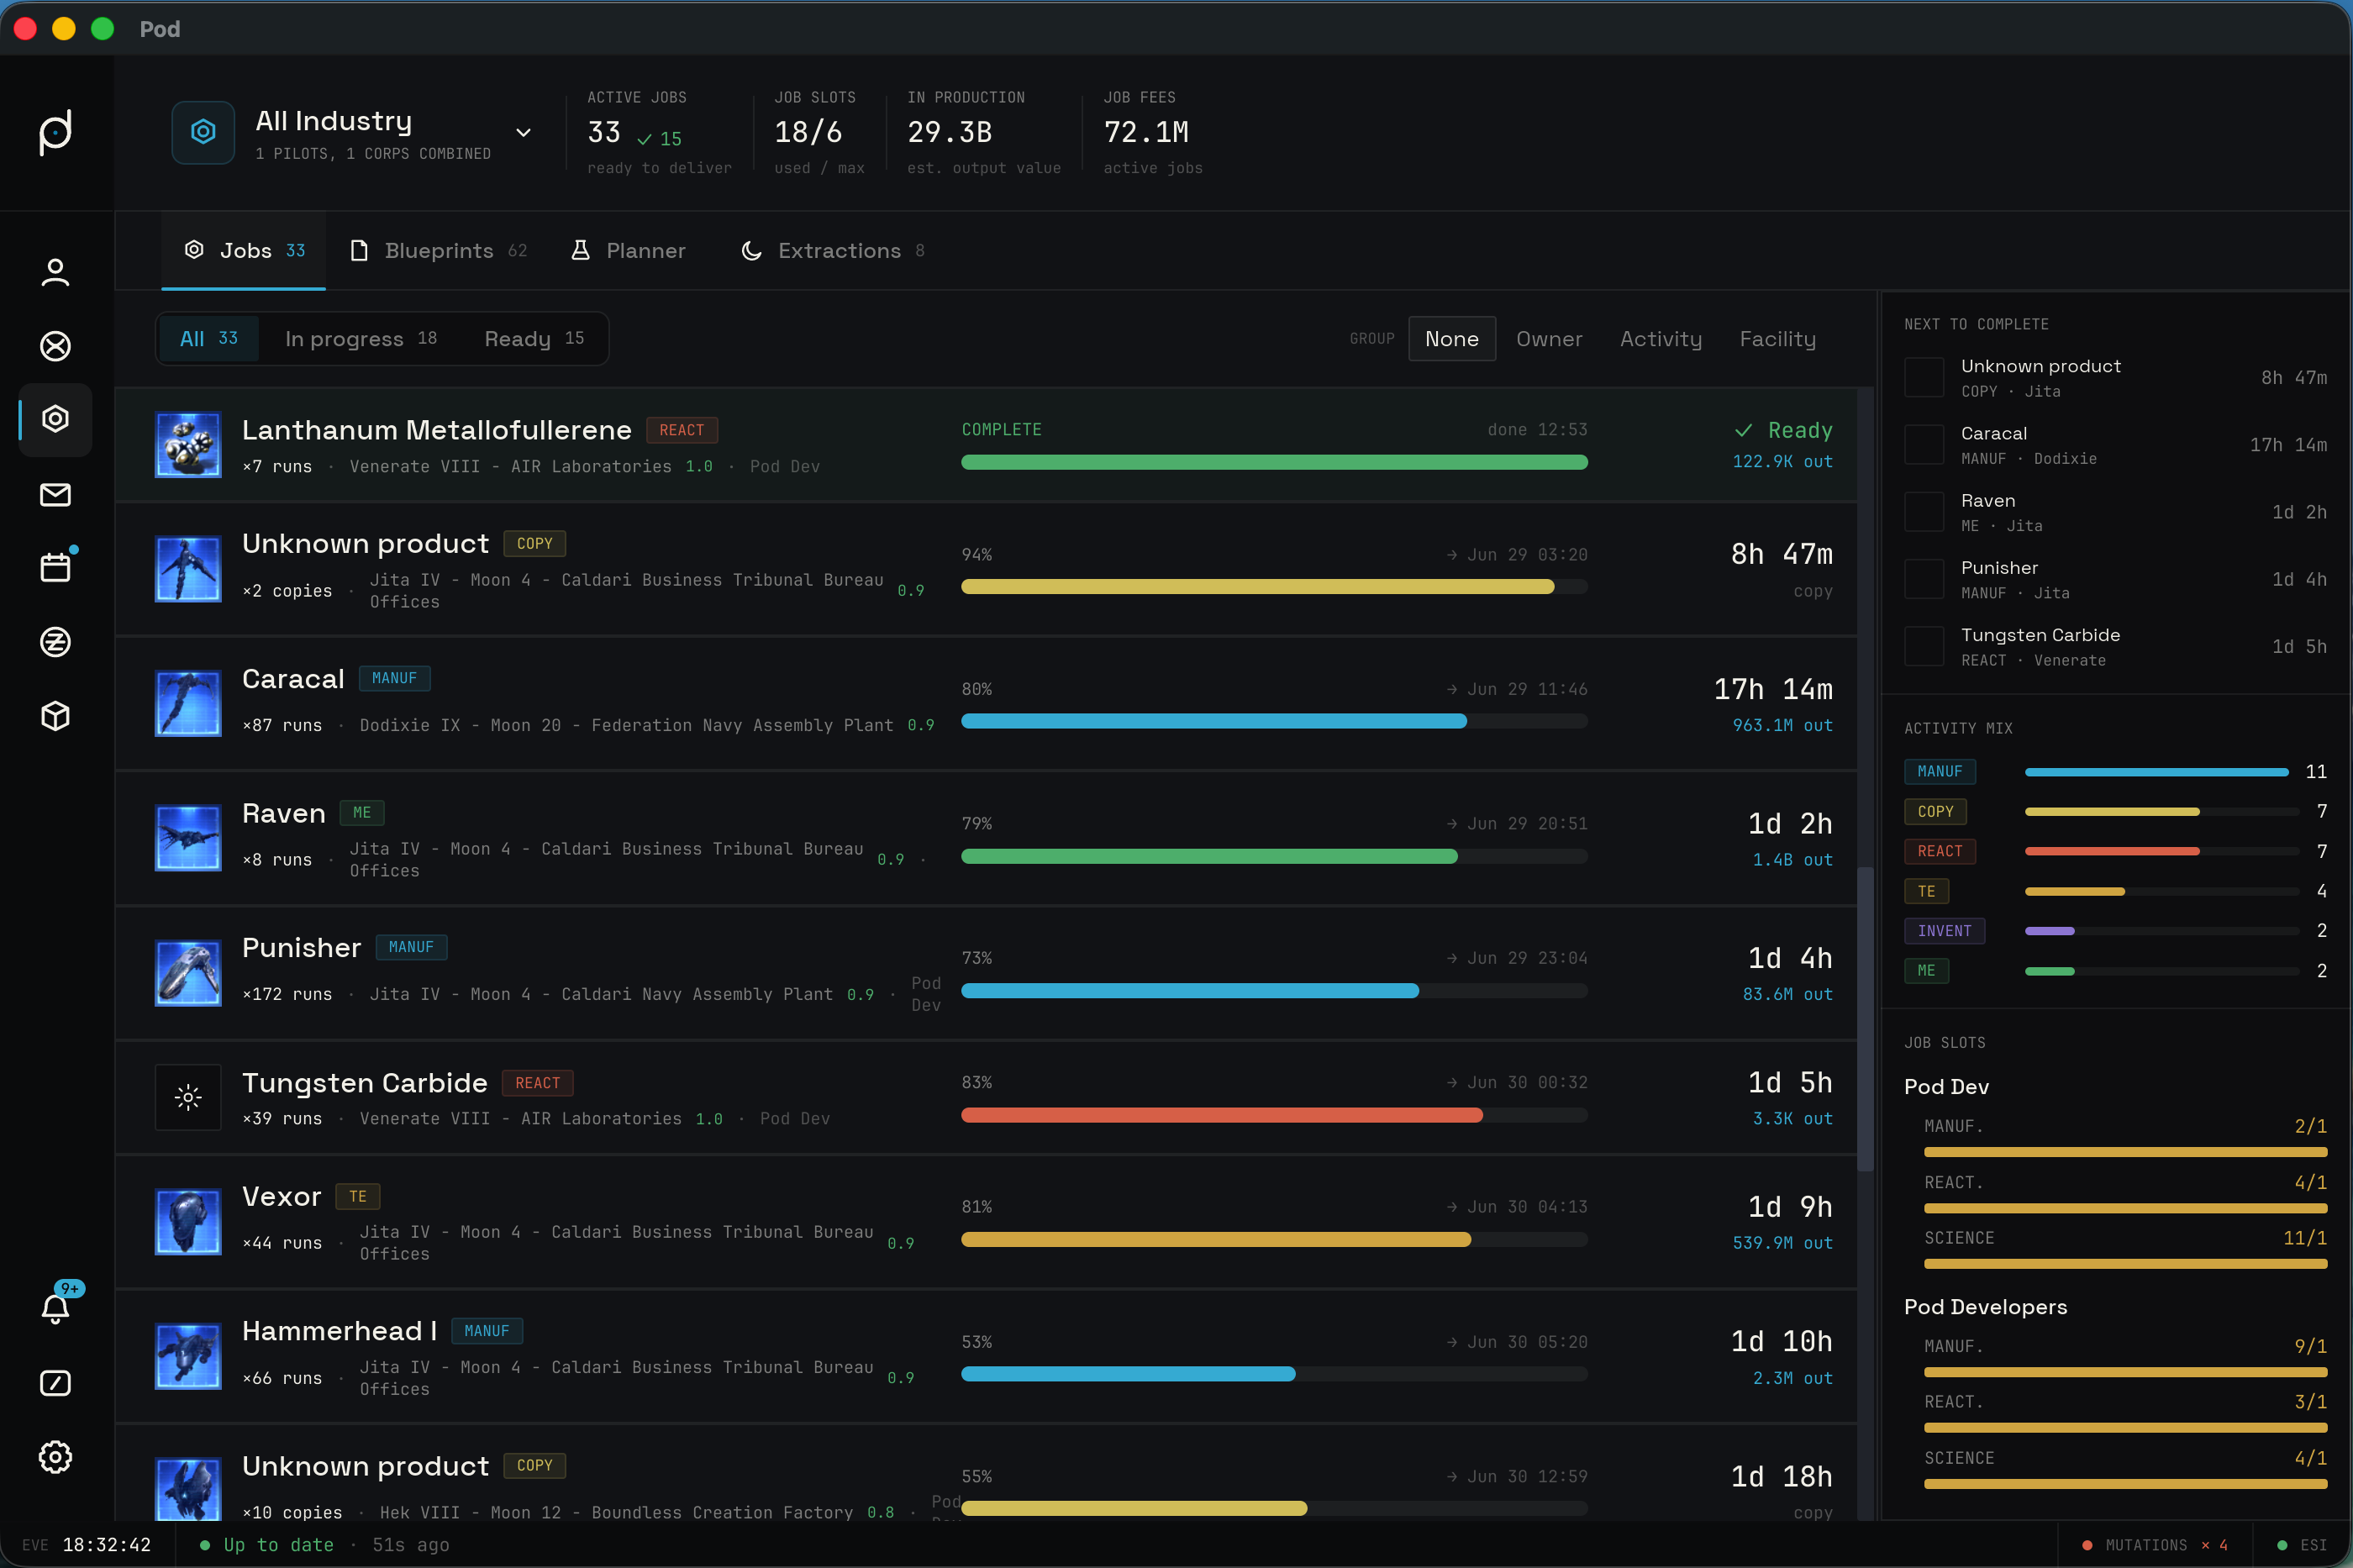
A filter bar across the top splits the jobs three ways. All shows every job and is the default. In progress shows jobs that have not reached their end time yet. Ready shows jobs that have passed their end time and are waiting for you to deliver them. Each filter button carries a running count, so you can see how many jobs are active and how many are ready without changing the view.
Next to the filter sits a group-by control with four options: None, Owner, Activity, and Facility. None leaves the list flat. Owner groups the jobs under each character or corporation. Activity groups them by job type. Facility groups them by the station or structure the job runs in. Grouped lists get a header per group that names the group and counts how many jobs it holds and how many are ready.
Each row shows the job's progress. A running job displays a percentage; a finished job reads as complete and shows a green check with Ready. The countdown shows the time left, and for a finished job it shows the date and time it completed instead. Run counts read in the units the activity uses: runs for manufacturing, tries for invention, and copies for copying. Invention jobs also show their success chance when ESI reports it.
A resizable detail rail on the right shows the selected job. Drag its edge to widen or narrow it.
Blueprints
The Blueprints tab lists your blueprint library with the efficiency and run data that the Assets window does not carry. It reads from a dedicated ESI blueprints endpoint, so it knows each blueprint's material efficiency, time efficiency, and remaining runs.
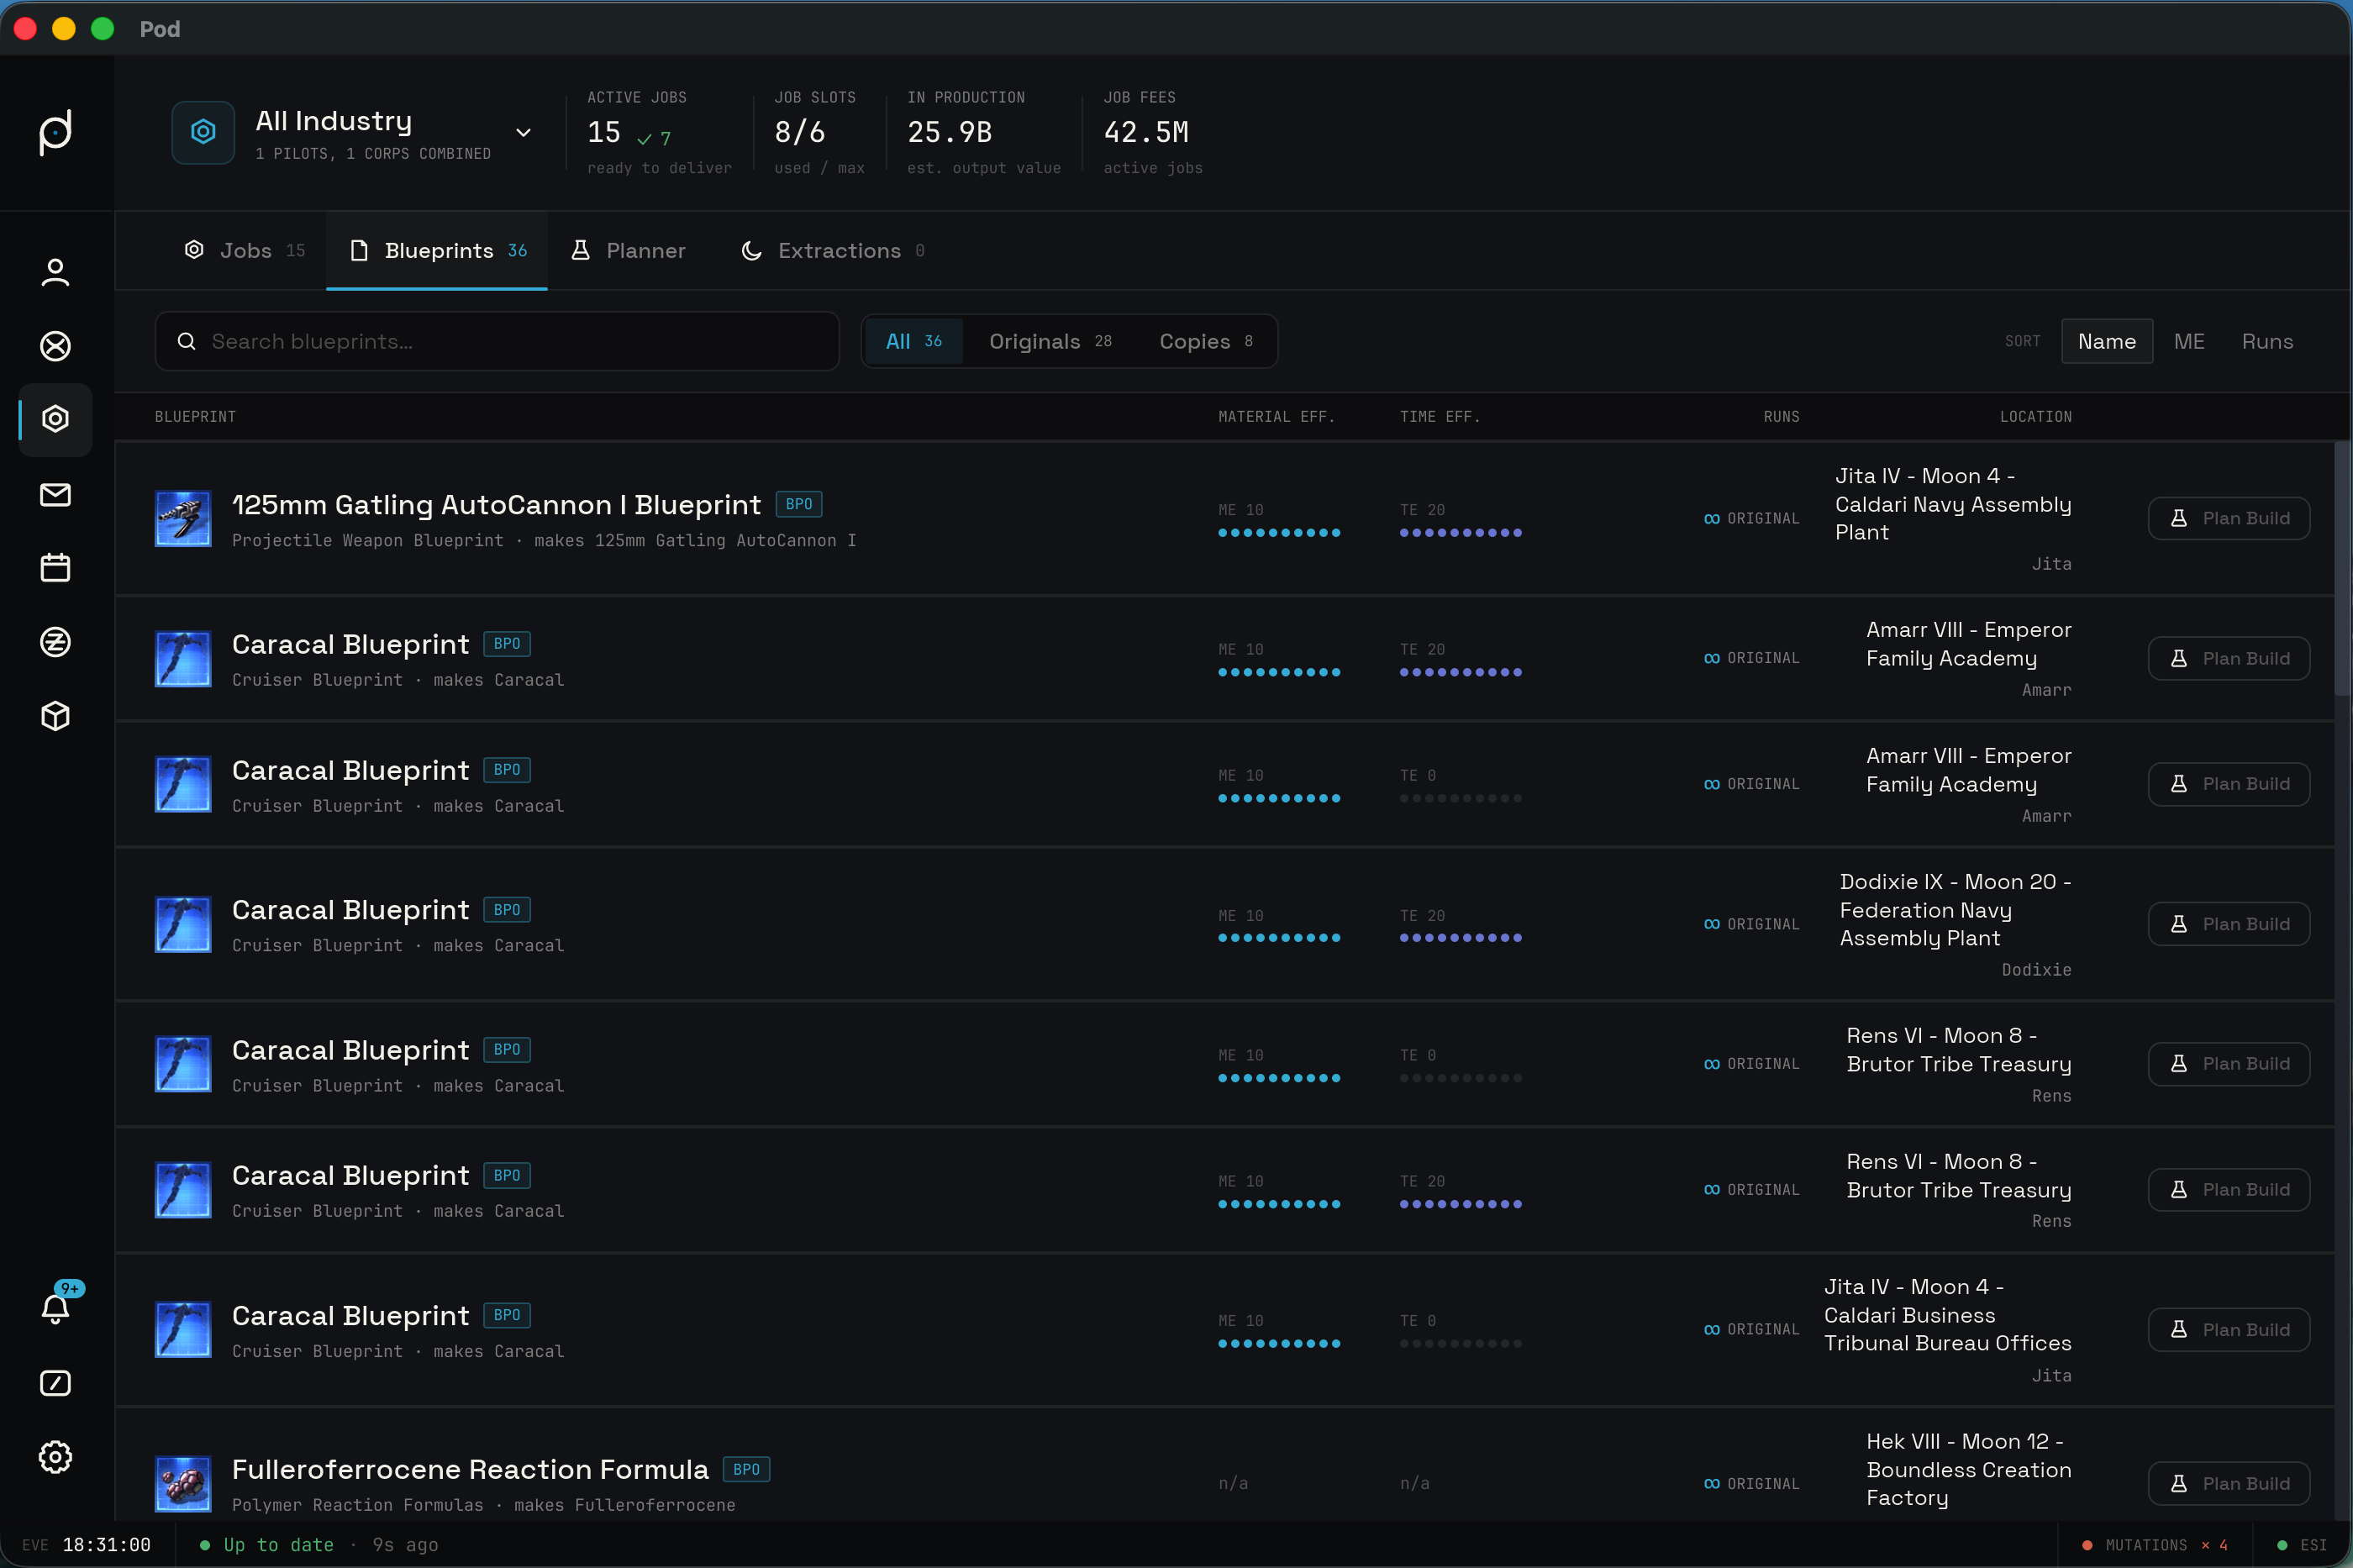
A segmented control filters the list by kind: All, Originals, and Copies. An original (BPO) has unlimited runs and shows an infinity marker where the run count would go. A copy (BPC) has a finite number of runs and shows how many it has left. Each filter button carries a count of how many blueprints fall under it. You can sort the list by Name, by ME, or by Runs.
Each row names the blueprint, tags it as a BPO or a BPC, and shows what it makes as a subtitle. Material efficiency and time efficiency each show their value next to a ten-dot meter that fills in proportion to the value. Reaction blueprints have no ME or TE, so those read as not applicable. The run column shows the original marker for a BPO and the remaining runs for a BPC. The row also shows where the blueprint sits, naming the station or structure and its system.
A Plan Build action on each row seeds that blueprint's product into the Planner and switches you to the Planner tab, so you can go straight from a blueprint to a full build plan.
Planner
The Planner is a recursive build planner. You pick a product, and it works out the full tree of jobs and materials needed to build it, sums the cost, and tells you whether the build turns a profit at current prices.
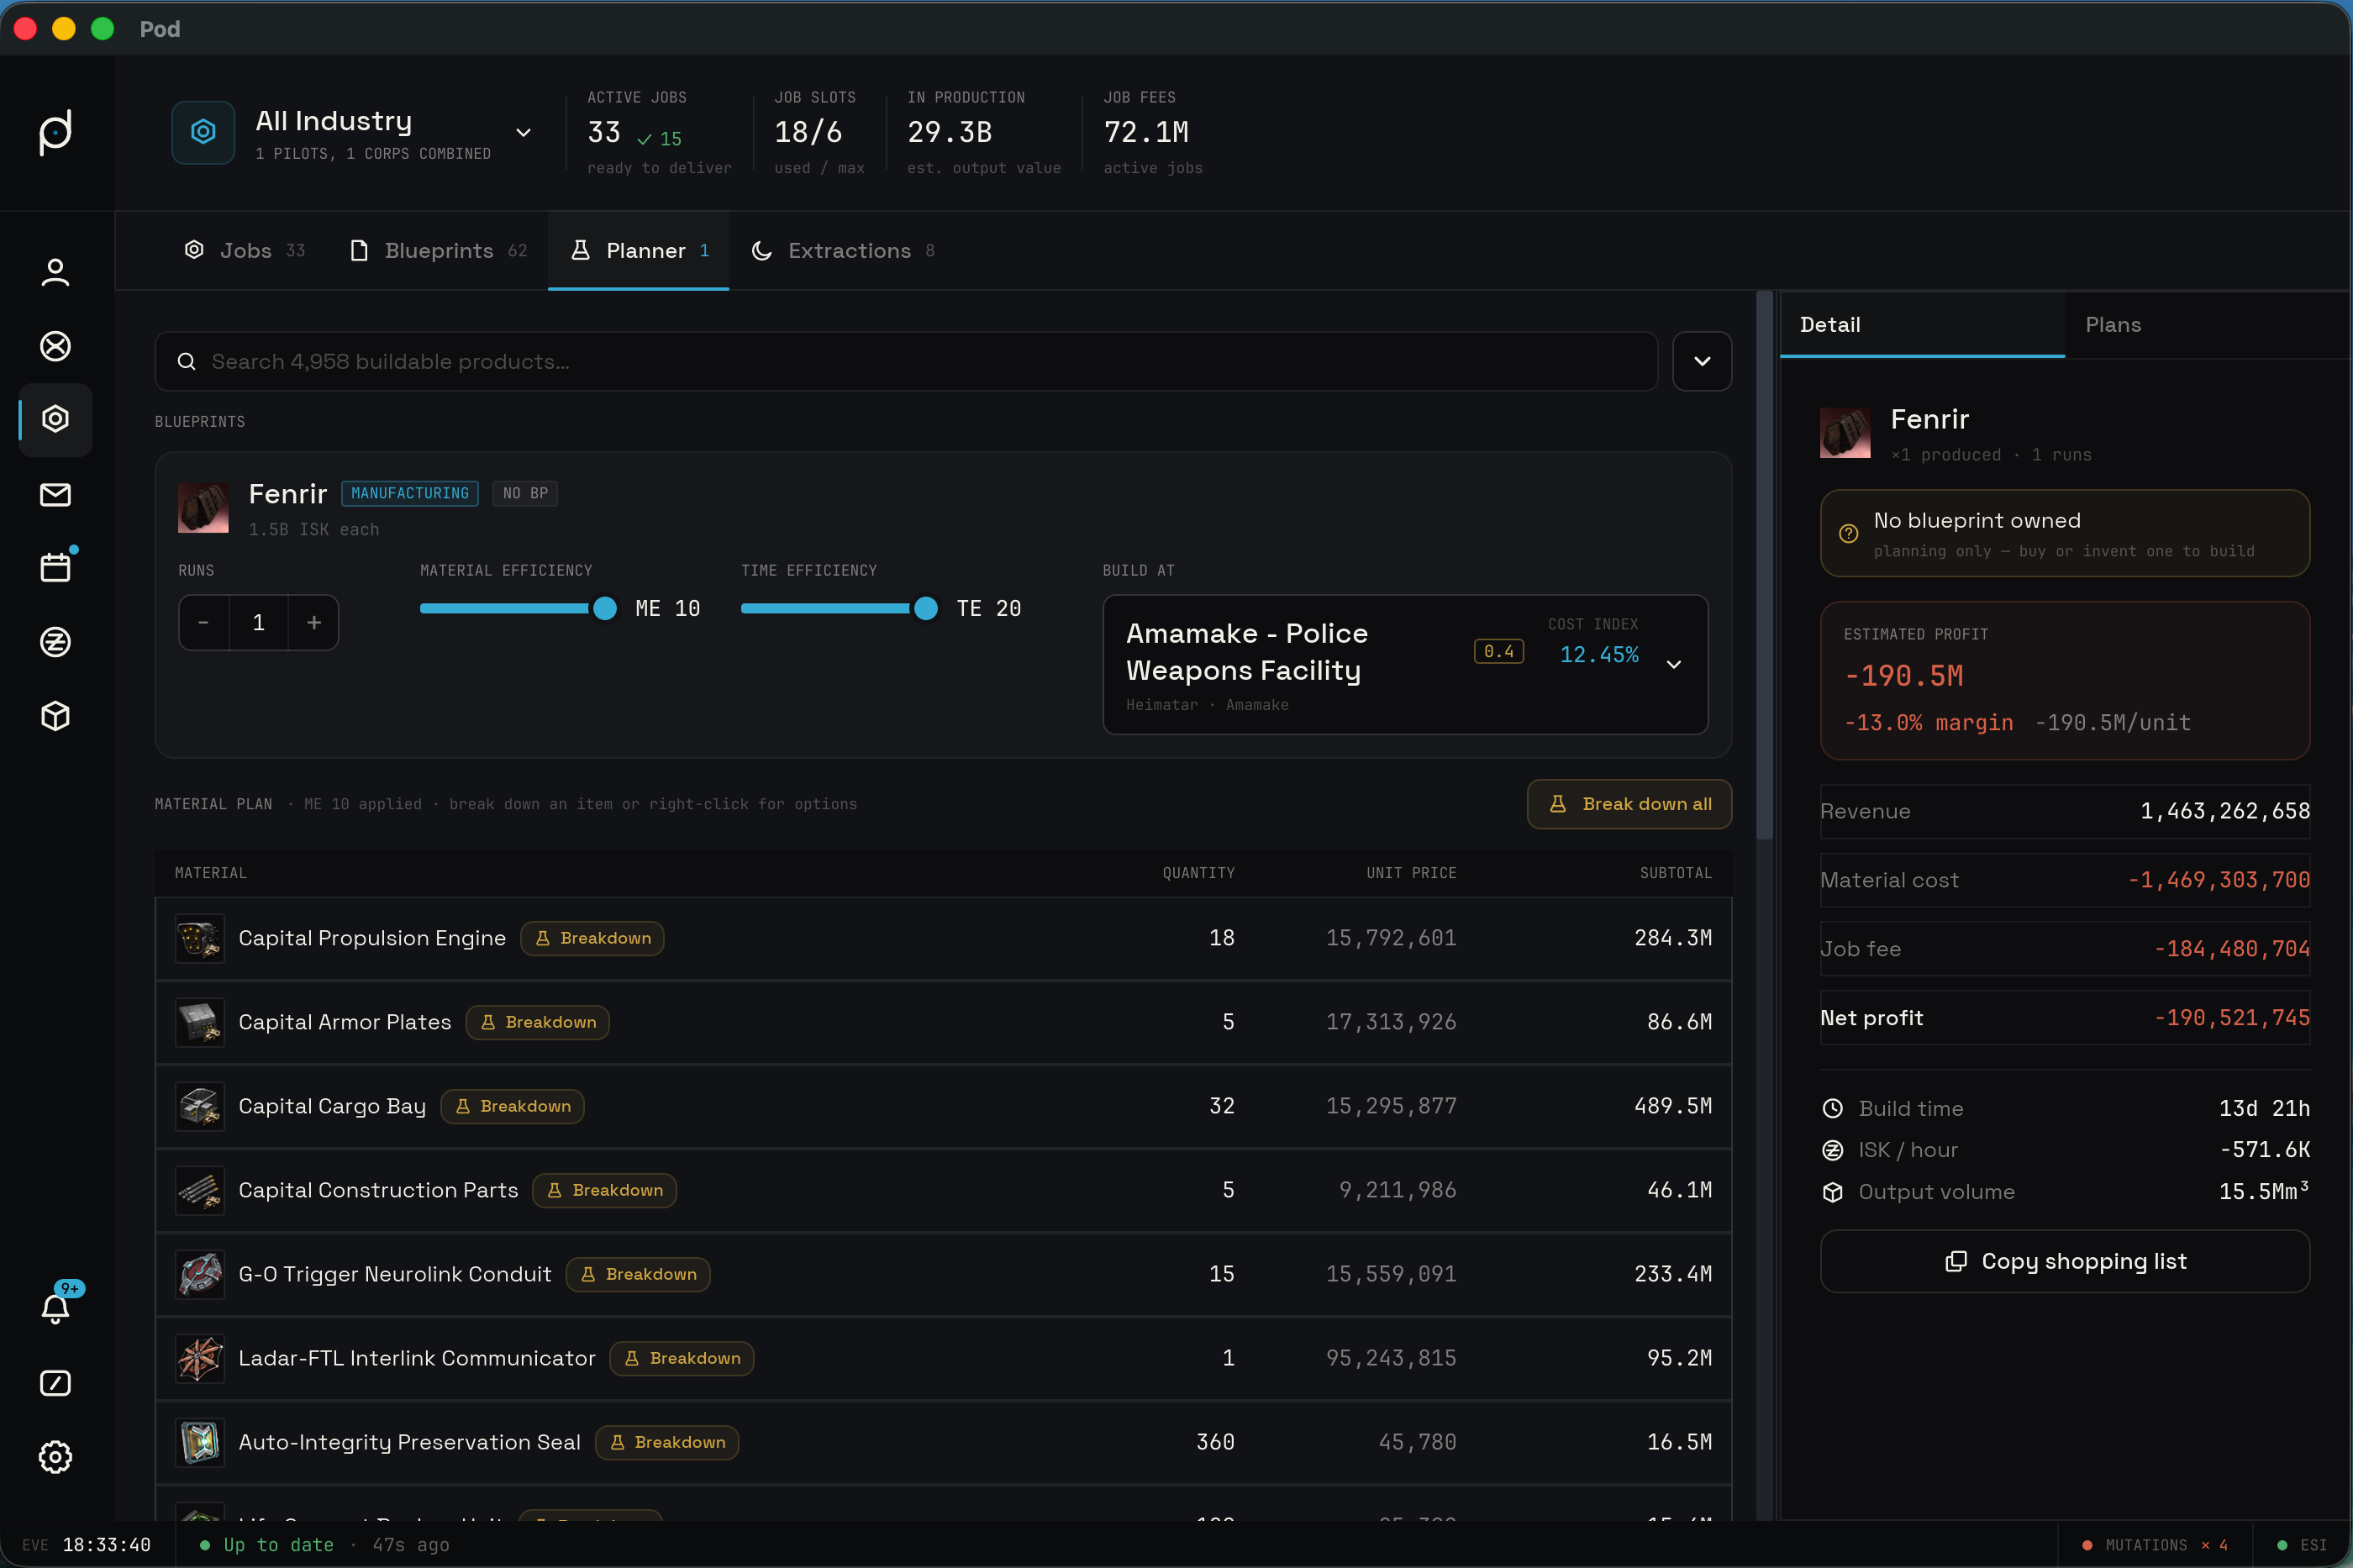
The Planner opens cold with no product selected. The left pane shows a product search over the seeded build catalog. Type to filter by name and pick the item you want to build. Nothing auto-selects, so the first thing you do is choose a product. Once you pick one, the Planner builds the plan and stacks the rest of the work down the left side: the per-type build cards, the Material plan, the Bill of materials, the Needed blueprints, and the Build order. The sub-sections stack one below the next rather than hiding behind tabs, so you read the whole plan in a single scroll.
Per-type build cards
Each item type in the plan gets one build card. The card carries the settings that decide how that type is made: a run count, an ME value, a TE value, a facility, and the cost index read for that facility's system. Manufacturing defaults to ME 10 and TE 20; reactions have no ME or TE and leave those fields blank.
Every type also has a build-or-buy choice. Mark a type as built and the Planner descends into its own recipe and adds its materials to the tree. Leave it as buy and the Planner treats it as a raw input you purchase, and the bill of materials lists it directly. Because the planner is recursive, switching a deep component from buy to build re-expands that whole branch.
Picking a facility
The facility for each type comes from a live-search combobox. Type at least three characters and Pod runs an ESI character search for matching stations and structures, debounced so it does not fire on every keystroke. Below three characters it falls back to the facilities you already have access to. The list covers NPC stations, your corporation's structures, and the facilities you track in Settings, Facilities. Picking a facility sets the cost index that the economics use for that type's jobs.
When you pick a facility you track in Settings, Facilities, the plan also applies that structure's fitted-rig bonuses. Its rigs lower the material each job consumes, cut the job time, and reduce the install fee, and each bonus scales with the structure's security band, so the same rig does more in low security or null security than in high security. Those adjustments carry through to material amounts, job times, install fees, cost, and profit. An NPC station, an untracked structure, or a tracked structure with no rigs fitted applies no rig bonus, so it plans at neutral values.
Material plan
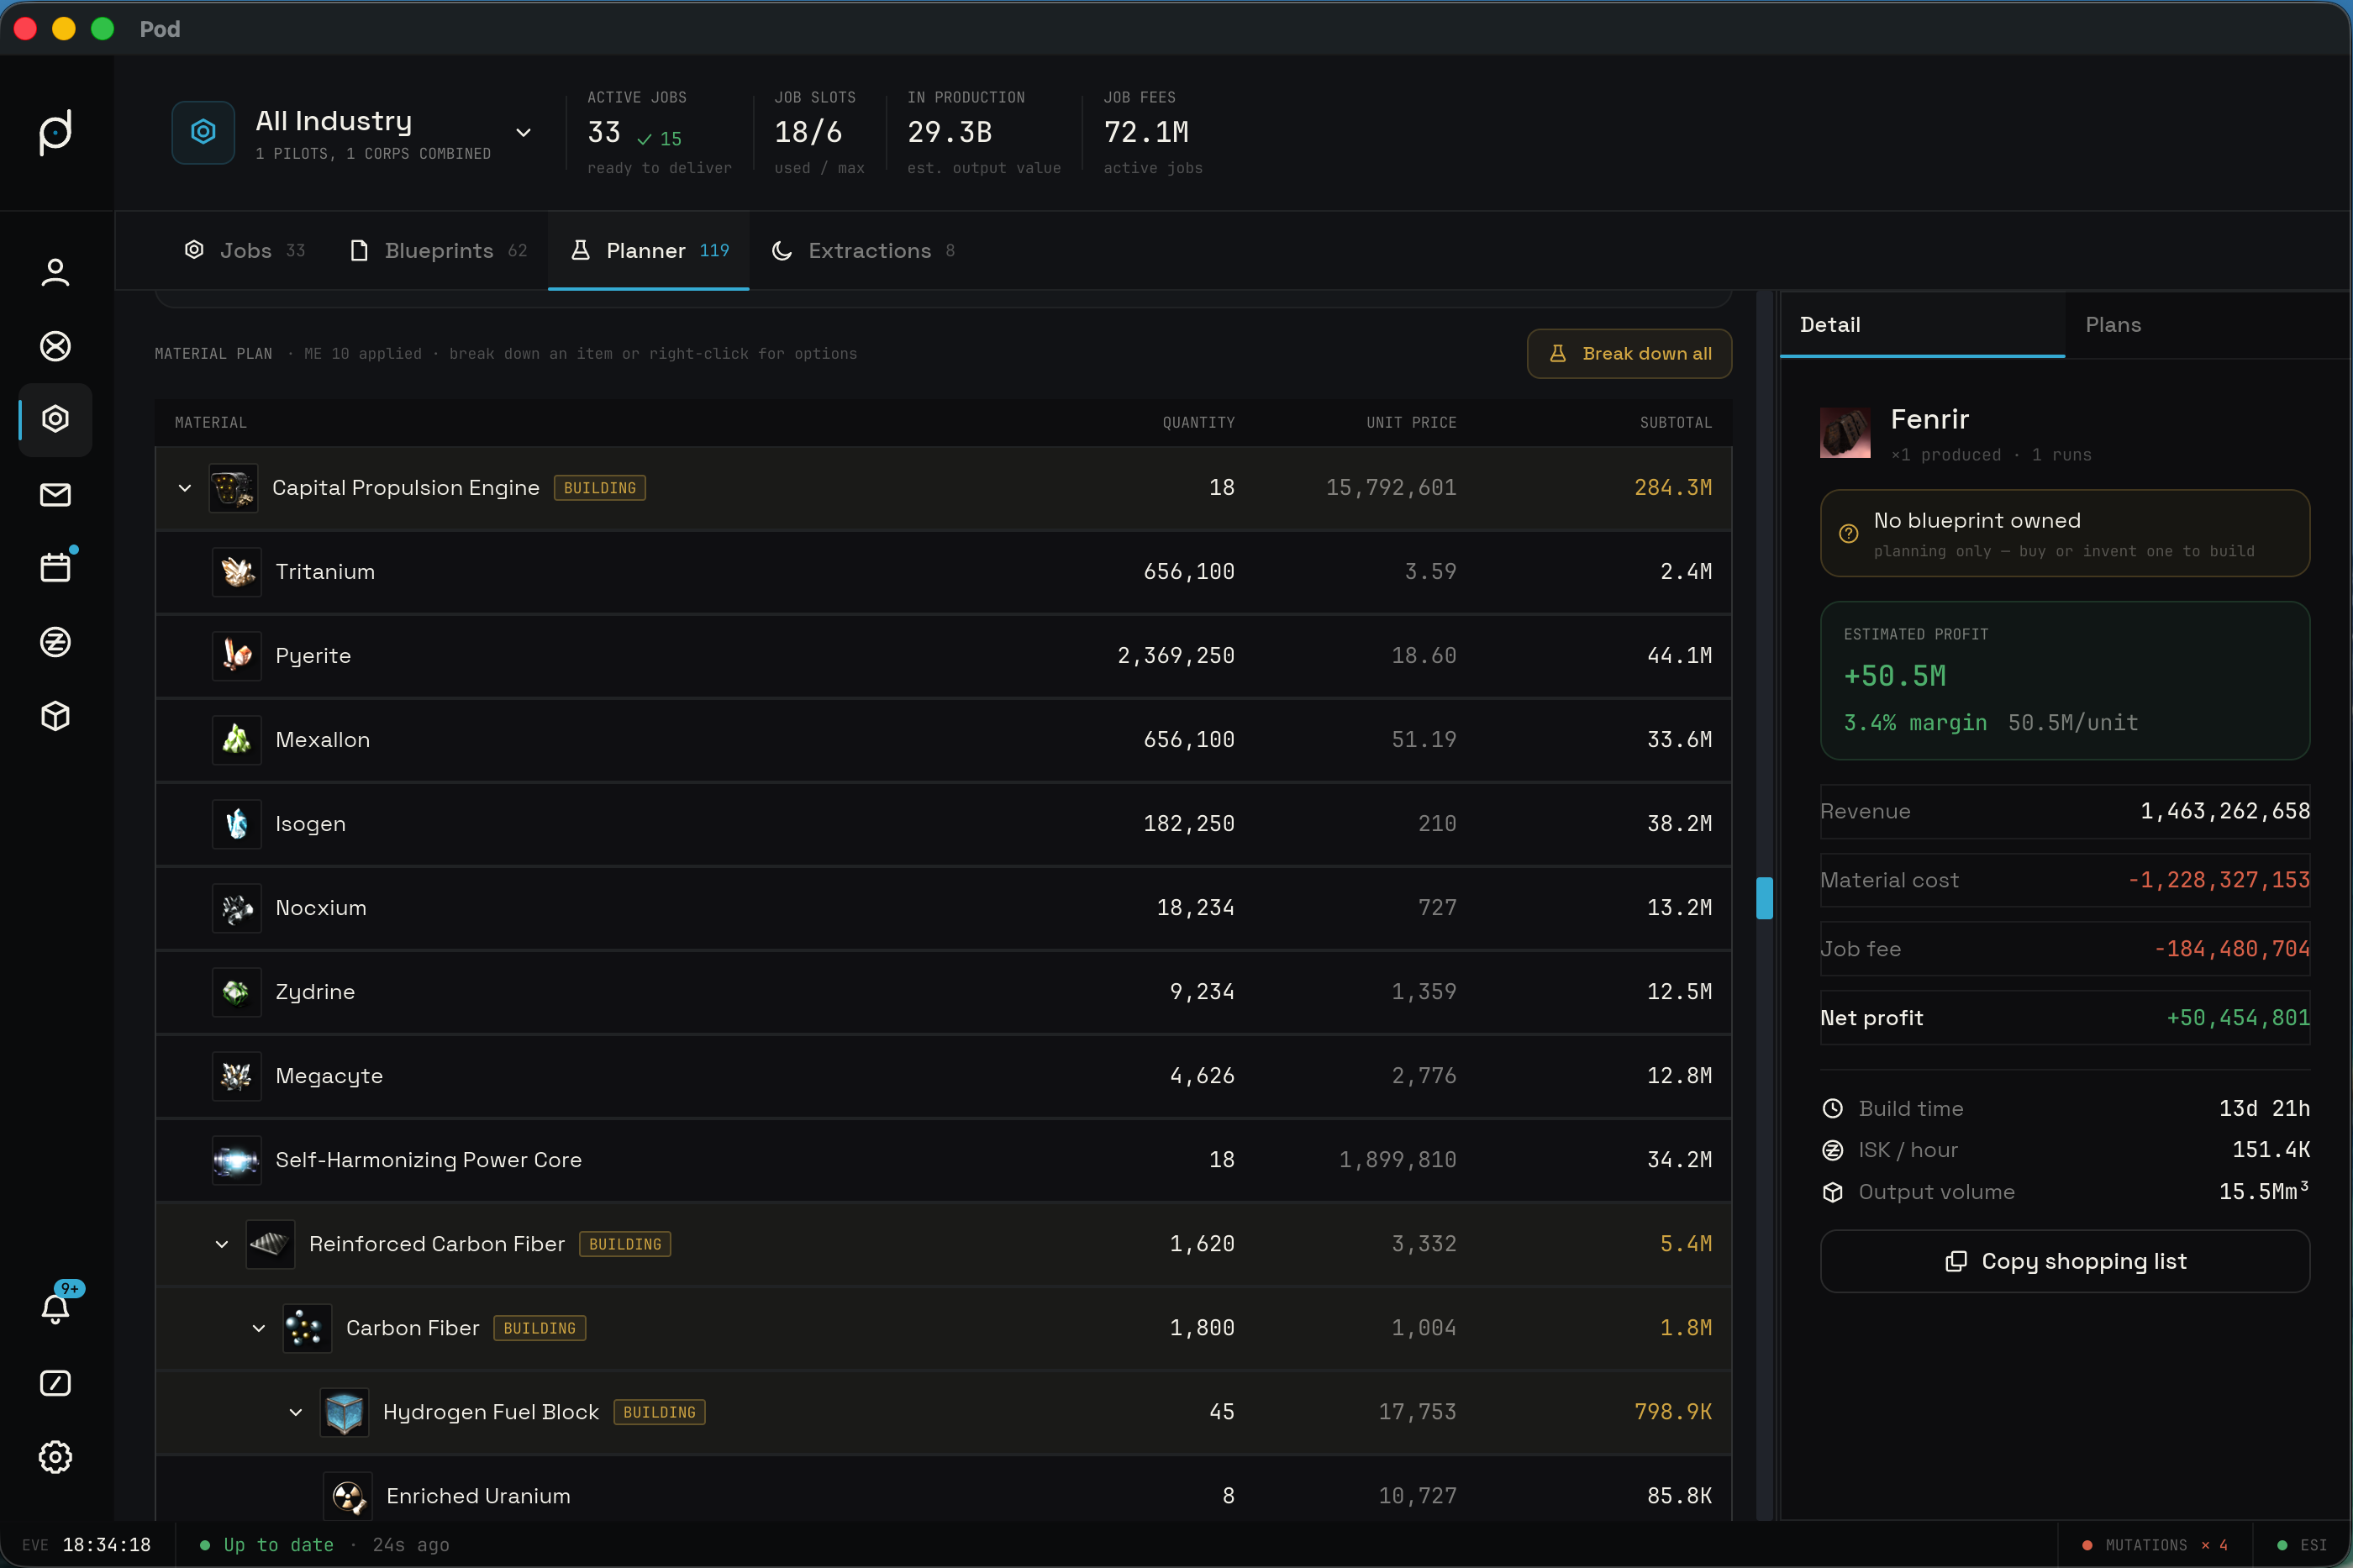
The Material plan is the grid that turns your build choices into a priced tree. The pane carries its name at the top, and each row shows a material, the quantity the plan needs, the unit price, and the subtotal, with a running material cost in the footer. Buildable rows expand in place, so a component sits above the inputs it consumes, and the pane hint points out that you can break an item down or right-click a row for more options.
Breaking down to raw materials
You do not have to expand the tree one component at a time. A break-down-all control expands the entire plan to its raw materials in one step. Each buildable line in the build order also carries its own breakdown action, so you can descend a single branch while leaving the rest as bought components. The expansion stops at any type you have left as buy.
Using stock you already hold
When you hold materials at a build site, the Planner can draw from them instead of buying. A type that has on-hand stock at its facility shows a use-stock toggle. Turn it on and the Planner allocates from the on-hand pool and nets the needed quantity in the bill of materials down by what it drew. The pool is shared, so two jobs that both want the same material draw from it in the order you toggle them, and the planner never counts the same unit twice or drops a needed quantity below zero. A line drawing from stock shows a stock chip in place of the toggle.
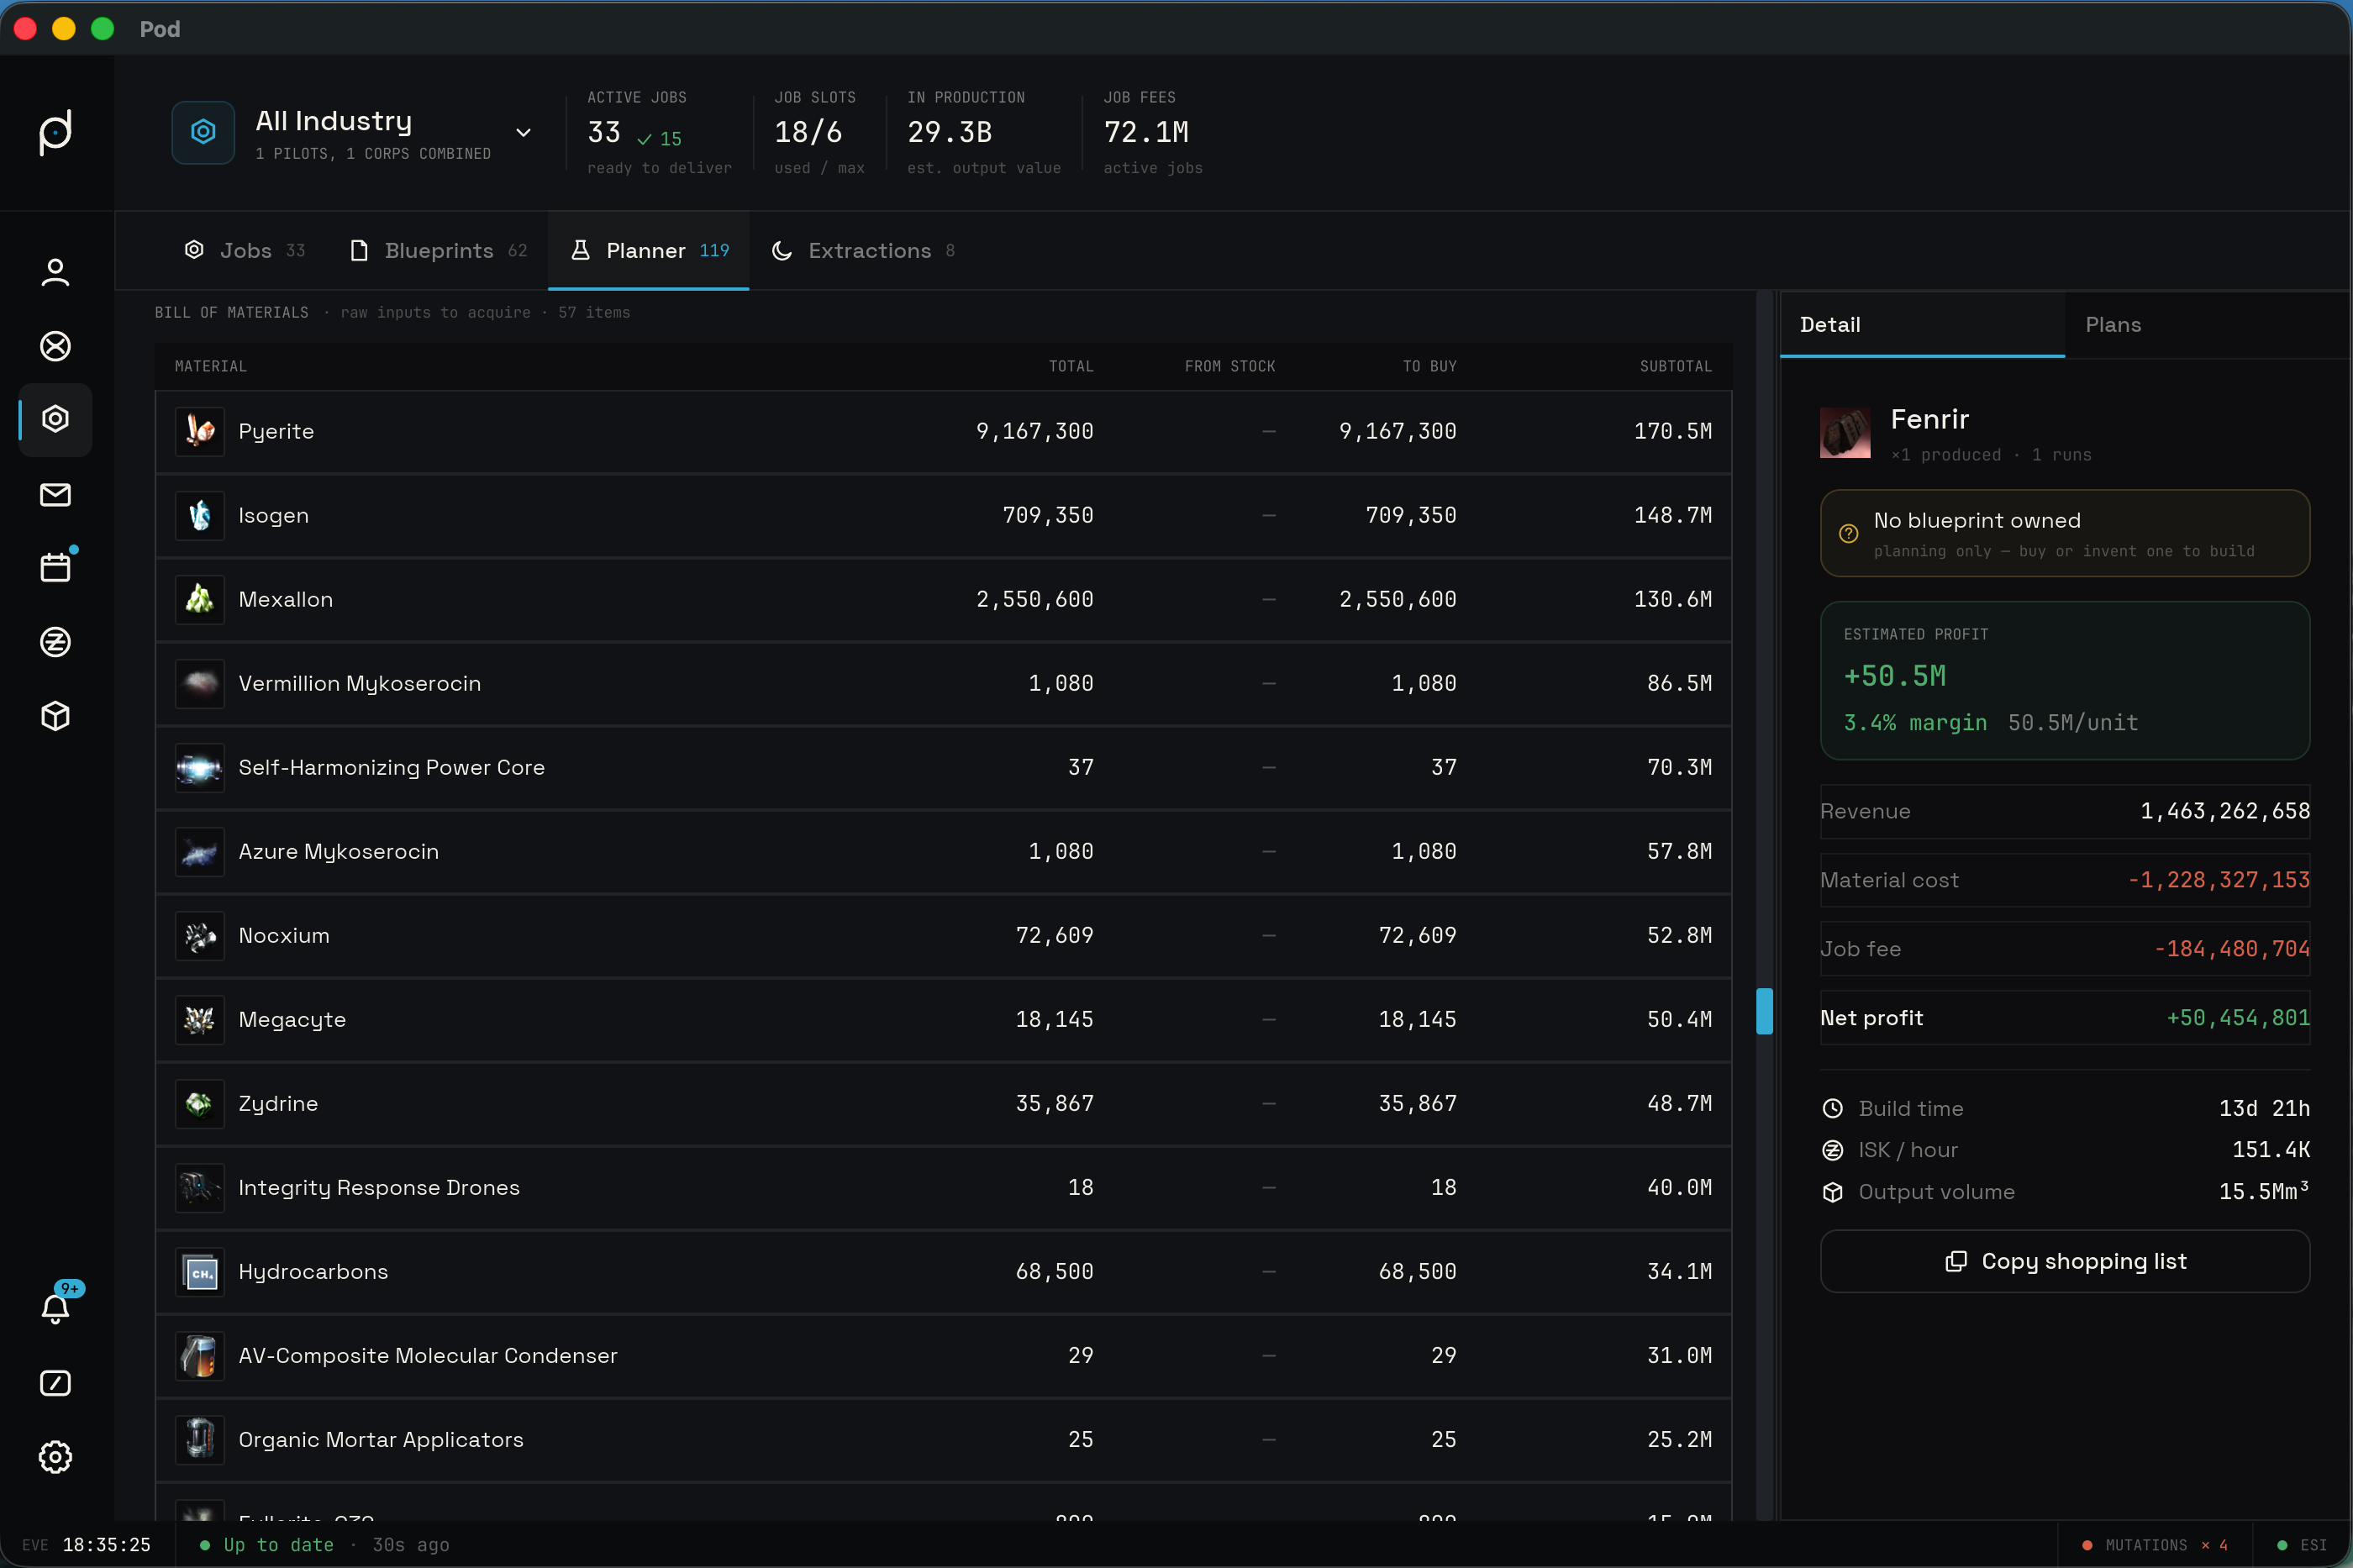
Bill of materials
The bill of materials lists every raw input the plan needs once the tree is expanded down to materials you buy rather than build. Each line shows the item, the quantity needed, the on-hand amount when you have stock, the unit price, and the line total. The bill is searchable and collapsible, so a large build stays readable.
Needed blueprints
The Needed blueprints pane reads the merged build order and lists every blueprint the plan depends on, one row per distinct print. The section header counts the blueprints and tells you how many you still need to acquire, or reads all owned when your library already covers the plan. Each row pairs a blueprint icon with the item name, tags it as a Blueprint or, for a reaction, a Formula, and carries a manufacturing or reaction badge. A subtitle counts how many jobs lean on that print and the total runs or cycles they ask of it.
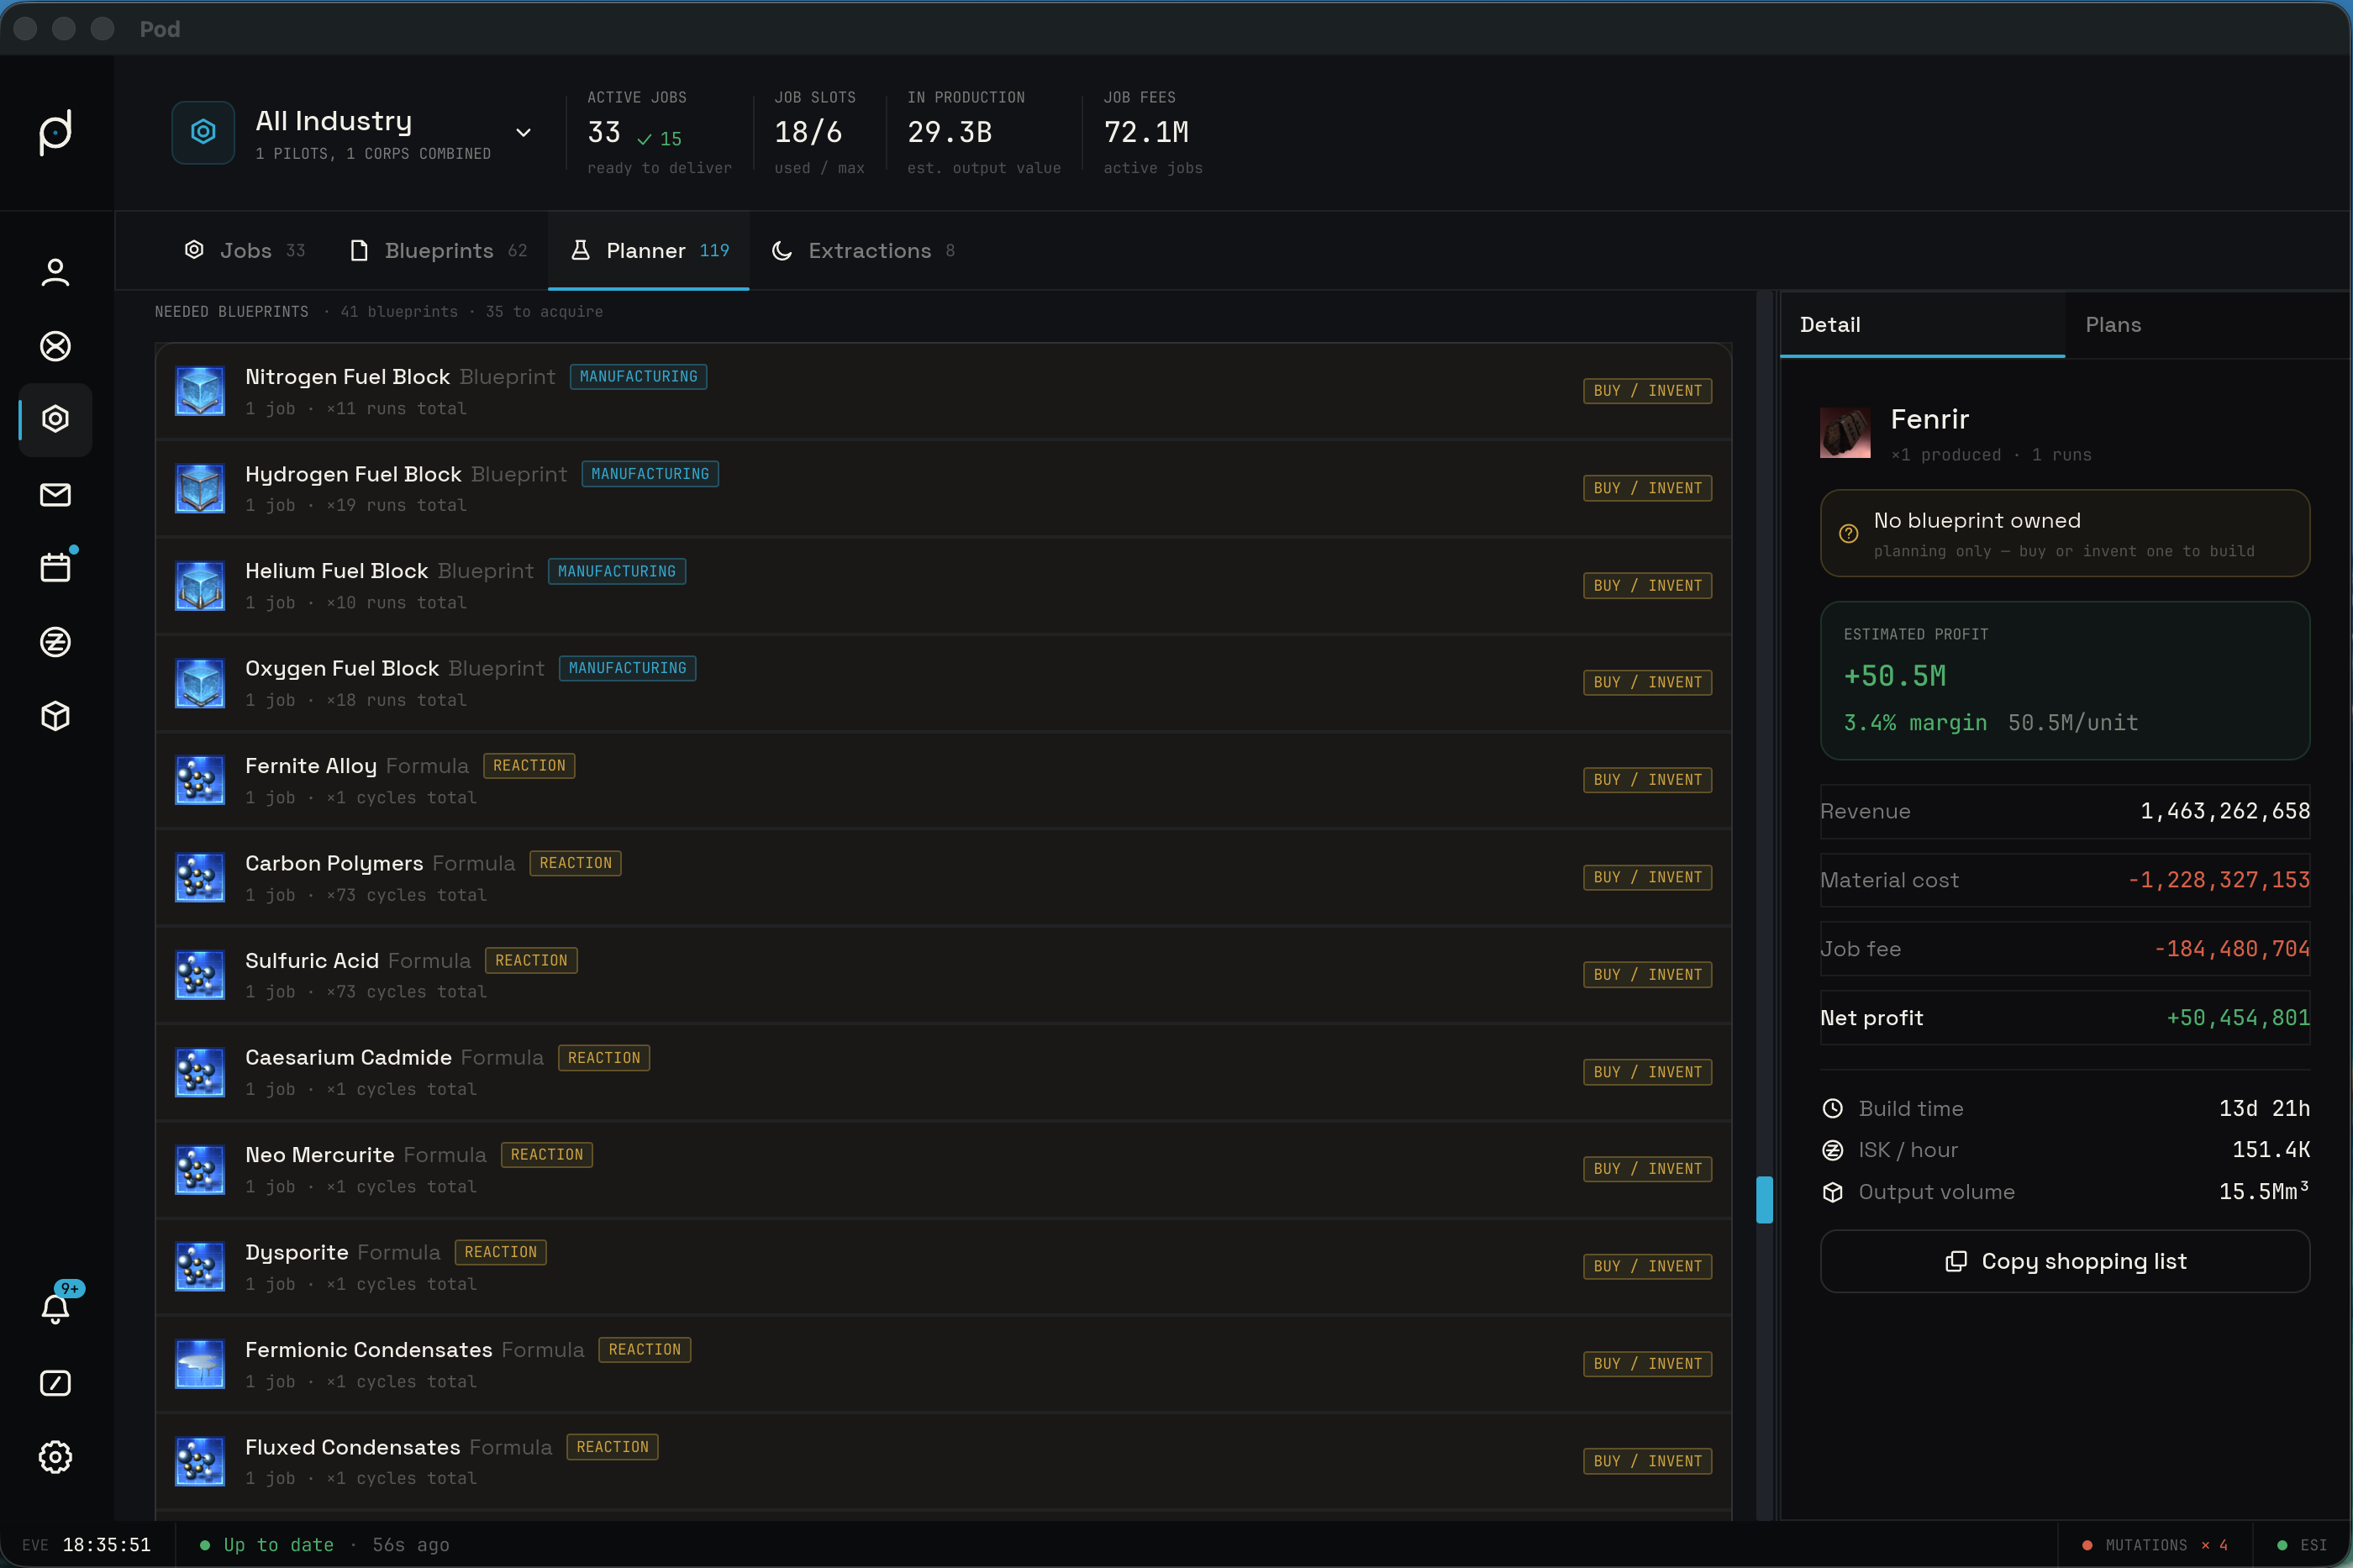
A status pill on the right tells you where each blueprint stands. A print you own reads as a BPO or a BPC, appends its ME when the print carries one, and notes when the only copy sits outside the current scope. A print you do not own reads BUY / INVENT, and its whole row picks up a warning tint so the gaps in your library stand out at a glance.
Build order
The merged build order lists the jobs the plan runs. It collapses duplicate jobs that share the same item, ME, TE, and facility into one line and sums their demand, so you see one entry per distinct job instead of a repeated stack. Producer jobs list before the jobs that consume their output. Each line names the item, shows what it feeds, the run count, the build time, and a pilot-assignment control.
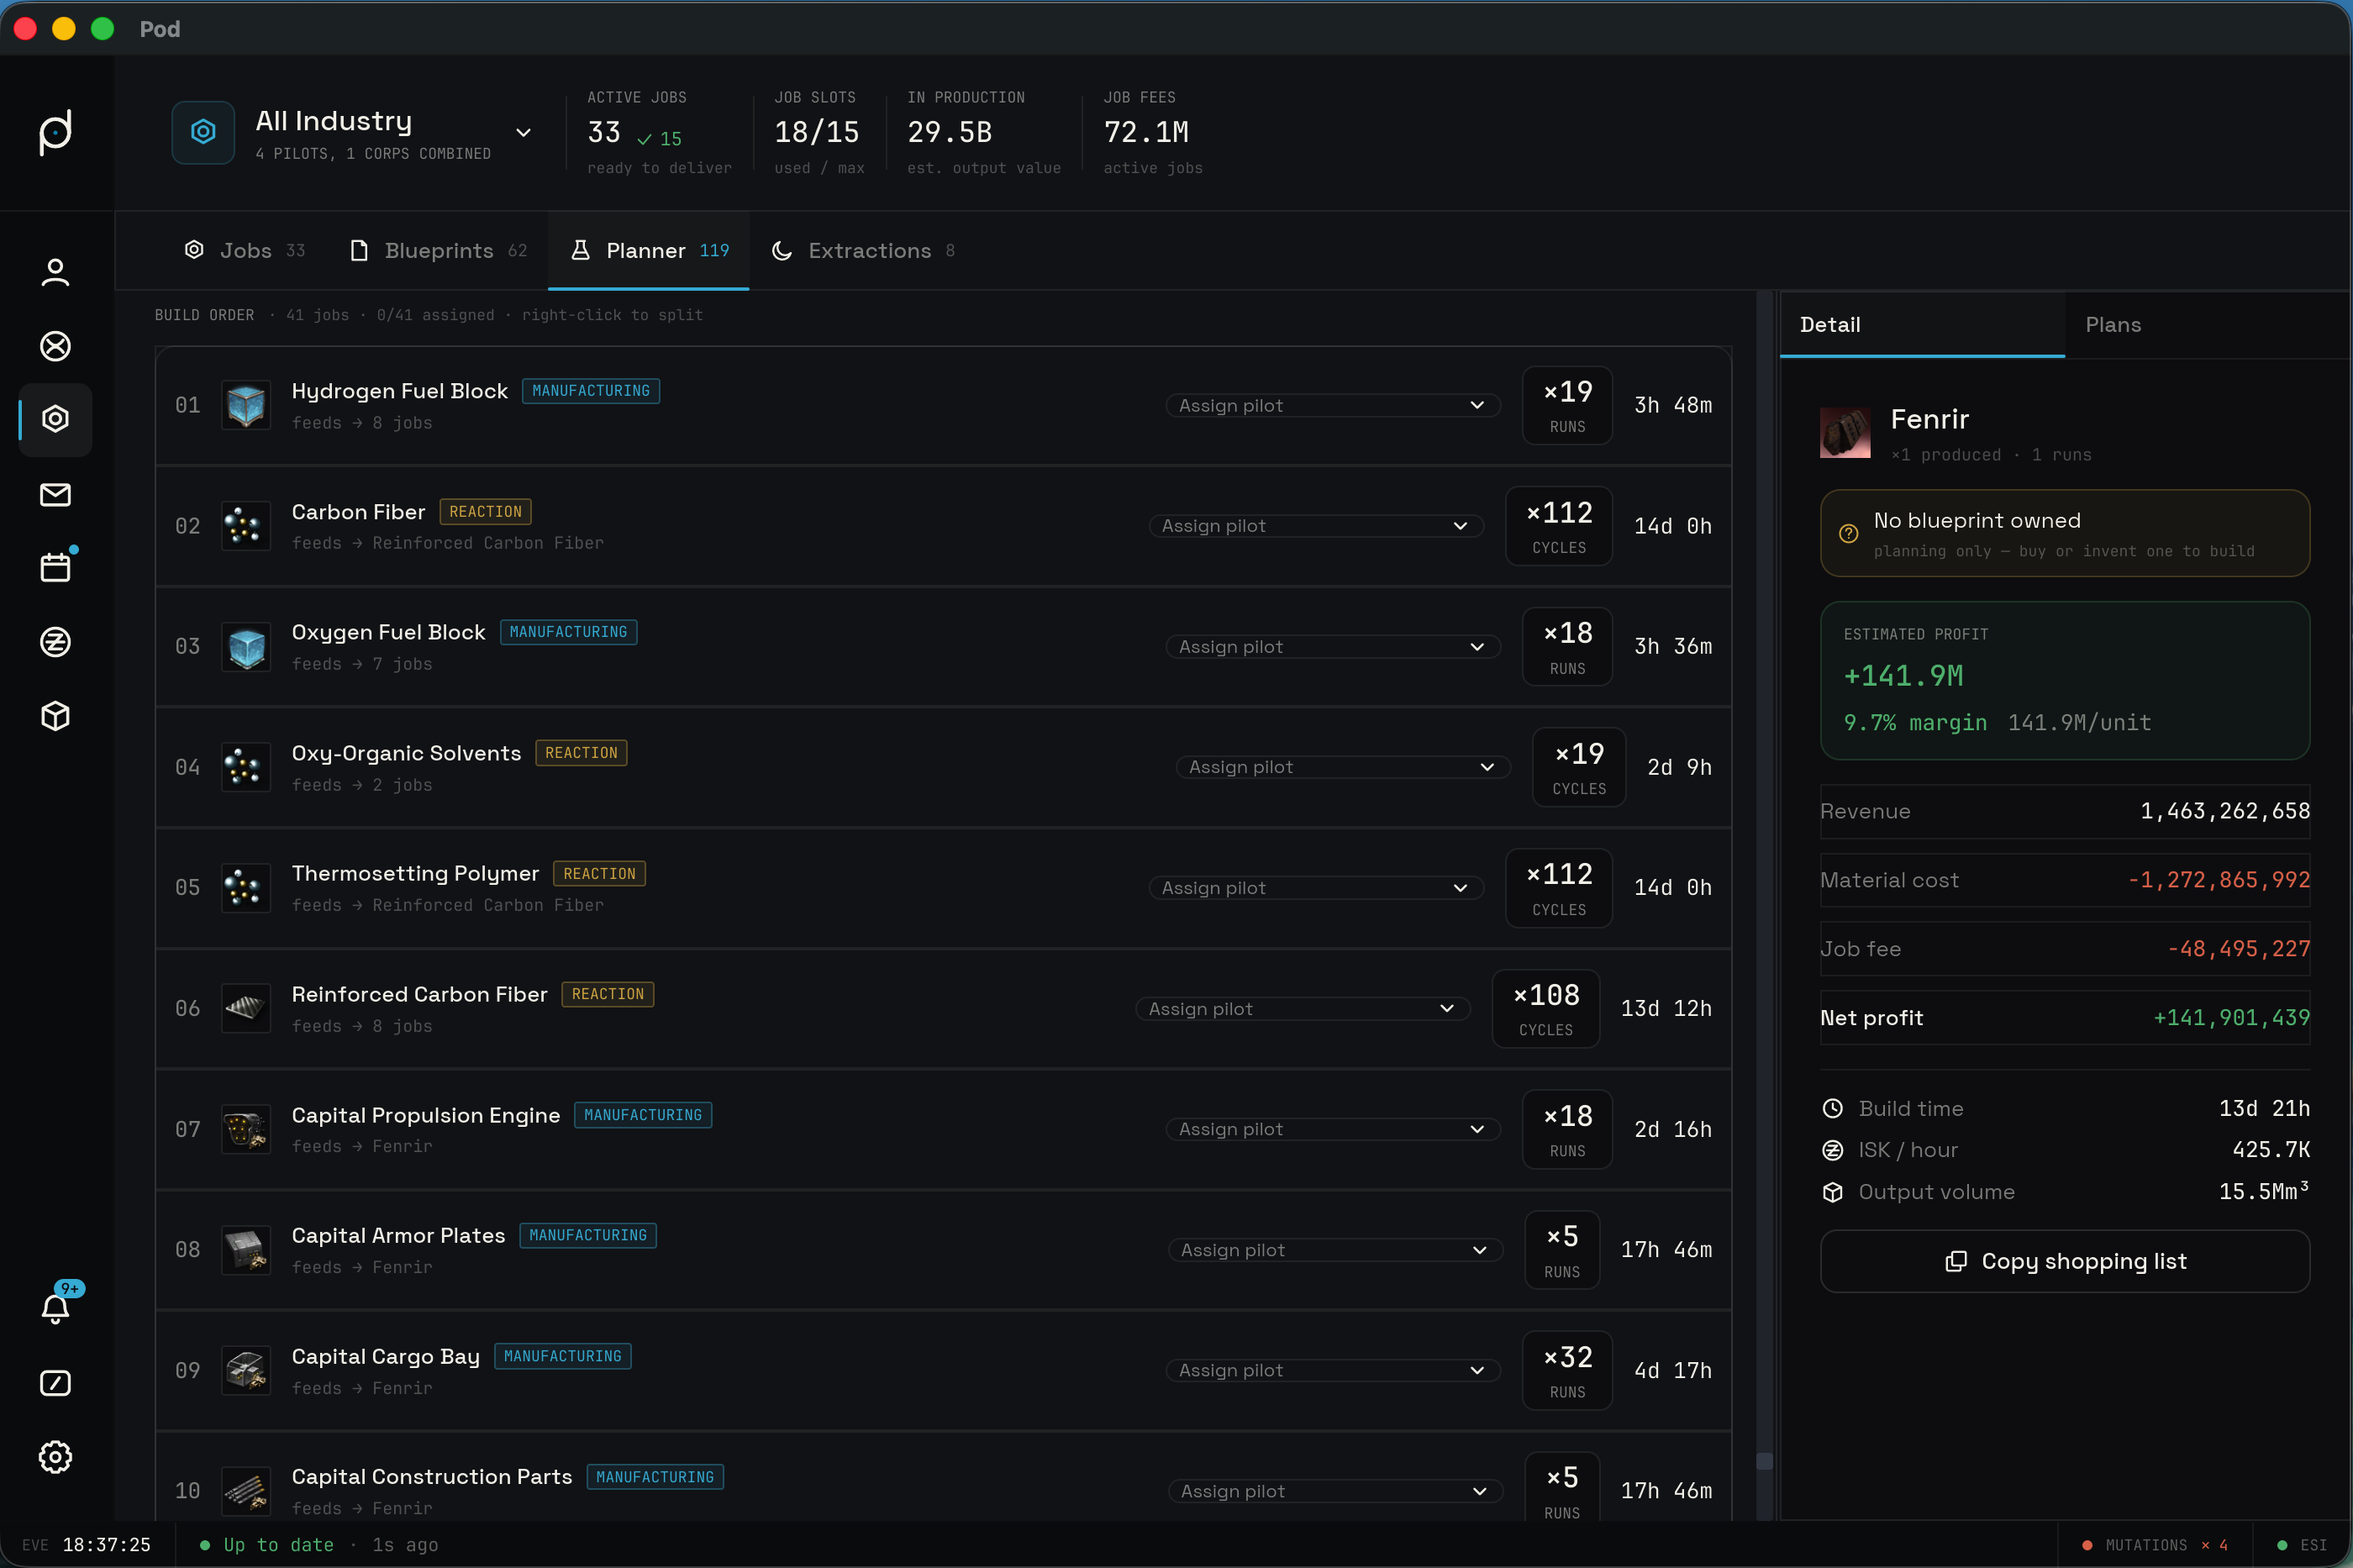
Splitting a build-order job into segments
A build-order job runs as one block by default. Right-clicking the job's header opens a menu that lets you split its runs into independent segments. The first split offers "Split job in two"; once a job is already split the same action reads "Split job again" and adds another segment, and a "Merge back into one job" option folds every segment back into a single block. When a job has too few runs to divide any further, the split option is disabled and reads "Too few runs to split further".
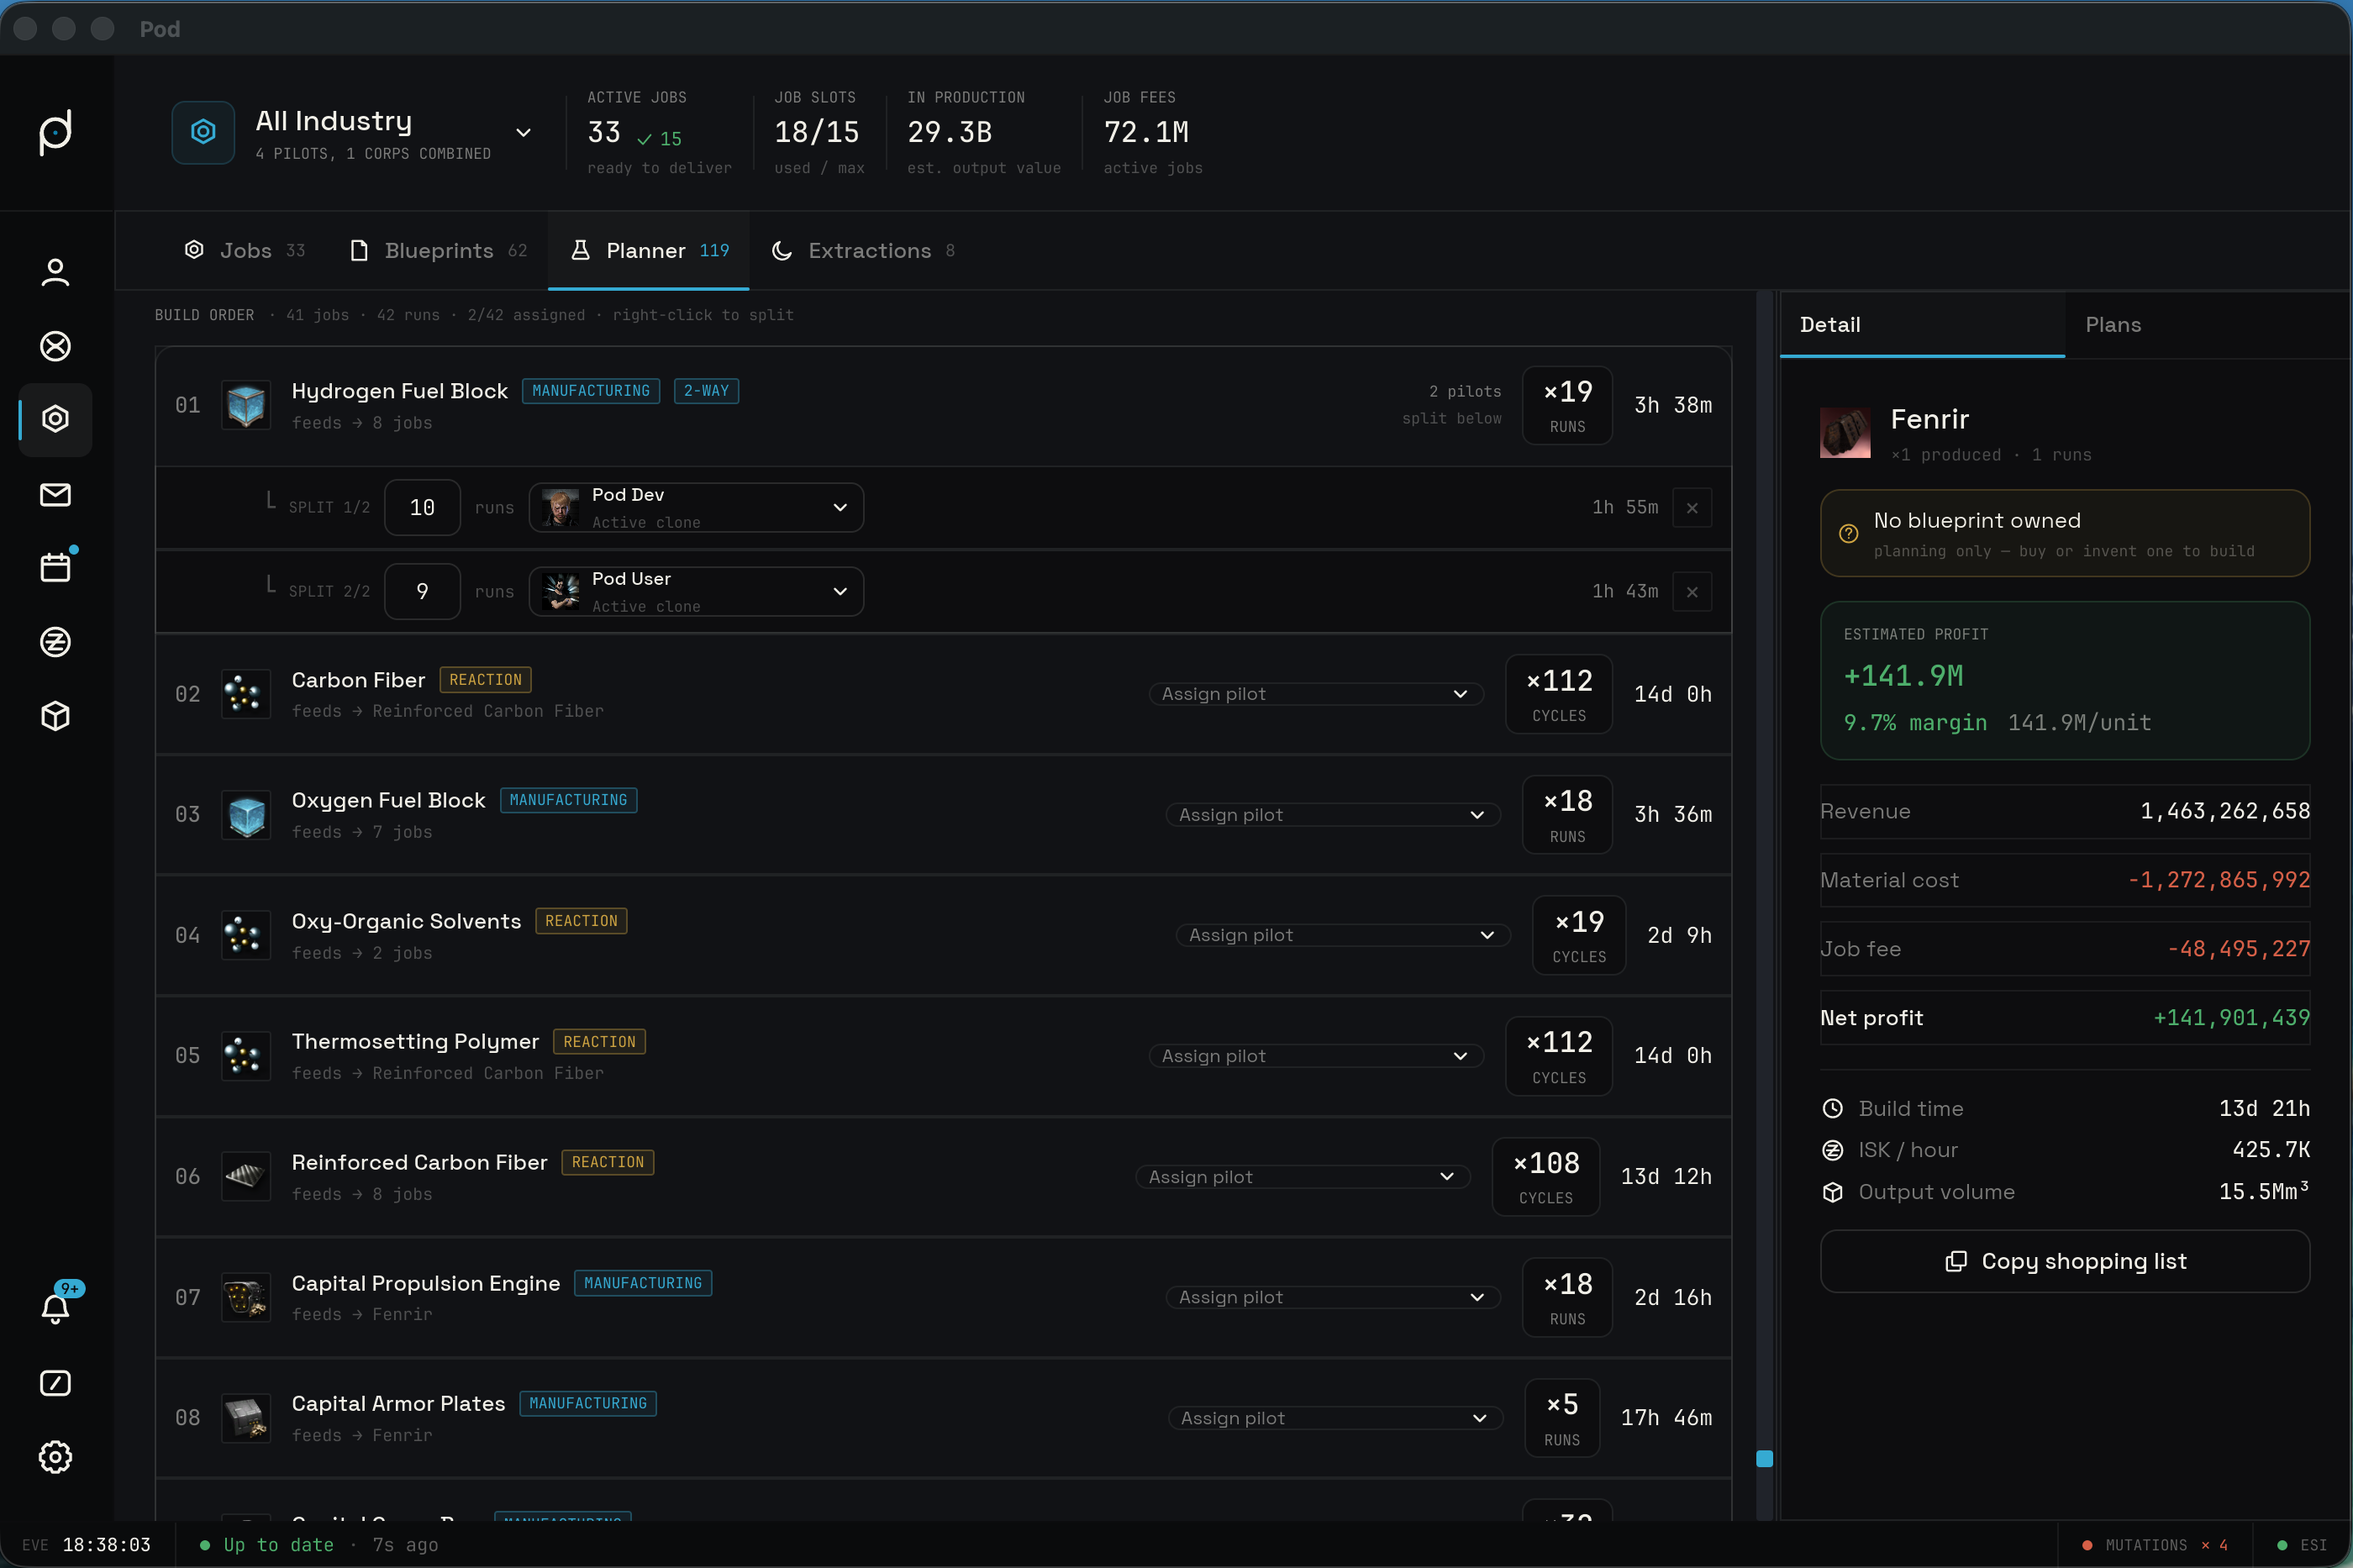
A split job carries an "N-WAY" badge next to its name, where N is the number of segments, and each segment appears as its own indented row beneath the job header. Each segment row shows a "SPLIT i/n" label, an editable run-count field, and the segment's own build time. Editing a segment's run count clamps the value and redistributes the remainder across the other segments, so the segments always sum to the job's total runs. Removing a segment folds its runs back into the survivors.
The Build order section header tracks the totals: it reads "N jobs", adds "M runs" once any job has been split, then "x/y assigned" for how many segments carry a pilot, and ends with "right-click to split". A segment counts as assigned once it has a pilot.
Assigning a pilot and clone
Each segment can carry a pilot and one of that pilot's clones, which is what the build-time math reads. An unsplit job shows the picker on its header row; a split job shows a per-segment picker on each segment row instead, and the header summarizes how many distinct pilots are in use.
The picker trigger shows the assigned pilot's portrait and name with the clone's name beside it, or "active clone" when the active clone is selected. When nothing is assigned it reads "Assign pilot".
Opening the picker shows a two-level list. The first level lists each eligible pilot with an "N clone(s)" subtitle. Expanding a pilot reveals that pilot's clones, the active clone first followed by each jump clone. Each clone row shows its name, an implant summary of the form "N implant(s) · first implant" (or "no implants"), and the clone's location. An "Unassign" action at the top clears the slot.
Picking a clone never changes the facility a type builds at. The clone's location is shown for context only, and the build still installs at the facility you chose on the type's build card.
The picker is only offered when both the Skill and Clone-Monitoring sub-features are enabled, since those are the features that supply the skill and implant data. When either is off, the slot shows an inert hint reading "Enable Skills + Clones to assign pilots" in place of the picker.
How skills and implants change build time
Assigning a pilot and clone changes build time only. It never changes the materials a job consumes, the job fee, or the revenue. An unassigned segment, or any segment while assignment is disabled, uses the blueprint-time-efficiency-only build time with no further reduction.
When a segment is assigned, Pod applies the pilot's industry skills and the clone's strongest time-bonus implant on top of the blueprint time efficiency. The Industry skill cuts manufacturing time by 4% per level and does not touch reactions. The Advanced Industry skill cuts both manufacturing and reaction time by 3% per level. The single strongest time-bonus implant in the clone applies for the activity, the manufacturing implant for manufacturing and the reaction implant for reactions. Only the strongest implant counts, so multiple time implants do not stack. All of these reductions multiply together with the blueprint time efficiency to give the segment's effective build time.
Economics
The detail pane sums the plan into a set of numbers. Material cost is the total of every raw input the bill of materials says you must buy. Each in-house job adds a job fee, which Pod computes the same way EVE charges you to install a job. Revenue is the product's market price times the output quantity. Profit is revenue minus material cost and job fees, and margin is that profit as a percentage of revenue. The pane also shows the per-unit cost, the total build time summed across every job, and an ISK-per-hour figure derived from profit over build time. A profitable flag turns on when profit is above zero.
How the job fee is computed
Every in-house job starts from its estimated item value (EIV). The EIV is the sum of each base material quantity times CCP's adjusted price for that material, before any material-efficiency reduction. Material efficiency lowers what the job consumes, but it never lowers the value the job is taxed against, so the EIV uses the pre-ME base quantities.
The job fee is then three parts added together:
- The system cost: EIV times the system cost index for the facility's system, times the structure's fee bonus. A facility you track in Settings, Facilities applies the fee bonus from its fitted rigs, scaled by security band, so those rigs lower the system cost. An NPC station, an untracked structure, or a tracked structure with no fee rigs uses a neutral bonus of 1.0, so the cost index carries the system component of the fee on its own.
- The facility tax: a flat 0.25% of EIV.
- The SCC surcharge: a flat 4% of EIV that EVE levies on every job regardless of where it installs.
Adding those three gives the fee Pod charges that job in the plan. The cost index comes from the facility you pick for the type, so changing a type's facility changes only its system cost, not the facility tax or the SCC surcharge.
Saved plans
A Plans tab on the right side of the Planner holds the plans you save. Saving stores the product, the run count, and the per-type settings: built-or-buy, ME, TE, facility, and use-stock. A saved plan also stores how each job is split into segments and the pilot and clone assigned to every segment, so a plan you reload keeps its splits and assignments. The list orders the newest plan first. Each saved plan reprices itself against current market prices every time you view it, so the economics stay live rather than frozen at the moment you saved. Load a plan to restore its tree and settings, or delete one you no longer need.
Extractions
The Extractions tab shows your corporations' moon-mining extraction timers. It is a corporation feature, so it reads from the corporation mining extractions ESI endpoint and needs the Station Manager role and the corporation mining extractions scope. Enabling the feature prompts a one-time re-authorization to add that scope.
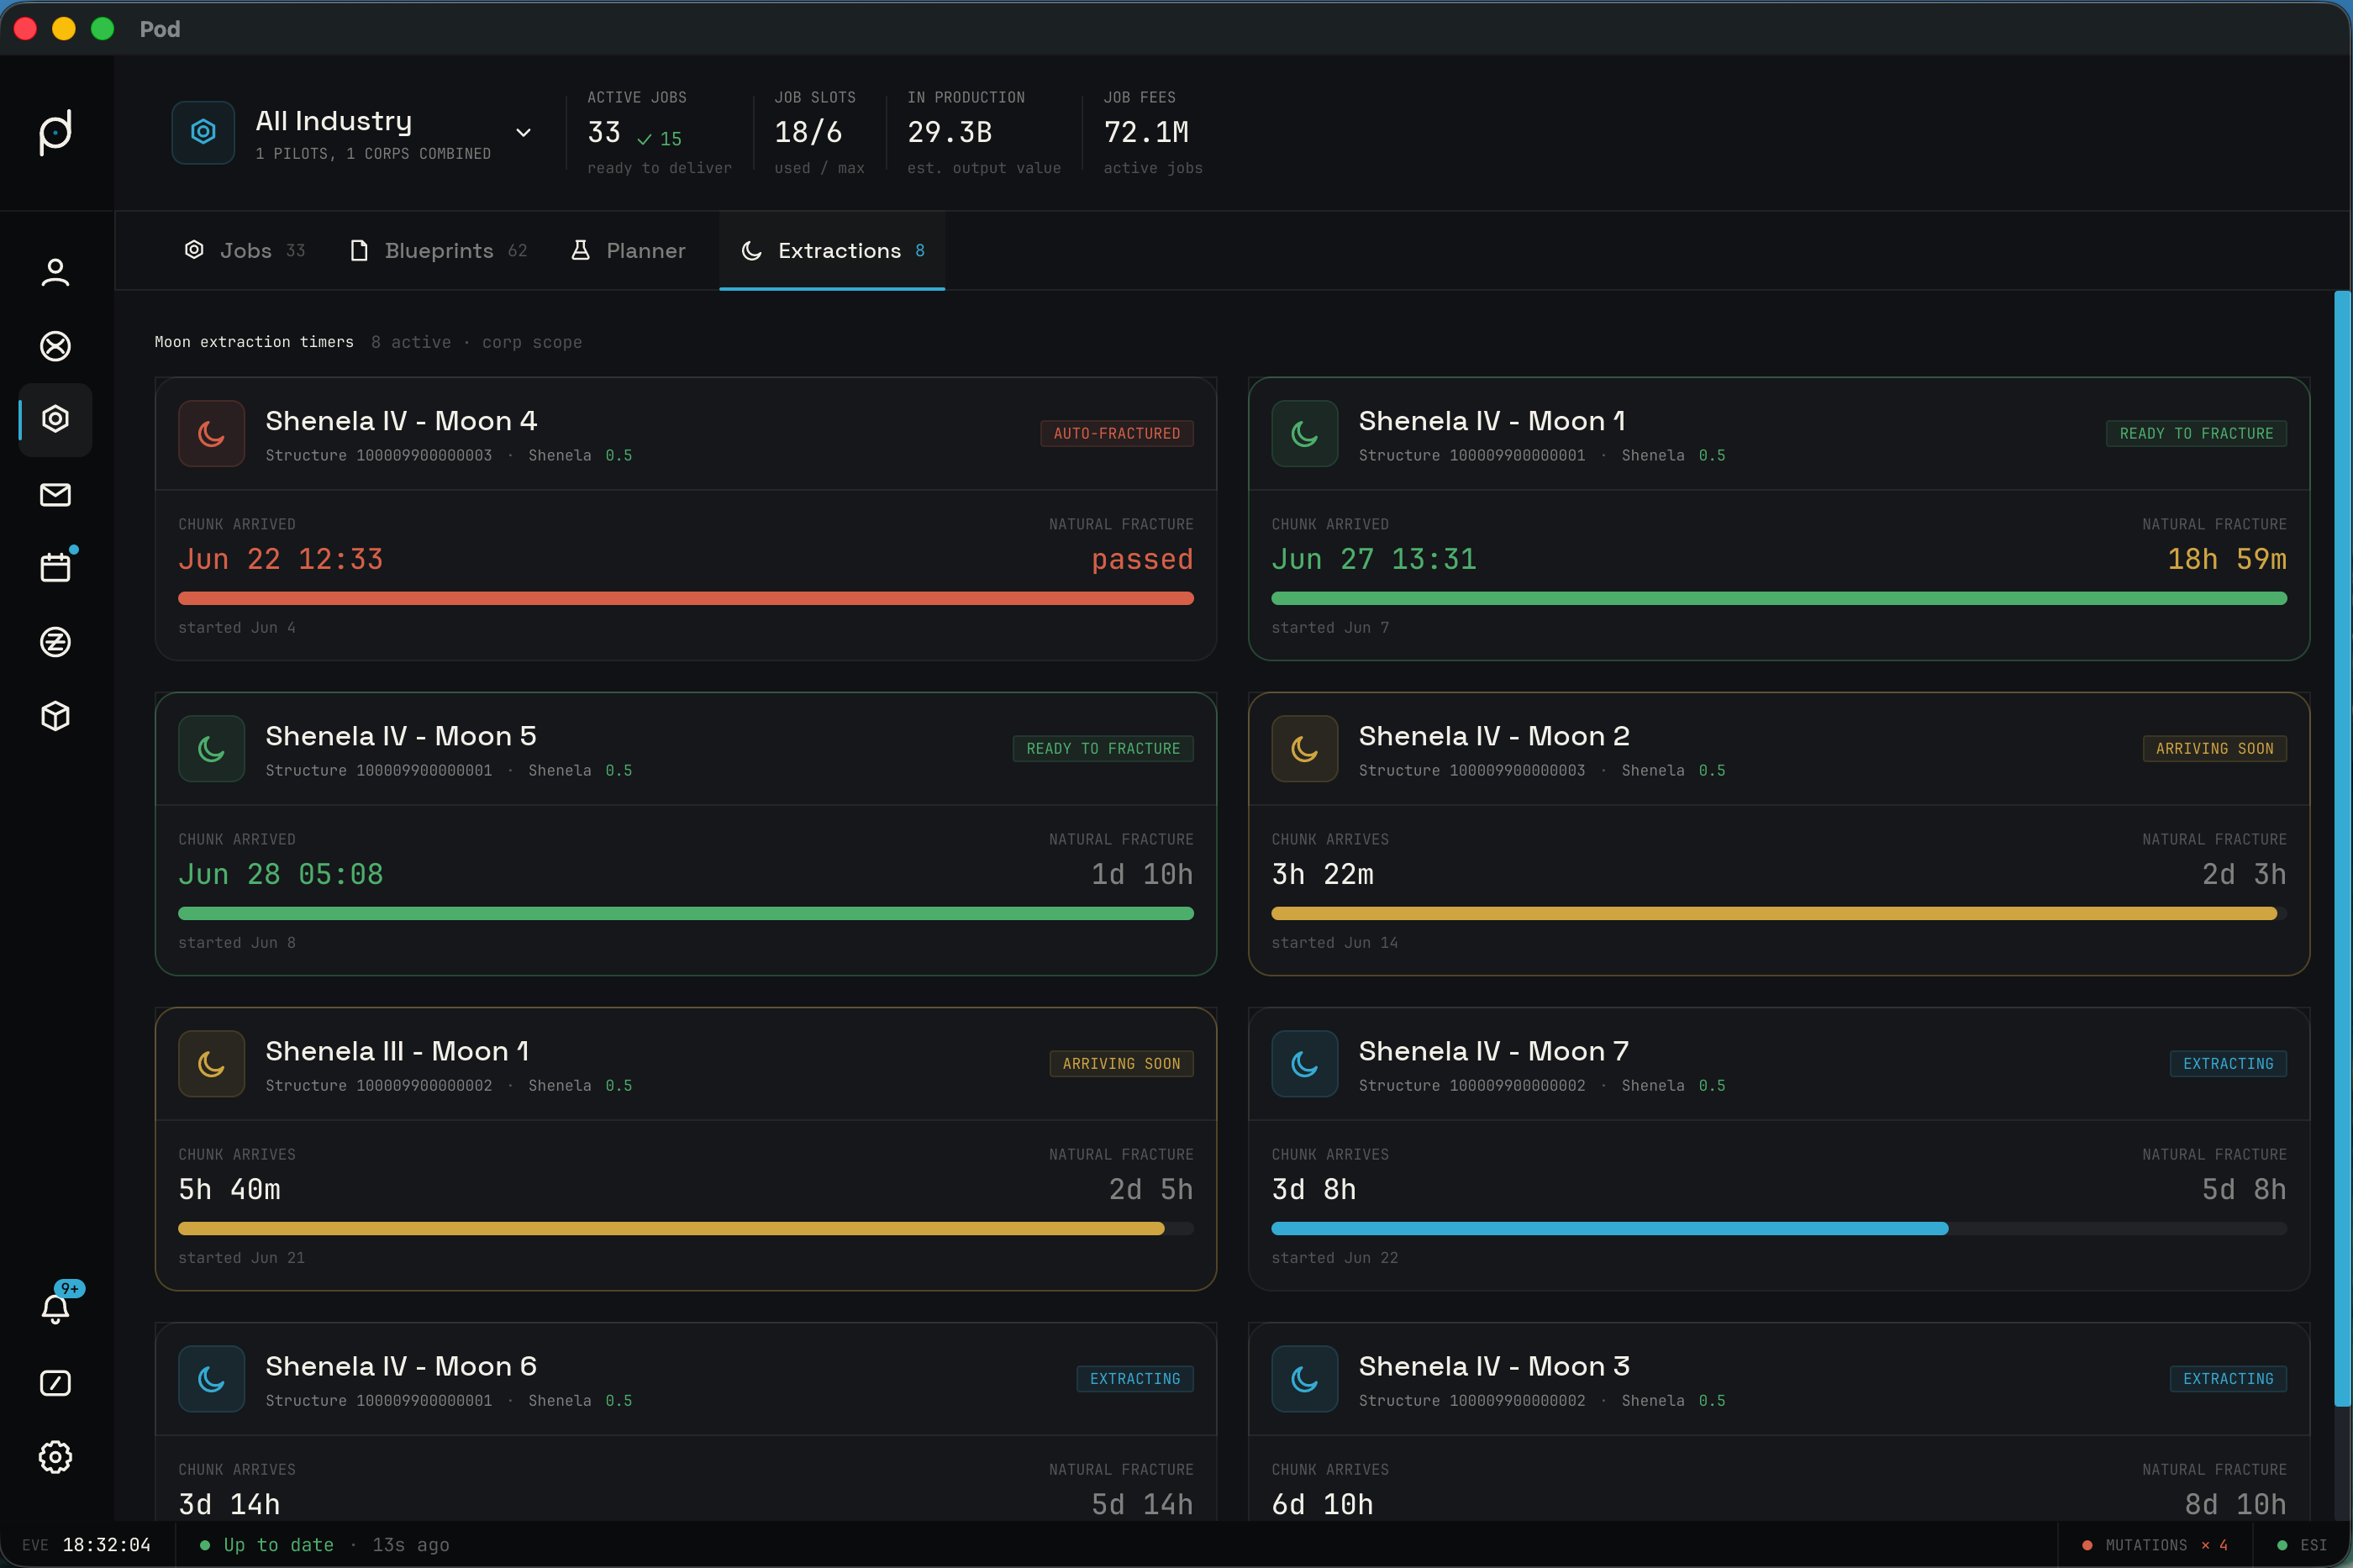
Each extraction shows as a timer card, sorted so the soonest chunk arrives first. A card names the moon, its structure, and its system with a security pill. A state badge tracks where the extraction is: Extracting while the chunk is still forming, Arriving soon when arrival is under a day away, Ready to fracture once the chunk has arrived, and Auto-fractured once the natural decay time has passed.
The card shows a Chunk arrives countdown to the arrival time and a Natural fracture countdown to the decay time, with a progress bar from the start of the extraction to the chunk's arrival. Once a timer is past, its countdown reads as done or passed rather than a duration. A label shows the day the extraction started.