Wallet
The Wallet feature tracks ISK across every character and corporation you have added. It collects market transactions, contracts, and wallet journal entries, and it builds a net-worth history from daily snapshots. The window has five tabs, each with a leading icon: Wallets, Journal, Transactions, Contracts, and Budget. It cold-opens on the Wallets tab, a read-only balances overview. A header at the top summarizes the active scope, and a hero panel below it shows the net-worth graph and the breakdown of what makes up your balance.
Header and scope
The header runs across the top of the window. On the left sits the scope picker. Open it to switch between three groups: All Wallets, your individual characters, and your corporations. The All Wallets row combines every character's liquid ISK and shows the count of characters folded together. Each character row shows the pilot's name, corp, and liquid balance. Each corporation row shows the corp name and ticker. If a character is missing a scope the Wallet feature needs, its row carries a re-auth marker so you know to sign that pilot in again.
Three stat blocks follow the picker. Liquid ISK is the cash on hand for the active scope. Net worth shows the estimated total value, labeled "est." for a single character or "all characters" when All Wallets is active. Change shows the movement over the selected timeframe, written with a sign and colored green for a gain or red for a loss. When there is not enough history to compute a change, the field shows a dash instead of a number.
Net-worth hero
Below the header, the hero panel leads with the net-worth figure for the active scope in large type, followed by an ISK suffix. A small chip under the number repeats the change for the current timeframe with an up or down arrow, green when the value rose and red when it fell.
To the right of the number sit three composition chips that split net worth into its parts. Liquid is your cash, drawn in plasma. Assets is the appraised value of what you own, drawn in muted grey. Escrow is ISK locked in standing market orders, drawn in red. Each chip pairs a colored dot with the formatted ISK amount, so you can read where your wealth sits.
A timeframe selector lets you choose how far back the panel looks: 1W, 1M, 3M, 6M, or 1Y. The default is 3M. The selection drives both the graph and the change figures in the header and hero.
The graph itself is a line chart of net worth over the chosen window, with the liquid portion drawn as a second series labeled Liquid. The line turns green when net worth is up across the window and red when it is down. Hover anywhere along the line and the hero number switches to the value at the nearest day, so you can read a specific point in your history. The graph is built from daily aggregation snapshots. If fewer than two days of history exist, the chart is replaced with a note that the net-worth history will appear after the next daily aggregation run.
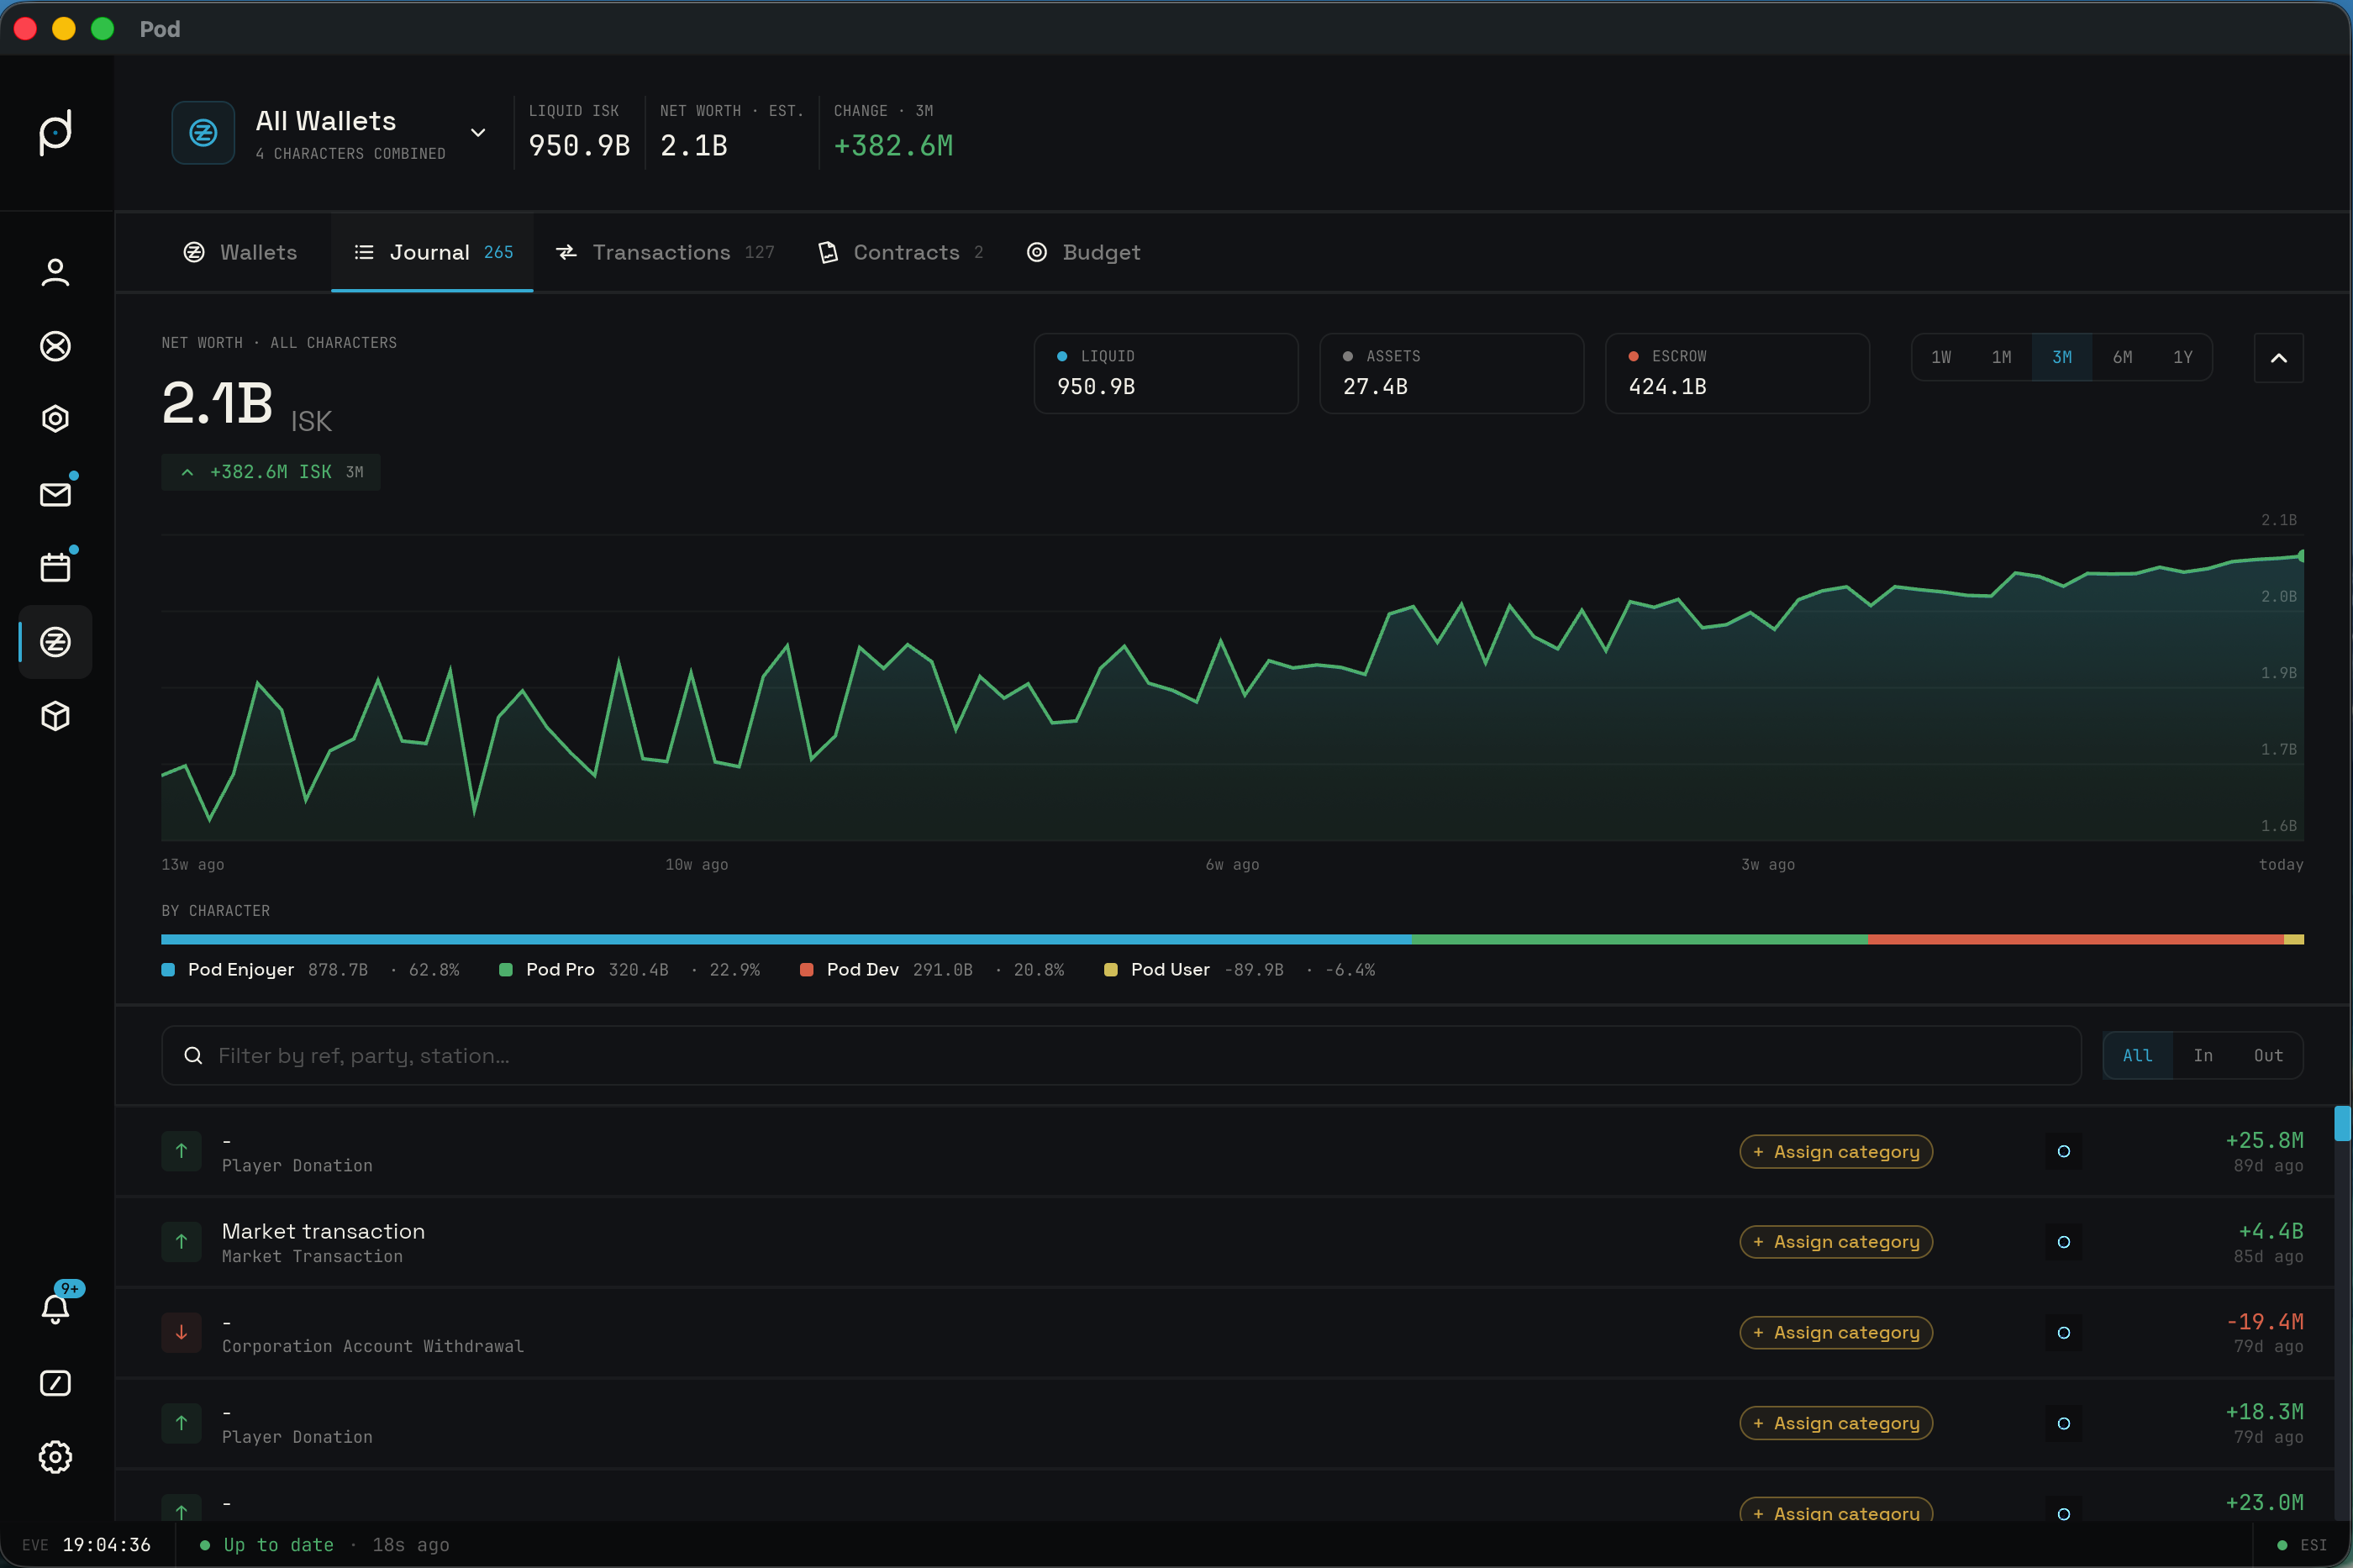
When All Wallets is active, a stacked bar under the graph splits net worth by character. Each segment is sized by that character's share, and a legend below the bar names every character with its ISK total and percentage of the whole.
Wallets tab
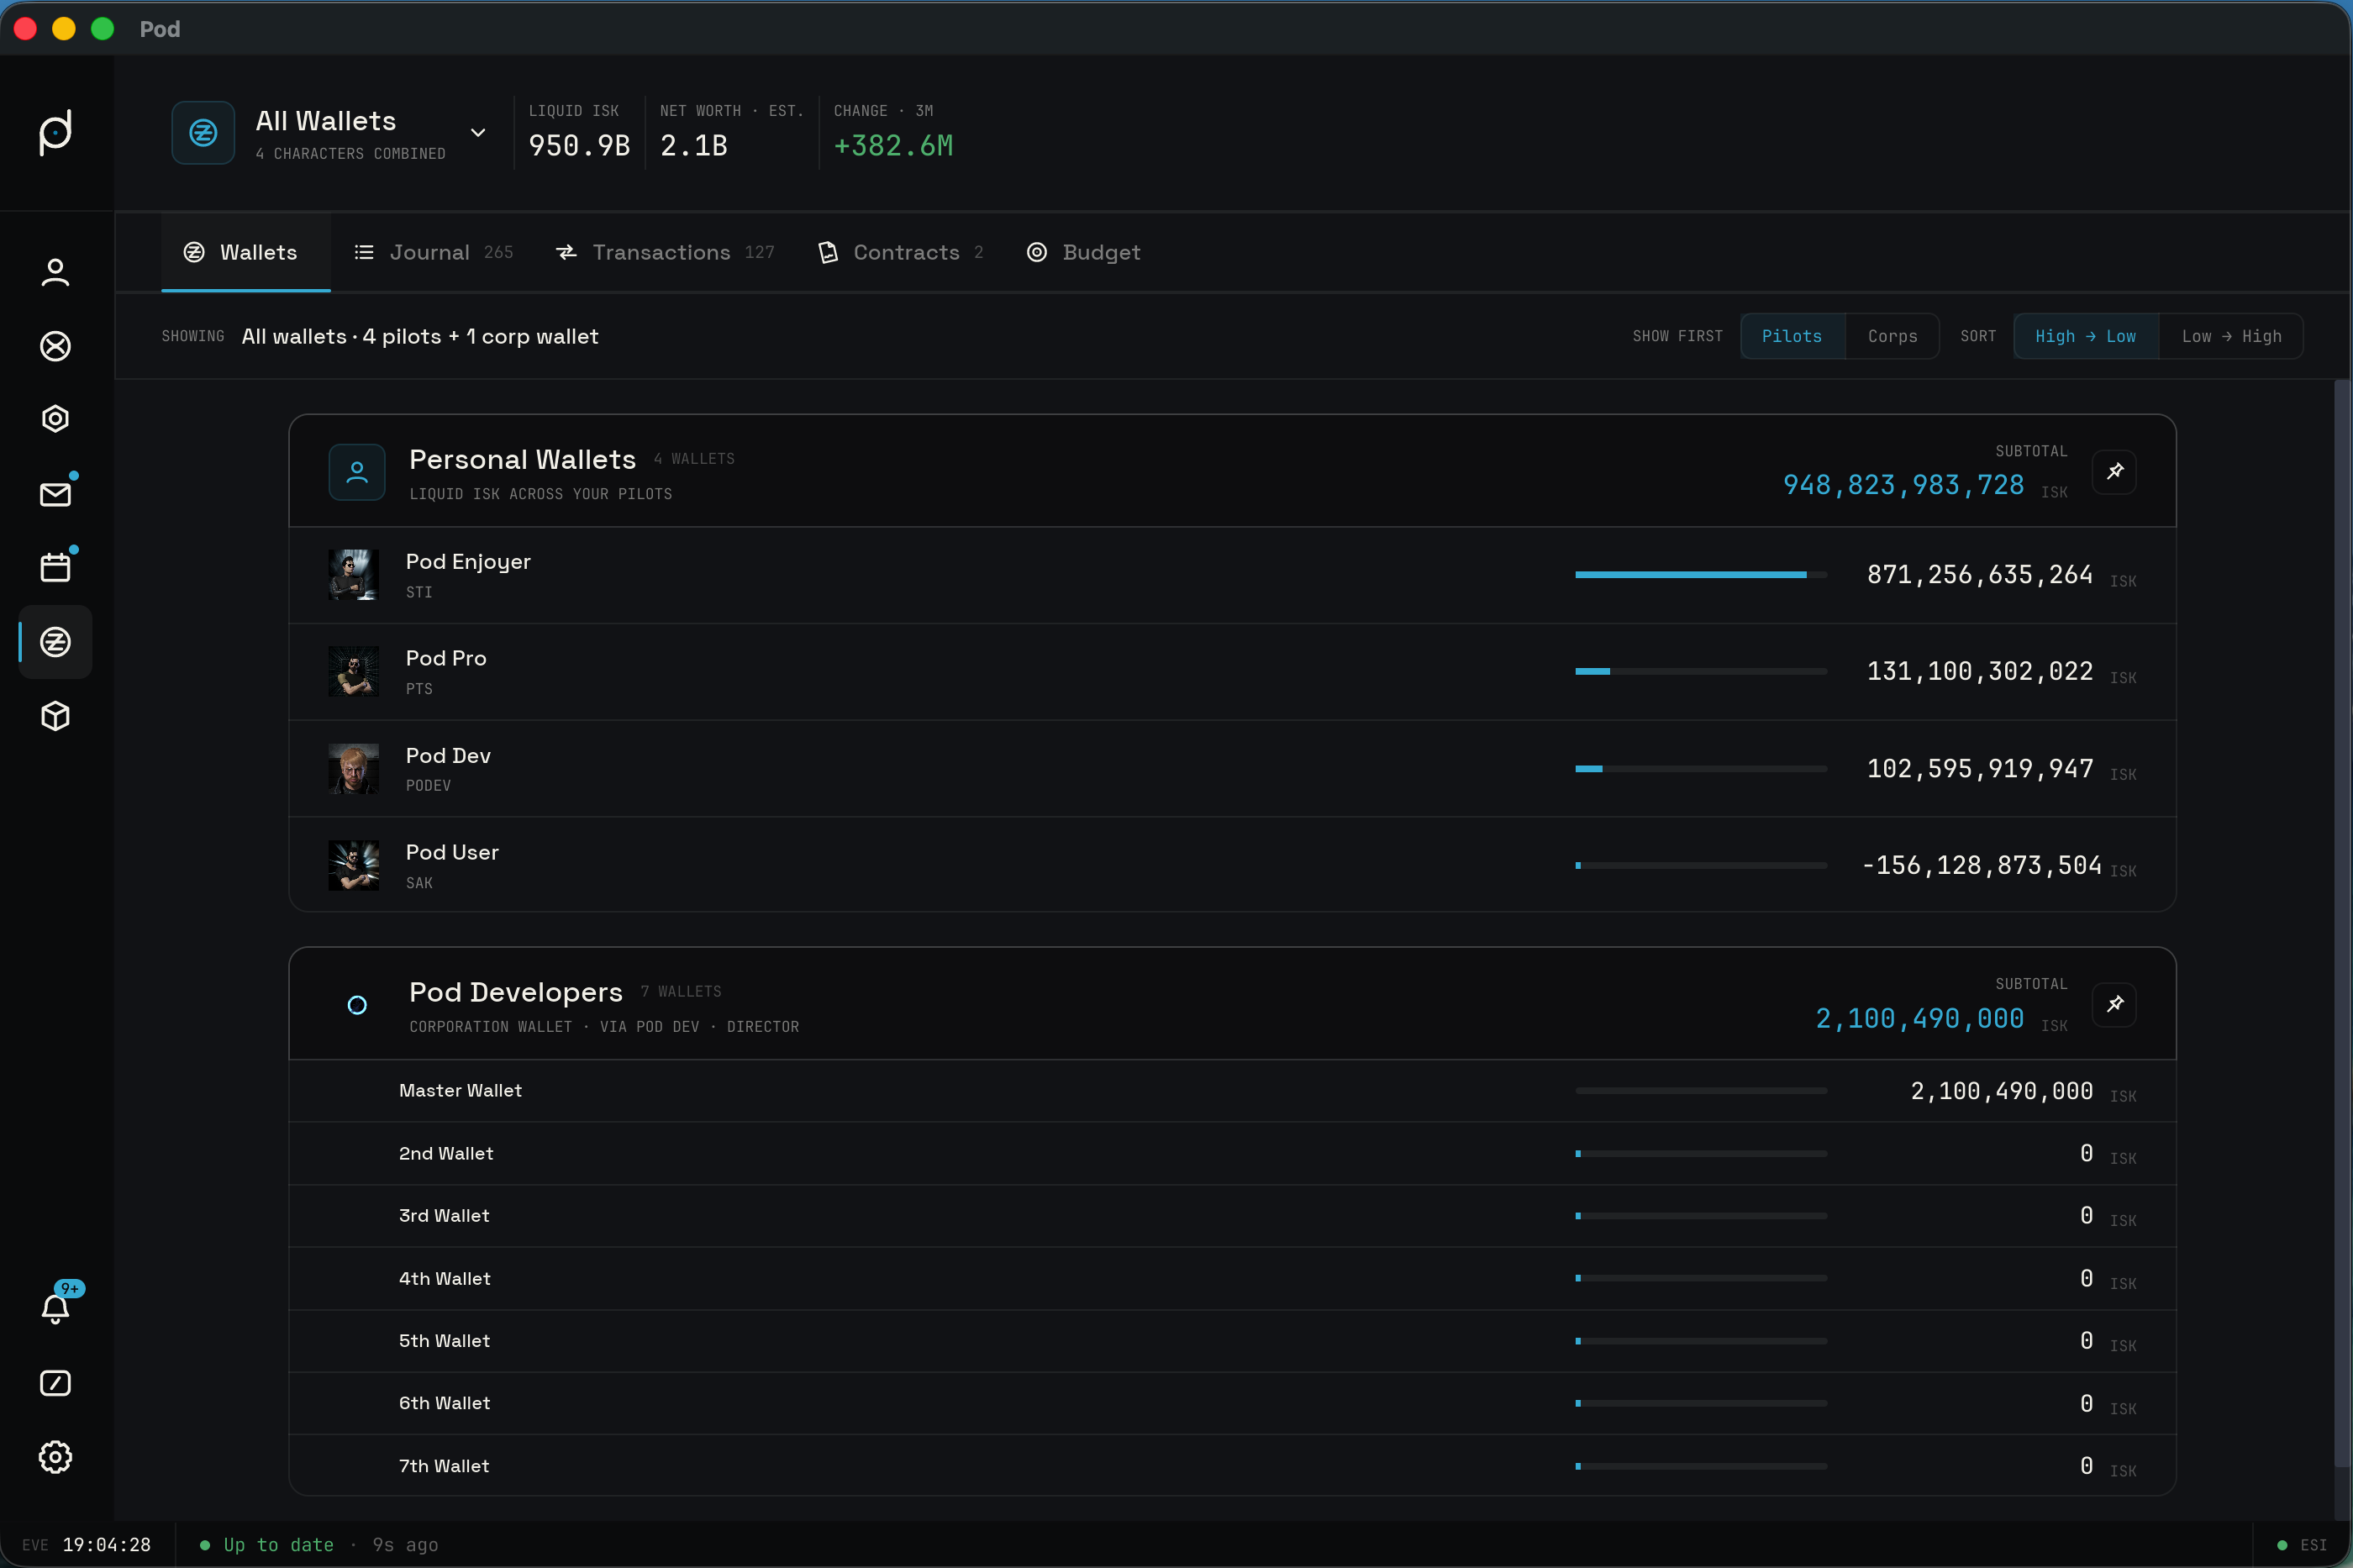
The Wallets tab is a read-only balances overview, a single read on the liquid ISK sitting in every wallet the active scope covers. It is the tab the window cold-opens on, and it changes nothing: it only reports balances that sync has already collected.
A toolbar runs across the top. On the left, the eyebrow "Showing" sits above a context label that names what you are looking at. On the right, the eyebrow "Sort" sits above a two-segment toggle, "High → Low" / "Low → High", that orders the rows within each section. The default is High → Low.
The context label follows the scope picker. On All Wallets it reads "All wallets · {n} pilots + {m} corp wallets", with the counts pluralized to match. On a single character it reads "{name} · personal wallet". On a corporation it reads "{name} · corporation wallet".
The body is a scrollable column of section cards. On All Wallets it leads with a "Personal Wallets" section, then one section per owned corporation. On a single character it shows one "Master Wallet" section. On a corporation it shows just that corp's own section.
The Personal Wallets section carries the caption "Liquid ISK across your pilots". It holds one row per pilot, each with a portrait, name, corp sub-line, and liquid balance, and its subtotal is the sum across those pilots.
A corporation section is titled with the corp name and logo. Its caption reads "Corporation wallet", or "Corporation wallet · via {granter} · {role}" when the access came through another character's role. Its rows are the corp's seven wallet divisions, each labeled by its name or, when unnamed, "Master Wallet", "2nd Wallet", "3rd Wallet", and "{n}th Wallet" for the rest. The subtotal sums across the divisions. A corp with no divisions synced still appears, with its rows at zero.
Each section header pairs a colour swatch and the title with a mono "{n} WALLET(S)" count and, under the eyebrow "Subtotal", the section total drawn in plasma. Each row leads with an avatar (blank for corp divisions), then the name, then a share bar sized by that row's share within its own section (non-zero rows always show at least a sliver), and finally the balance in mono with a trailing " ISK".
On a single character, a pilot hero card prepends the surface: the pilot's avatar and name, their corp in uppercase, and three stats: "Liquid · master wallet", "Assets · est.", and "Net worth". This pilot hero is the only hero on the Wallets tab; the Liquid / Net worth / Change hero from the ledger tabs does not appear here.
When there is nothing to show, the tab reads "No wallets to show yet, sync populates balances."
Journal tab
The Journal tab lists wallet journal entries: bounties, mission rewards, transfers, market settlements, and every other ref type the game records. Each row shows the entry description and a humanized ref type on the left, the character's portrait and name in the middle, and the signed amount with a relative timestamp on the right. Income is marked with a green badge and a plus sign; spend is marked with a red badge and a minus sign.
The tab is paginated by cursor. It loads the first fifty entries and fetches the next page as you scroll past roughly four fifths of the list, so a long history streams in without loading everything at once. The total entry count appears on the tab itself.
Two filters sit above the list. The sign filter has three options: All, In, and Out. All shows every entry. In narrows the list to income, the entries with a positive amount. Out narrows it to spend, the entries with a negative amount. The timeframe selector reuses the same 1W through 1Y choices as the hero, so you can scope the journal to a recent window or the full year.
Transactions tab
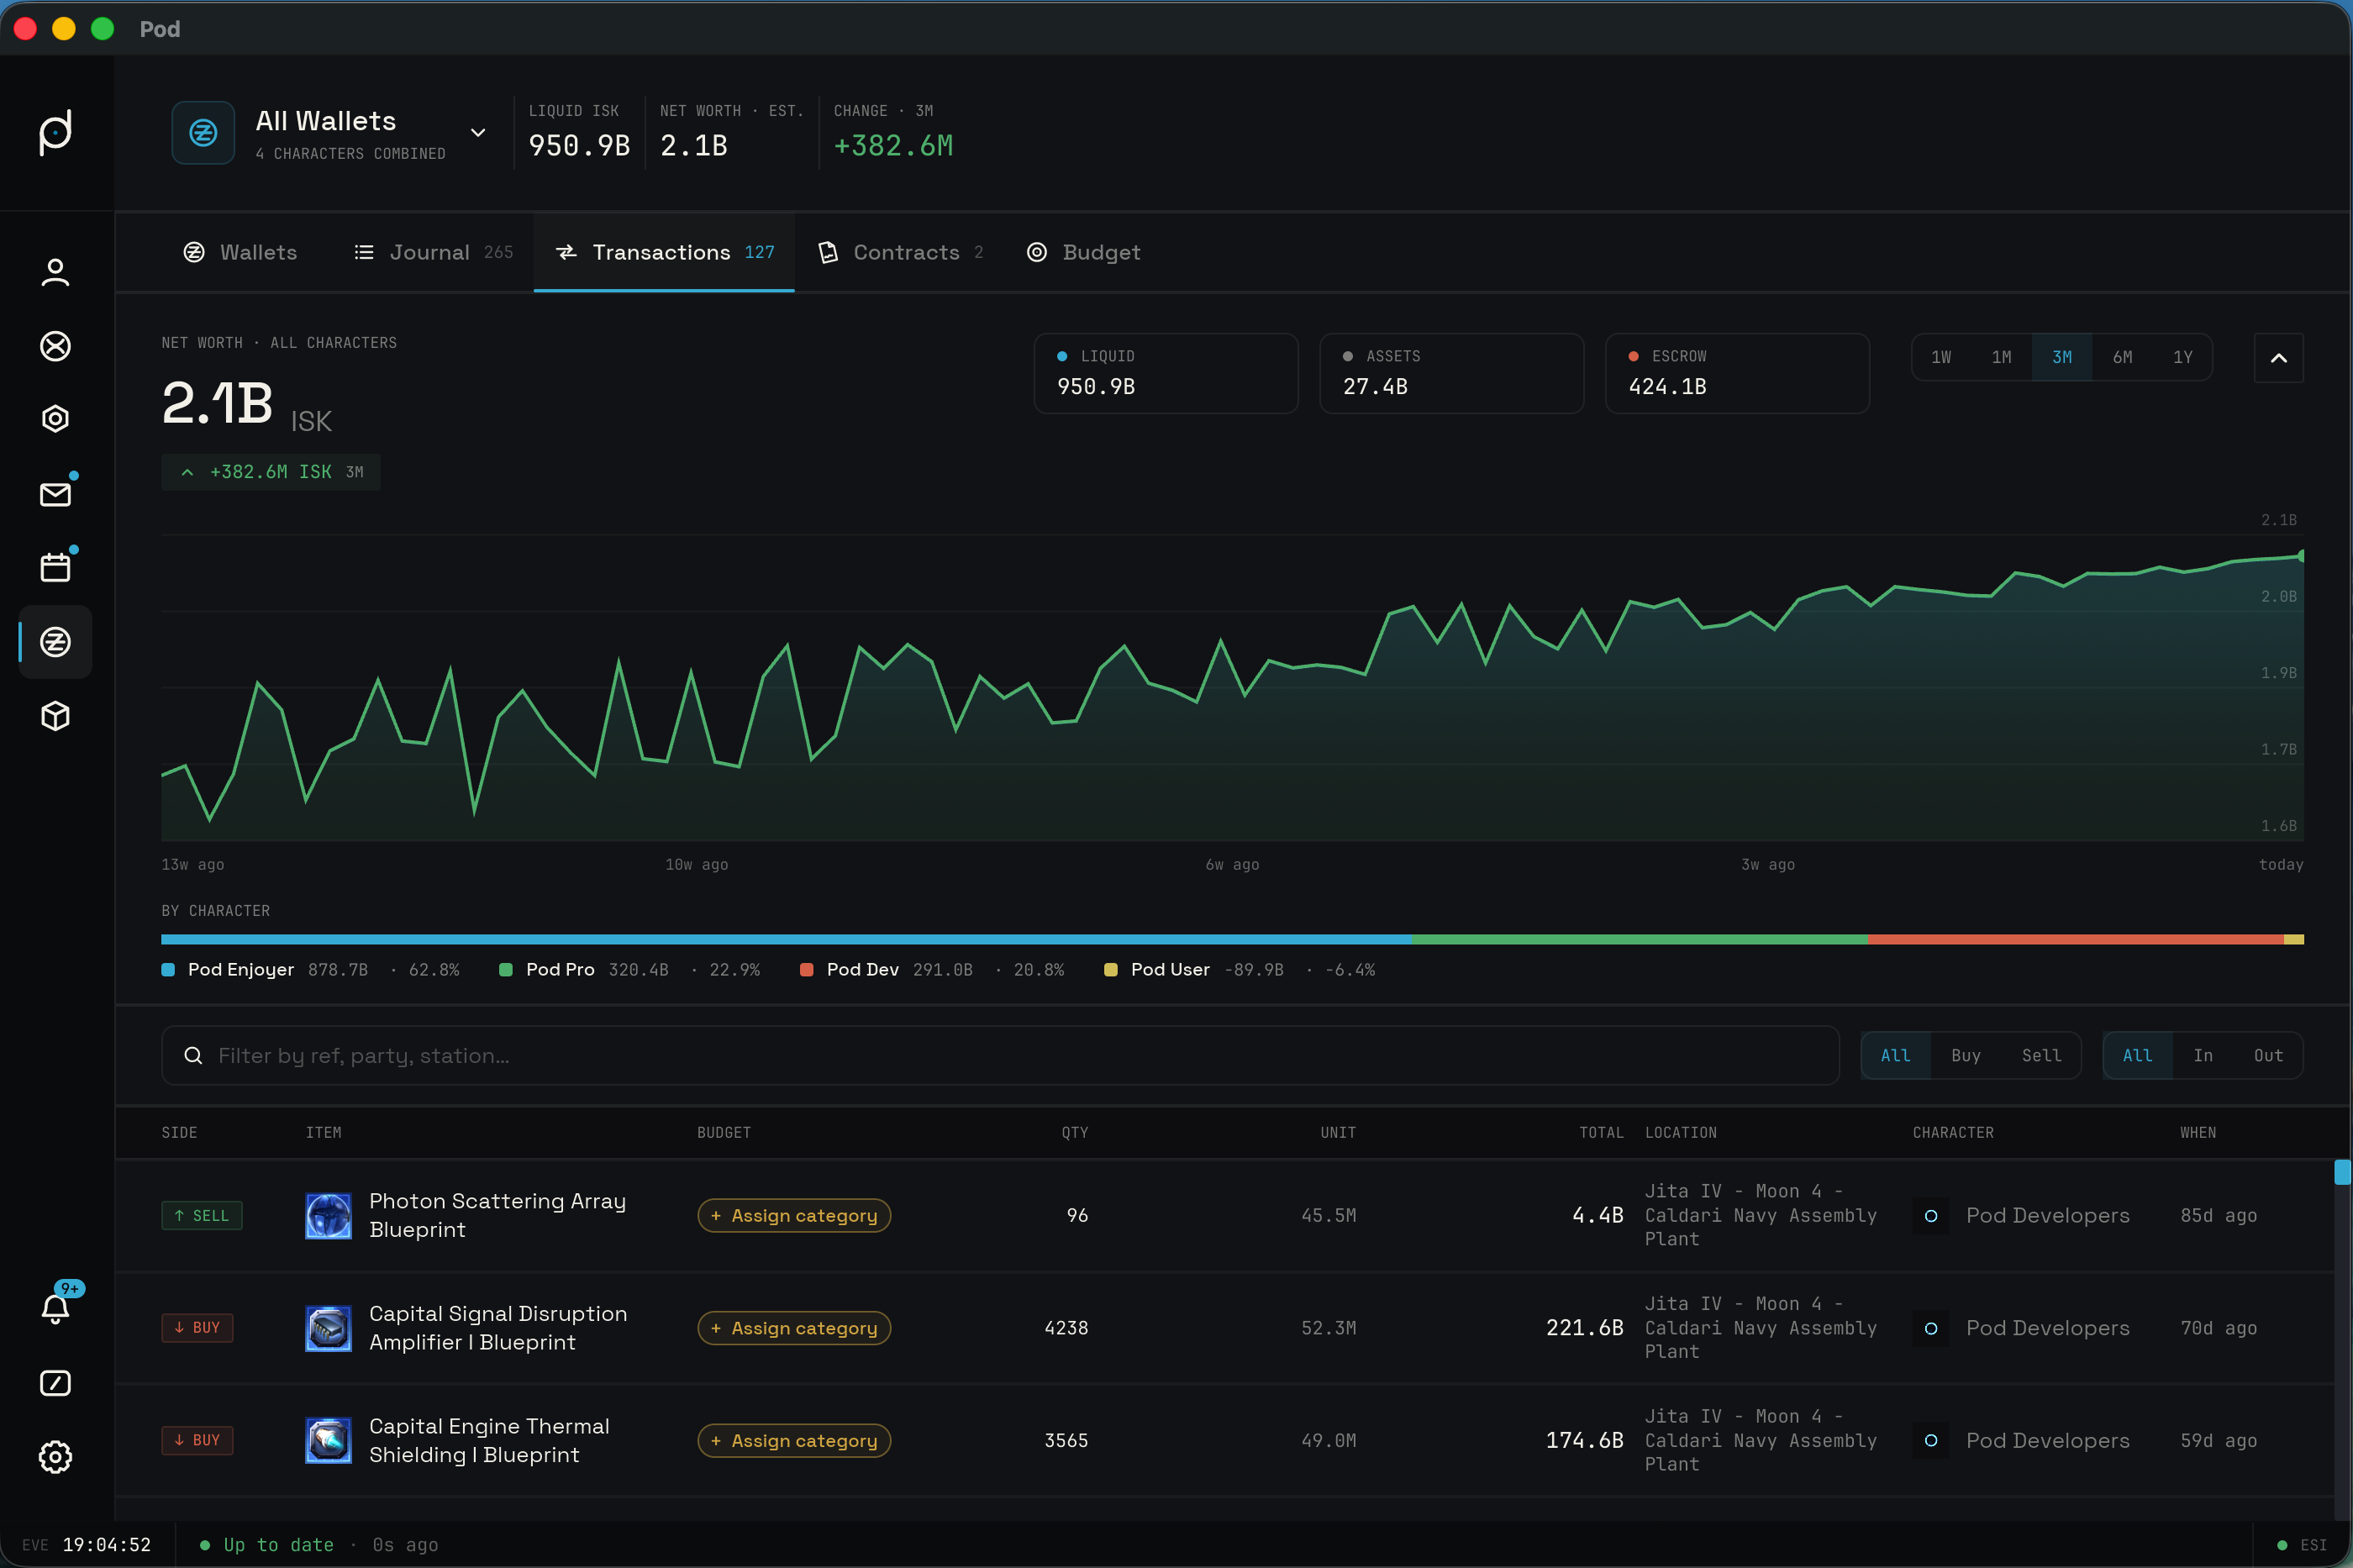
The Transactions tab lists your market transactions as buy and sell orders. Each row shows the side, the item, the quantity, the unit price, the order total, the location, the character who placed it, and when it happened. Buy rows are marked with a down arrow and "BUY" in red. Sell rows are marked with an up arrow and "SELL" in green.
Like the Journal tab, the Transactions tab pages in fifty rows at a time by cursor and fetches more as you scroll. A side filter across the top switches between All, Buy, and Sell so you can isolate one direction of trade. The sign filter applies here too: In shows sells, Out shows buys.
Contracts tab
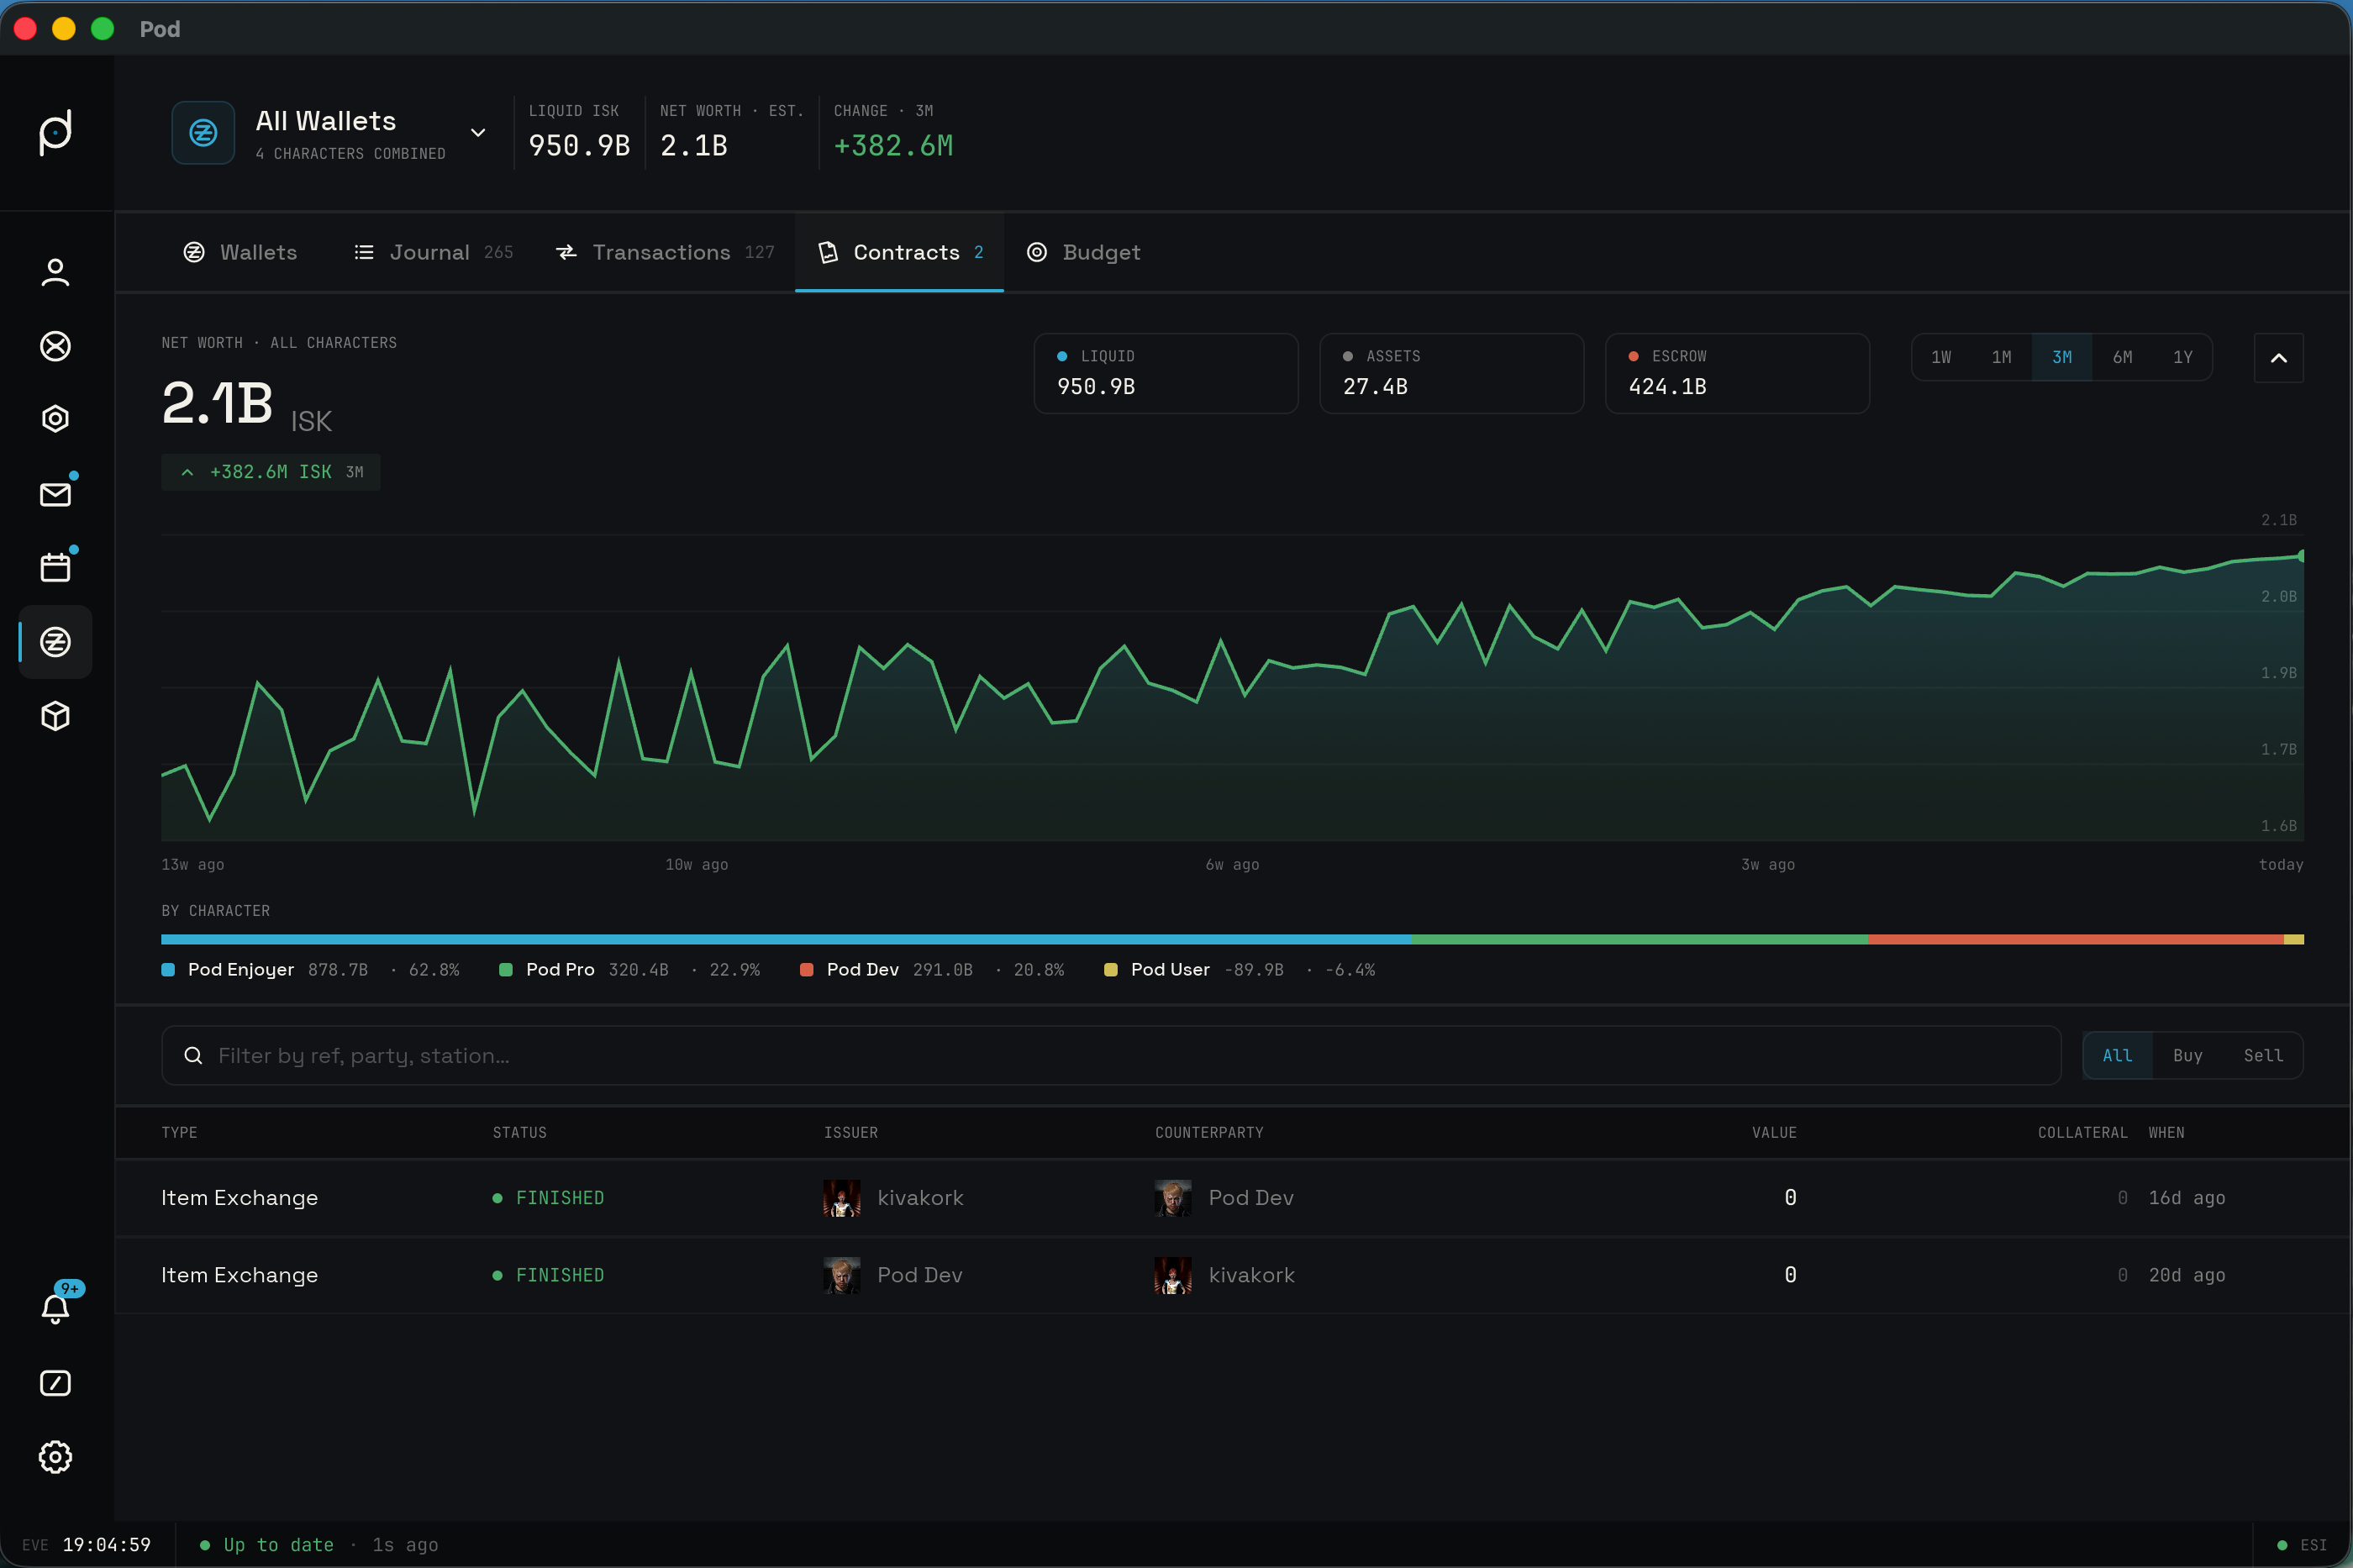
The Contracts tab lists item exchange, courier, and auction contracts tied to your characters. Each row shows the contract type, its status, the issuer, the counterparty, the value, the collateral, and when it was issued. The counterparty resolves to the acceptor when one exists, otherwise the assignee, otherwise the issuer.
Status is shown in uppercase next to a colored dot. Outstanding contracts read in yellow, in-progress contracts in plasma, and finished contracts in green. Cancelled and deleted contracts are greyed out, while outbid, failed, rejected, and reversed contracts are red. A contract that is still outstanding or in progress past its expiry date is shown as expired.
The Contracts tab pages by cursor in the same way as the other tabs and carries its own total count. A side filter lets you narrow to buy or sell contracts.
The Contracts tab shares the same filter box as the Journal and Transactions tabs, the one labeled "Filter by ref, party, station". On contracts that box matches by contract ID, type, status, the parties (issuer, assignee, and acceptor), and the names of the items the contract carries. The match is a case-insensitive substring, so typing "rhea" finds a courier hauling a Rhea without you knowing the exact name, and the item names are resolved from the SDE across every item the contract holds. The search runs over the contracts already loaded into the tab, so paging further back widens what it can reach. Only item names are searchable this way, not their value or quantity.
Contract detail
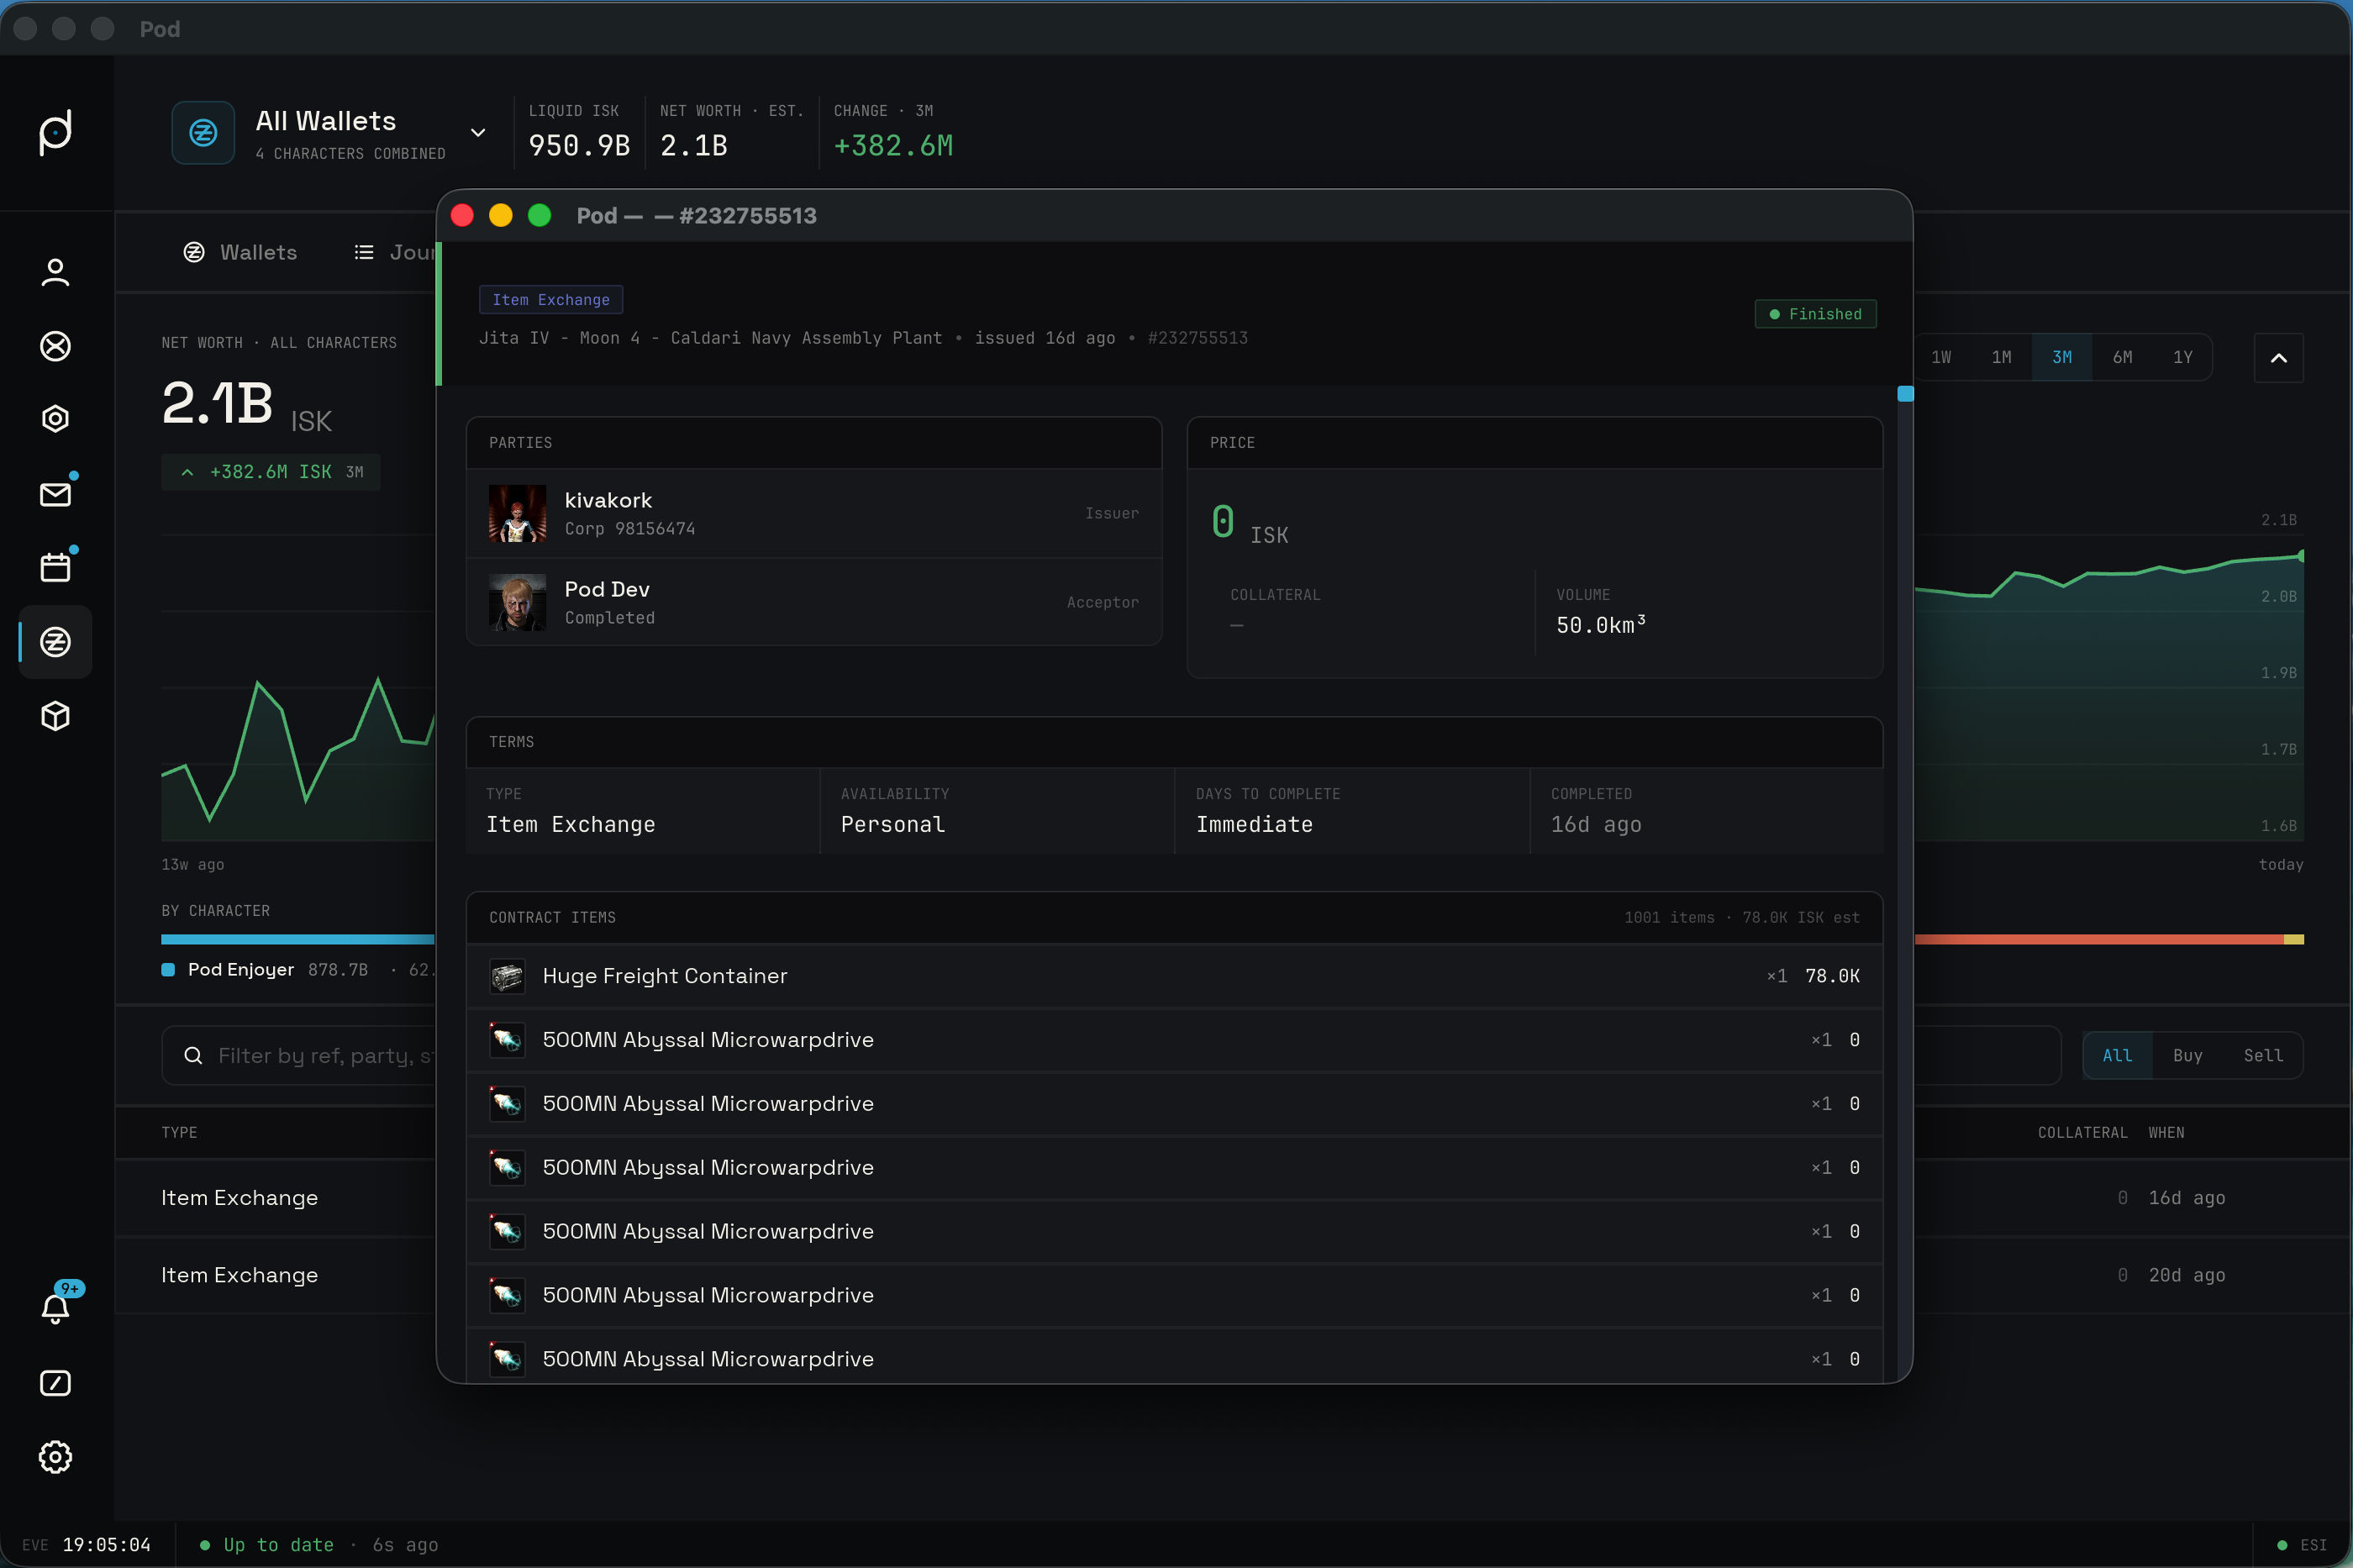
Select any contract row to open the contract viewer, a detached window separate from the main Pod window. You can move and resize it, and you can open several viewers at once to compare contracts side by side. The header names the contract kind, its title or a fallback contract number, the location, when it was issued, and the contract ID, with a colored status badge alongside.
A Parties section shows the people involved with their portraits. The issuer appears first with their corporation, or "Public contract" when there is no named recipient. Below a divider, the other party appears when one exists, labeled Acceptor on a finished contract or Hauler on one in progress. When no one has taken the contract, the section reads "Open to anyone" or "Assigned, awaiting acceptance" depending on how it was offered.
A headline panel shows the contract's money figure in large type. The label reflects the contract: Price, Reward, Current bid, or You pay. A small grid beneath it lists the collateral and either the volume, for courier and exchange contracts, or the buyout, for auctions. A Terms section spells out the type, the availability (Public or Personal), the days allowed to complete the contract, and when it expires or that it has completed.
For courier contracts, a Route section draws the path from pickup to destination with the two locations and an arrow between them. The cargo itself appears in a manifest panel, headed "Cargo manifest" for couriers or "Contract items" otherwise, with an estimated total. Each item lists its icon, name, quantity, and per-unit value, and items are flagged as assembled or requested where that applies, so you can read the fitting and cargo item by item.
For auctions, a Bids section lists each bid with the bidder, when it was placed, and the amount. The leading bid is highlighted and tagged as the high bid.
Budget tab
The Budget tab is a zero-based budget in the spirit of YNAB: you give every ISK a job by handing it to an envelope, and you watch what you actually spent flow back against those envelopes. There is one budget, combined across every wallet you have added. It is not split per character or per corporation. Every pilot's liquid ISK and every corporation division's balance feed the same budget, and the figures are derived straight from your wallet journal, so a category's activity and your Ready to Assign pool always agree with the ledger.
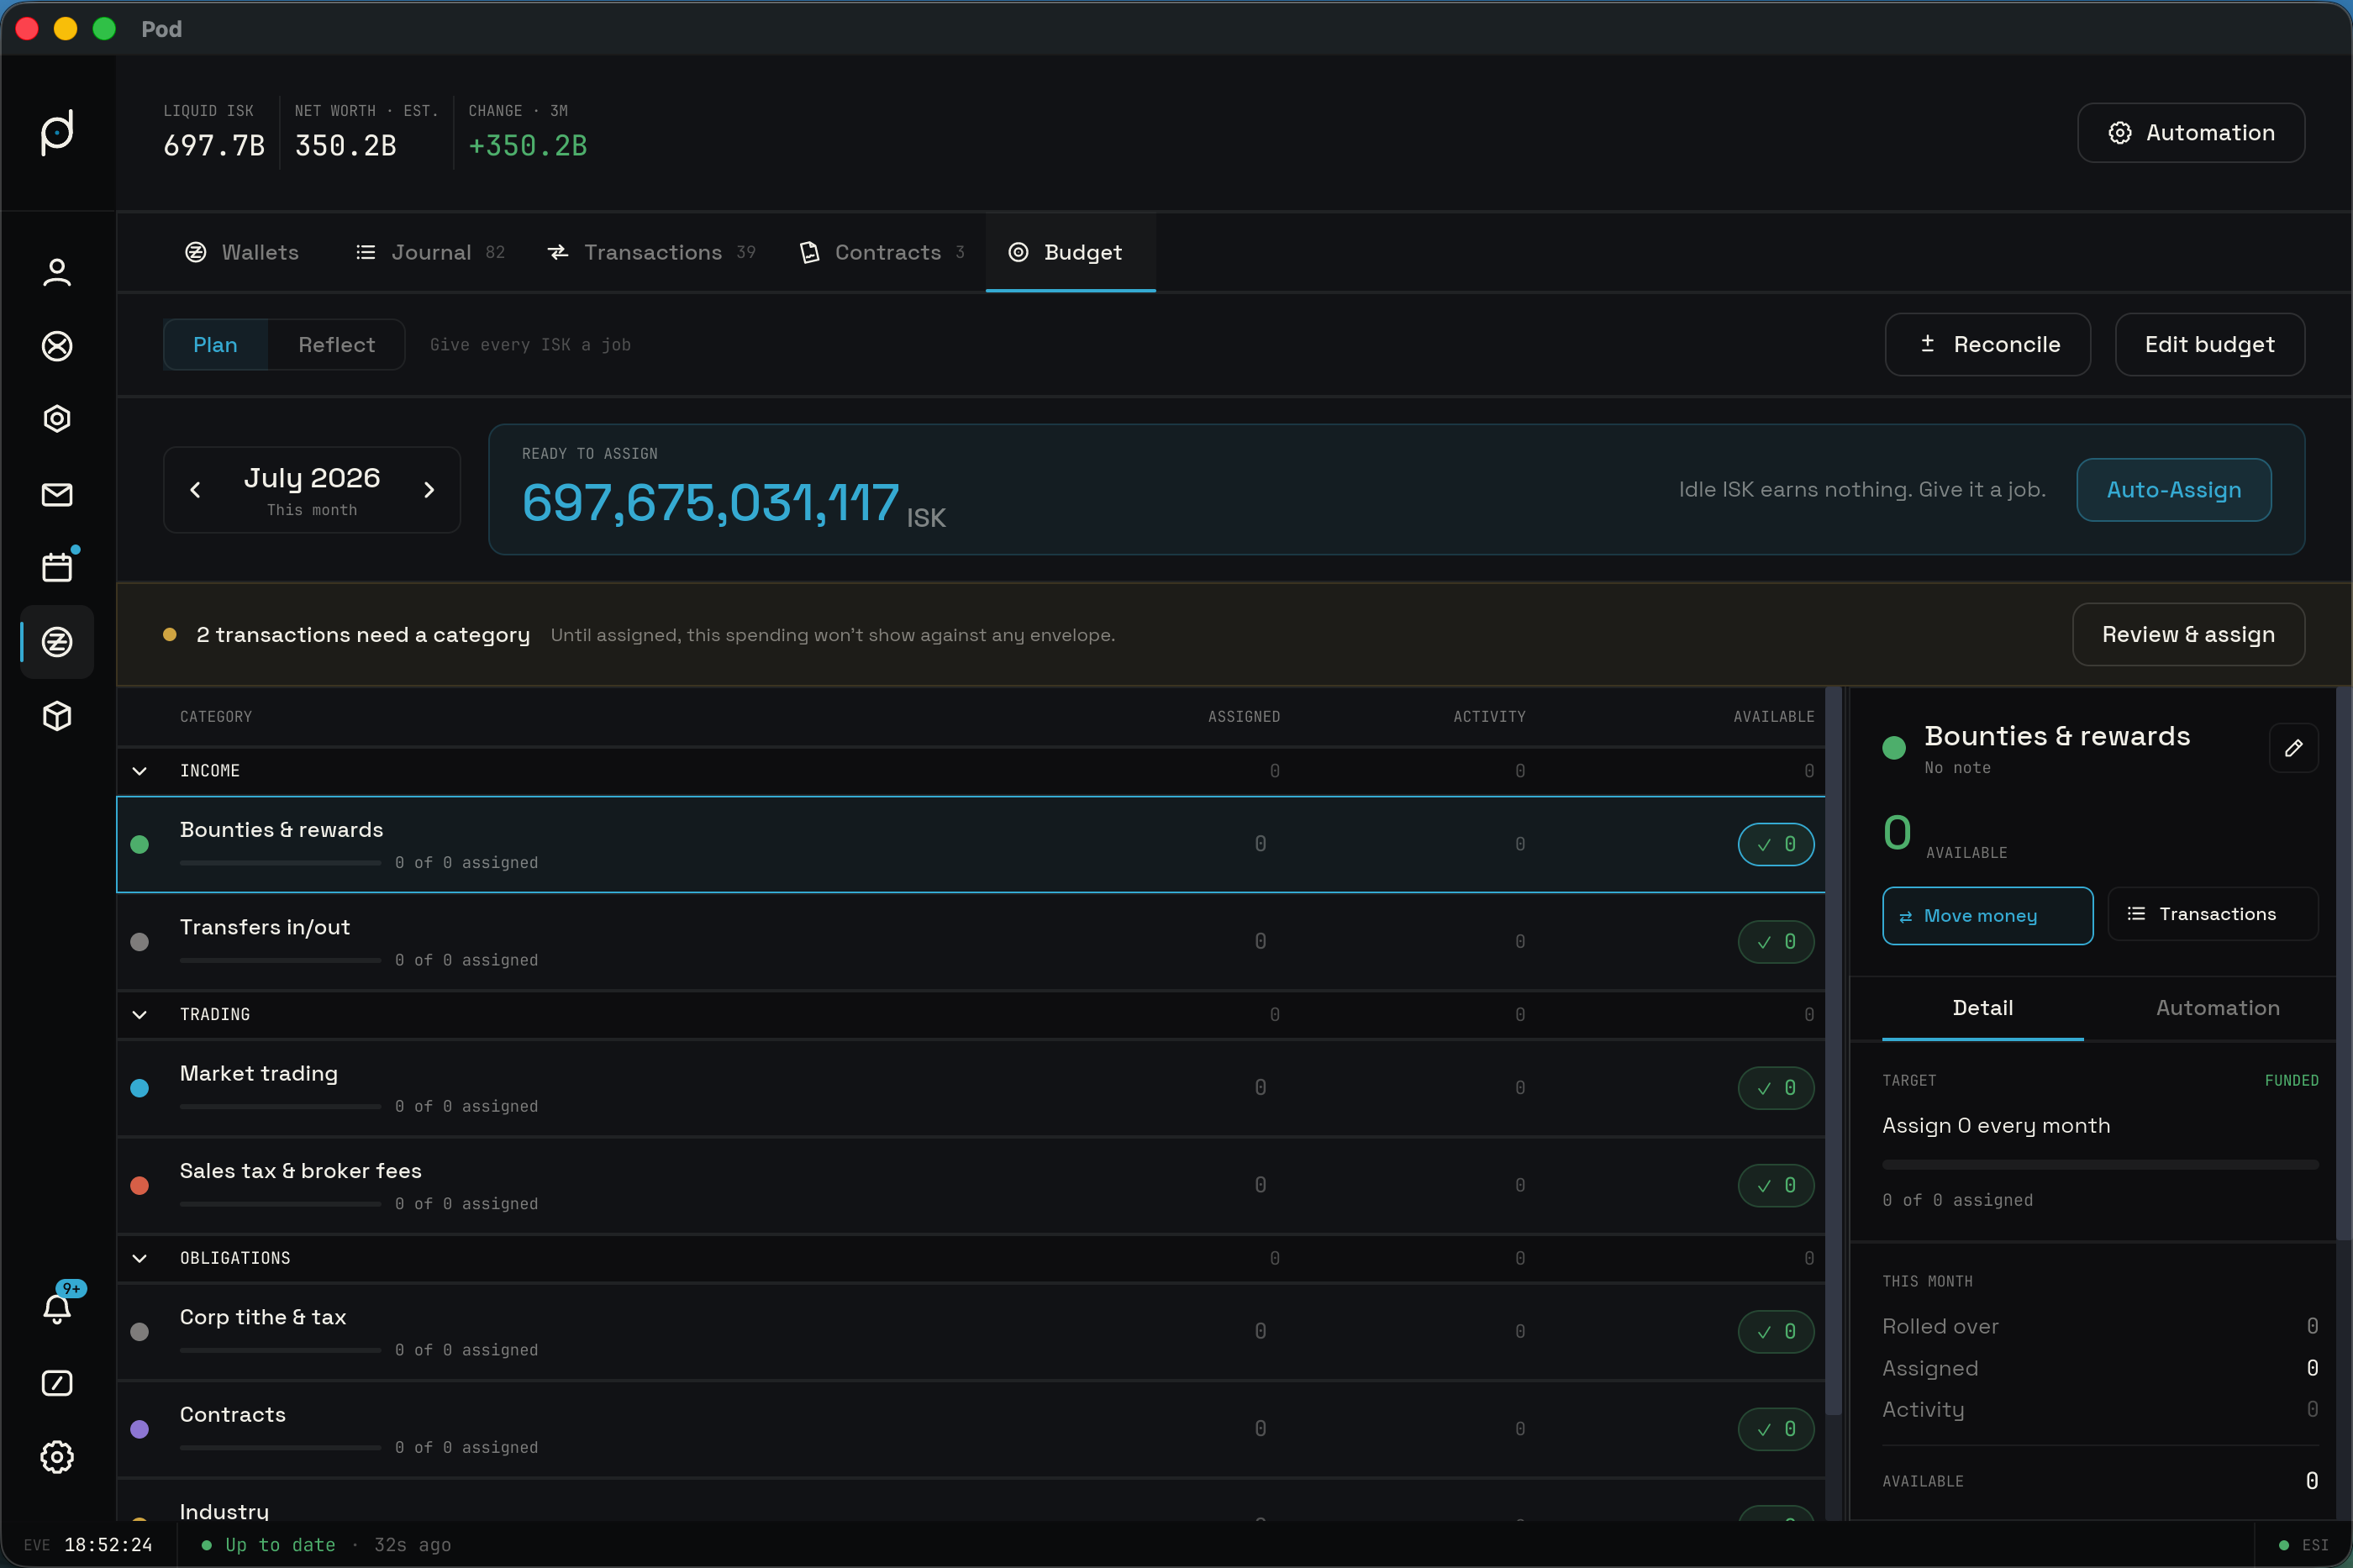
Because the budget is all-wallet by definition, the Budget tab is the one tab that drops the scope picker from the header. In its place the header carries an Automation button that opens the rules window described later on this page.
A sub-nav pill at the top switches between two modes. Plan, the planning mode, carries the blurb "Give every ISK a job". Reflect, the review mode, carries the blurb "Look back at where it went". In Plan mode a Reconcile button and an Edit budget toggle sit on the right. Reconcile opens the square-up dialog covered below; press Edit budget to enter editing, where the label changes to "Done editing" until you leave. Reconcile is hidden while you are editing.
Plan mode
Plan mode opens on a month. A month navigator with left and right chevrons steps you through your history, and a relative sub-label reads "This month" when you are on the current month, "Last month" on the previous one, and the month's name otherwise. Editing is only allowed on the current month; past months are read-only.
Below the navigator sits the Ready to Assign hero: the pool of ISK you have not yet handed to an envelope, shown as a large ISK figure. It is your combined liquid balance across every wallet, derived from the journal, minus everything you have already assigned to envelopes. It carries one of three state messages. When the pool is zero it reads "Every ISK has a job. Nothing left idle." in green. When it is positive it reads "Idle ISK earns nothing. Give it a job." in plasma, and an Auto-Assign button appears beside it to spread the pool across underfunded categories for you. When it is negative, meaning you have assigned more than you hold, it reads "You've assigned more than you hold. Pull some back." in red, and the Auto-Assign button is hidden.
Internal transfers between your own wallets do not affect Ready to Assign. EVE mirrors one transfer into both wallets as a matched pair of legs, one positive and one negative, and those legs cancel each other out, so moving ISK from one pilot to another nets to zero rather than reading as fresh income.
When a category is overspent, its Available pill shows an Overspent state with a "Click to cover" affordance, so you can move ISK in to bring it back to zero.
If any of the month's spending still lacks an envelope, an amber banner appears above the table. It reads "{n} transaction needs a category" (or "{n} transactions need a category" when there is more than one), with the sub-line "Until assigned, this spending won't show against any envelope." A Review & assign button on the right jumps to the ledger filtered to the uncategorized entries so you can clear them out.
The count is exact, not a tally of whatever rows happen to be loaded. Pod derives it straight from the database across every entry in the month, then subtracts the spending that already has a home: entries you picked by hand, entries an automation rule resolved, and the journal twins that mirror a market trade you have already counted from the Transactions side. A corp trade carried out on behalf of a corporation lands in two wallets at once, and the count de-dupes those into a single transaction so it is never double-counted.
Reconcile
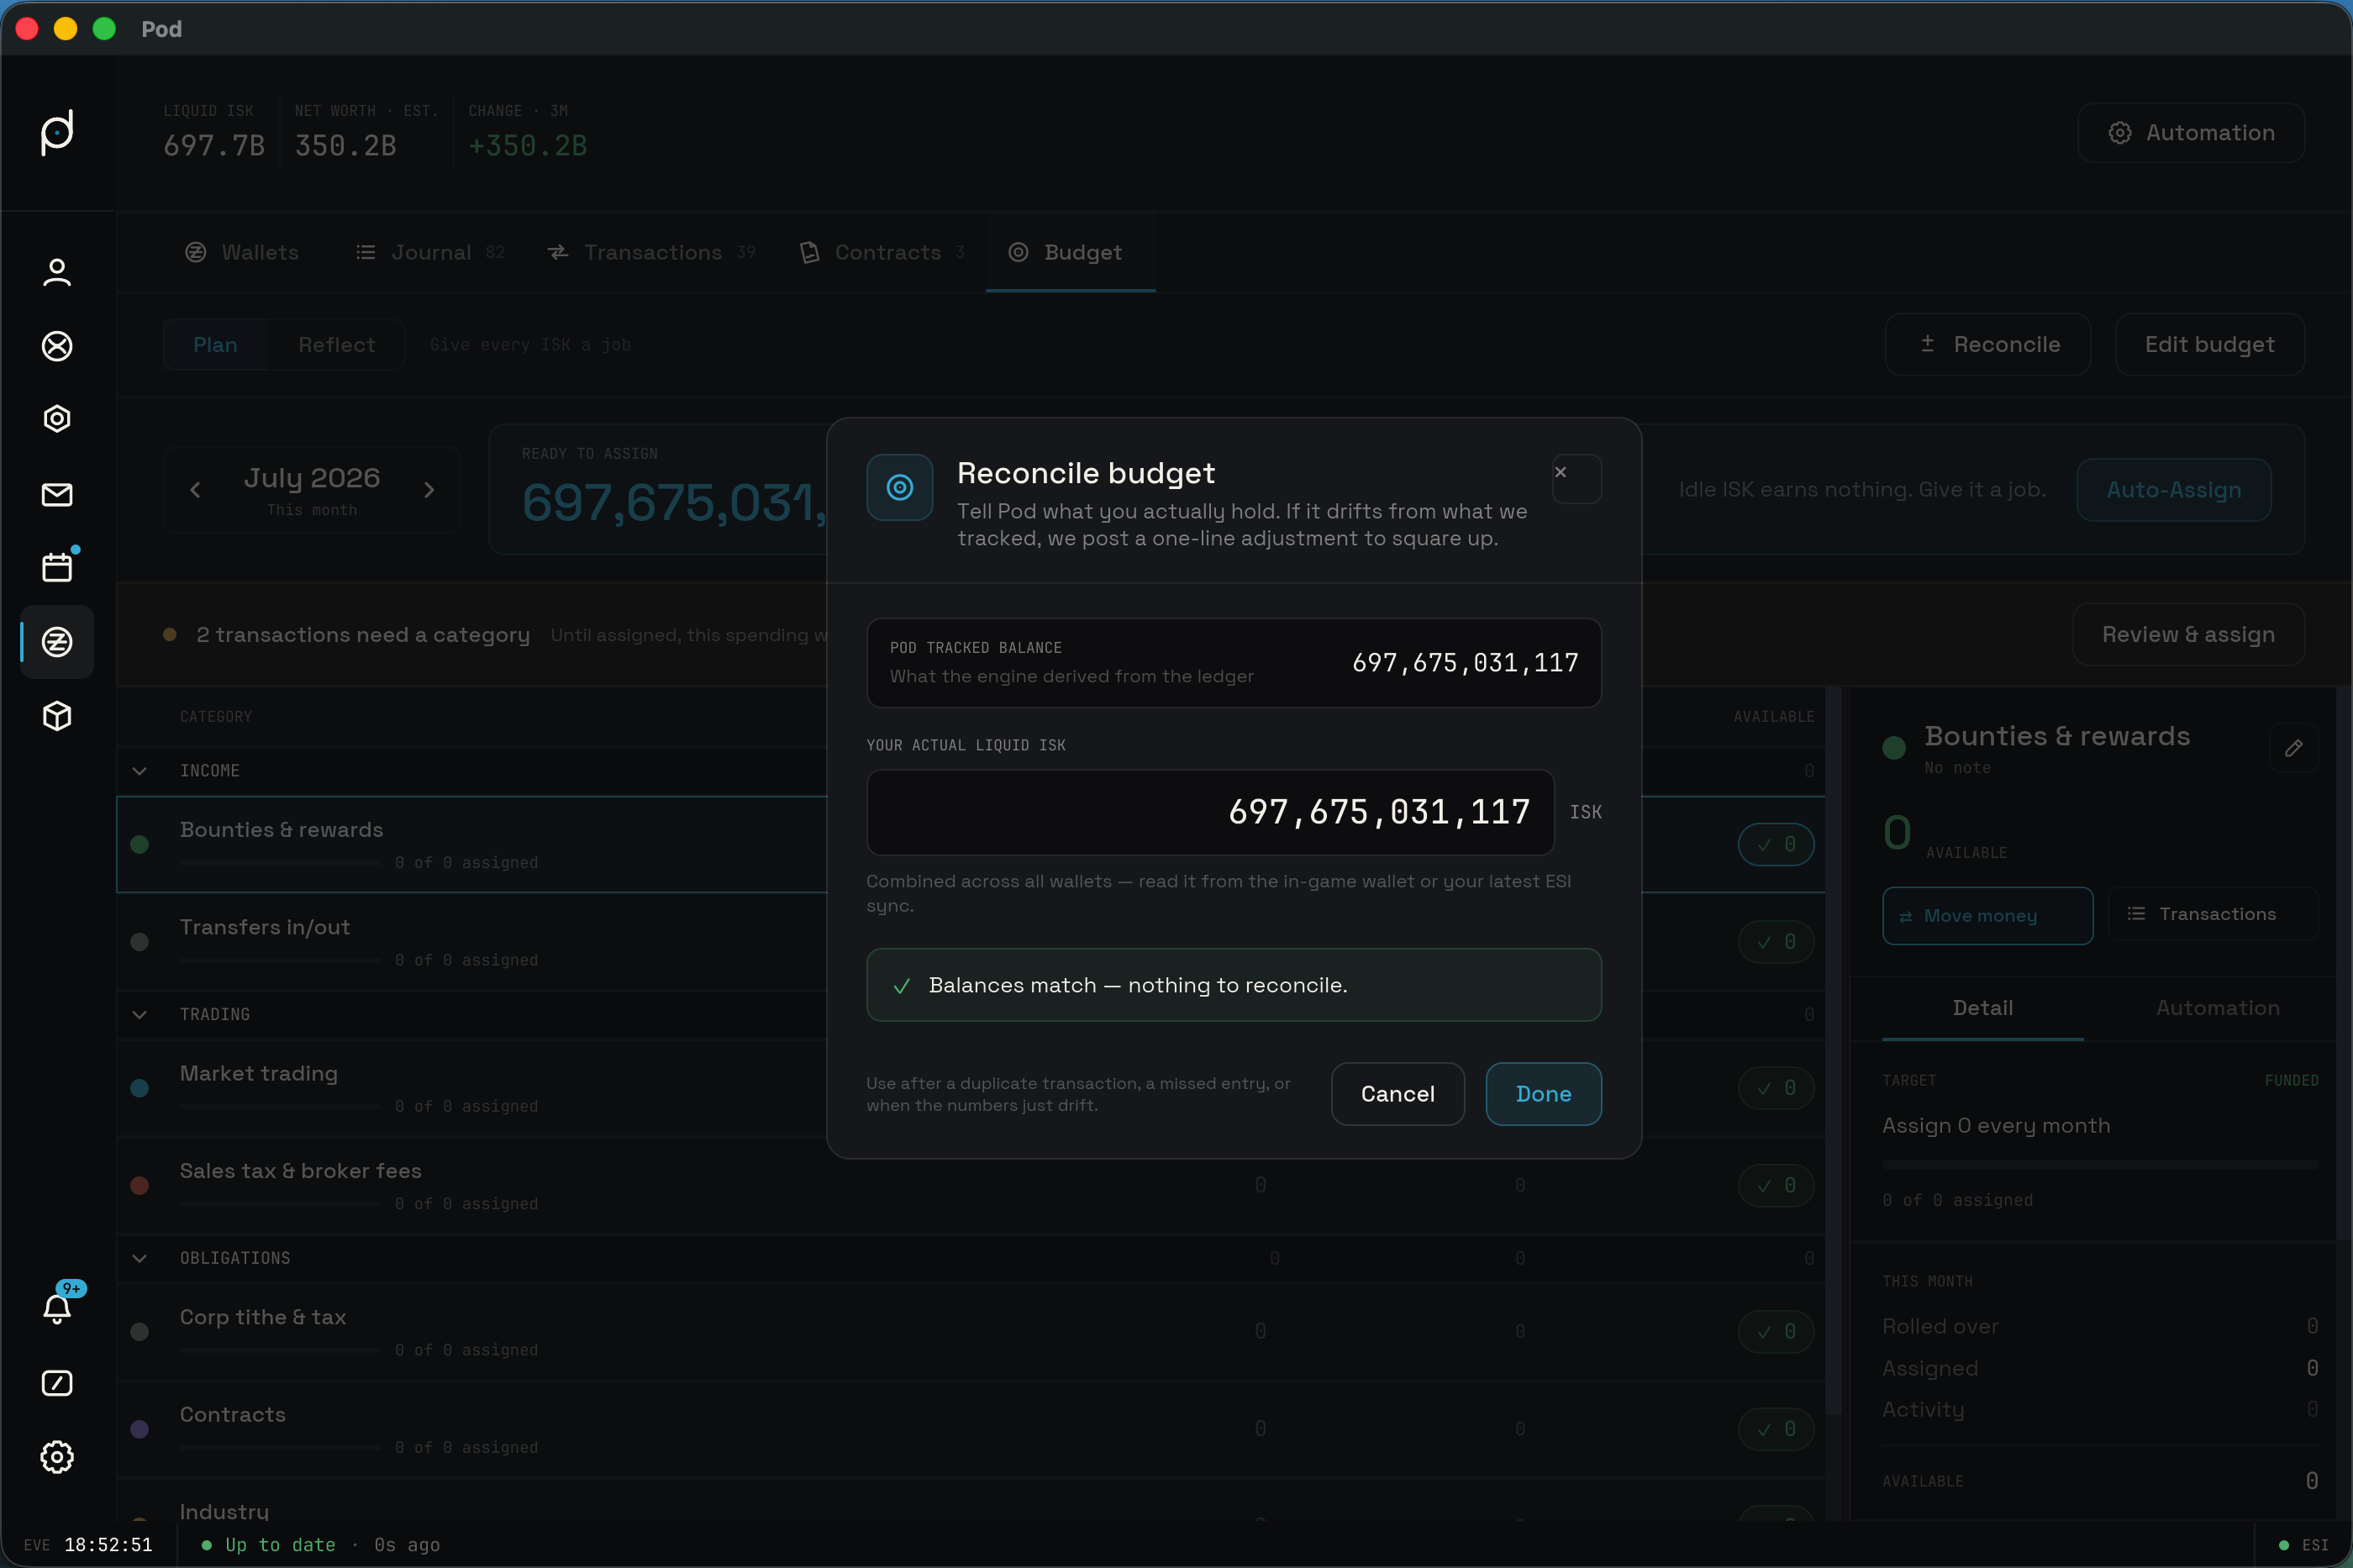
Because the pool is derived from your journal rather than read live from EVE, it can drift: a duplicate entry, a missed entry that aged out of EVE's history, or a rounding gap can leave Pod's tracked balance a little off from what you actually hold. Reconcile squares the two up, YNAB style, and it lives behind the Reconcile button in the Plan sub-nav.
The dialog is titled "Reconcile budget". It shows the Pod tracked balance, the figure the engine derived from the ledger, above a field where you type your actual liquid ISK. That figure is combined across all your wallets, so read it from your in-game wallet or your latest sync. As you type, the dialog compares the two. When they match it says there is nothing to reconcile. When they differ it names the gap: if Pod under-counted, it will post an inflow that drops the difference into Ready to Assign; if Pod over-counted, it will post a negative inflow that pulls the difference back out. The panel previews the resulting Ready to Assign, and warns you when the adjustment would drive it negative, which means you would need to pull ISK back from over-funded envelopes to zero it out.
Confirm with Post adjustment and Pod writes a single correcting entry into your wallet journal, tagged as a reconciliation, so the ledger and the budget agree again. Nothing else is touched. Because the correction is a real journal entry, it flows through the budget the same way any other entry does.
The envelope table
The body is a table of envelopes grouped into collapsible category groups. A fresh scope is seeded with starter groups (Income, Trading, and Obligations, rendered in uppercase) holding starter envelopes: Bounties & rewards and Transfers in/out under Income; Market trading and Sales tax & broker fees under Trading; and Corp tithe & tax, Contracts, and Industry under Obligations. These are only seeds. You can rename, add, and delete groups and envelopes freely.
Each row carries four columns:
- Category: the envelope name, with a small tone dot for its colour. Rows with a by-date target also show a "DUE {label}" pill, and a "View transactions" link reveals on hover that filters the ledger to that category.
- Assigned: what you have handed this envelope this month. Click the figure to edit it inline; on past months it is read-only.
- Activity: the signed total of what actually moved through the envelope this month.
- Available: a pill showing what is left. It turns red with a "!" when the envelope is overspent, green with a "✓" when it is funded, and stays neutral when it is underfunded but not overspent.
The inspector
A resizable inspector pane sits to the right; drag its edge to size it. With nothing selected it reads "Select a category to inspect its target, set funding, and review activity."
Select an envelope and the inspector fills in. Two tabs sit beneath the header: "Detail", the default, holds the target, funding, and activity content described below; "Automation" holds the envelope's rules and carries a badge with the count of rules that file into it. The Detail tab's header shows the name, any note, and the available balance, with a pencil to jump into editing. Next to it, a Transactions button filters the ledger to that envelope. There used to be a second, full-width "View transactions" button lower in the pane; that duplicate is gone now, so the header's Transactions button and the per-row hover link are the two ways into the filtered ledger. A Target block shows a state tag (Overspent, Funded, or Underfunded) with a progress bar toward the target. A This month block breaks the envelope down into Rolled over, Assigned, Activity, and Available.
Below that, the inspector offers Auto-assign suggestions as one-click rows: Underfunded (top it up to its target), Assigned last month, Spent last month, Average assigned, and Set to zero. These per-category suggestions are distinct from the toolbar's Auto-Assign button, which spreads the whole Ready-to-Assign pool at once.
Edit mode
Toggle Edit budget and the table becomes editable. You can rename and delete groups, add envelopes with + Add category, add a group with + New category group, and drag rows to reorder them or move them between groups.
In edit mode the inspector becomes a category editor with fields for Name, an optional Note, a Colour swatch picker, and a target. The target type chooses how the envelope is funded:
- Monthly: assign a set amount every month, then spend it down.
- Refill: top the Available balance back up to a number each month.
- Balance: build a standing reserve and hold it there, open-ended.
- Goal: save toward a number, no deadline.
- By date: save a number by a deadline, with a "By date" field for the deadline.
Reflect mode
Reflect mode looks back at the month. A stat band runs across the top with five figures: Net this month, Assigned, Income, Spent, and Age of ISK (in days).
Below the band sit four report cards:
- Income vs spending: grouped monthly bars over a trailing window, with a 3M / 6M toggle that defaults to 6M.
- Age of ISK: a sparkline with an explainer of how long ISK sits in your wallet before it is spent.
- Spending by category: horizontal bars ranking where the ISK went.
- Target health: a segmented bar with Funded, Underfunded, and Overspent tallies, followed by a Needs attention list of the envelopes that fell short.
Assigning spending to an envelope
The Transactions and Journal tabs each carry a Budget column. When an entry is already assigned, the column shows a tone dot, the category name, and a caret. When it is not, the column shows an amber "+ Assign category" pill. Click either one to open an anchored, grouped picker of your envelopes, with a "✓" beside the one the entry is currently assigned to.
Assignment is manual-first with automation underneath. Hand-file any entry and that pick always wins; automation rules (below) file the rest for you, automatically and retroactively; and only spending that neither a manual pick nor a rule catches stays uncategorized, exactly what the amber banner in Plan mode warns about. Because of that automation, the per-row Budget chip does not distinguish a rule-filed entry from a hand-assigned one: both show the settled tone dot, the category name, and the caret. A chip may already be filled before you have touched the entry, because a rule filed it.
When you assign a market trade, its fees ride along. A single trade also leaves a Transaction Tax and a Broker's Fee in the journal, and assigning the trade files those fee rows into the same envelope automatically, matched to the trade by its transaction id. The one exception is a fee row you assigned by hand: a manual pick on a fee is left exactly where you put it rather than being swept up with the trade.
A trade a character makes on behalf of a corporation shows up in two wallets at once, the character's and the corp's, under the same transaction id. Pod treats the pair as one trade. The row carries a composite avatar, the trading character's portrait with a small corp logo badged into the corner, which marks it plainly as a corp-on-behalf trade. Assigning either copy co-assigns the other (fee rows included), per-owner manual overrides are still respected on both sides, and the trade counts only once toward your spending rather than twice.
After you follow a View transactions link or the Review & assign banner, a dismissible filter badge appears in the filter bar. It reads "Uncategorized only" in amber when filtered to unassigned spending, or shows the category name with its tone dot when filtered to one envelope. Press its "×" to clear the filter.
Budget automation rules
Rather than hand-file the same kind of transaction over and over, you can teach an envelope to file matching entries for itself. A rule is a saved search attached to a category; any ledger entry it matches lands in that category automatically. Each category's rules are surfaced from the Automation tab of its inspector, and every rule across the whole budget is edited and ordered together in the Automation window, a detached native window you open from the Automation button in the Budget header.
The Automation tab
Open a category's inspector and switch to the Automation tab. It opens with the intro "Rules file matching spending into {category} automatically. Manual picks always win." and a plasma "+ New rule" button. With no rules yet it reads "No rules yet. Add one to stop hand-filing the same kind of transaction into this envelope."
Each rule shows as a card: an on/off switch, the rule name, a "{n} match(es)" pill counting what it currently catches, a one-line summary of its conditions, and an "✕" to delete it. The "+ New rule" button and clicking a card both open the Automation window with the rule editor ready, so editing always happens in that detached window. A footer link, "Manage all rules & priority", carries a "{n} rules · {m} transactions filed here" summary and opens the same window on its full list.
The rule editor
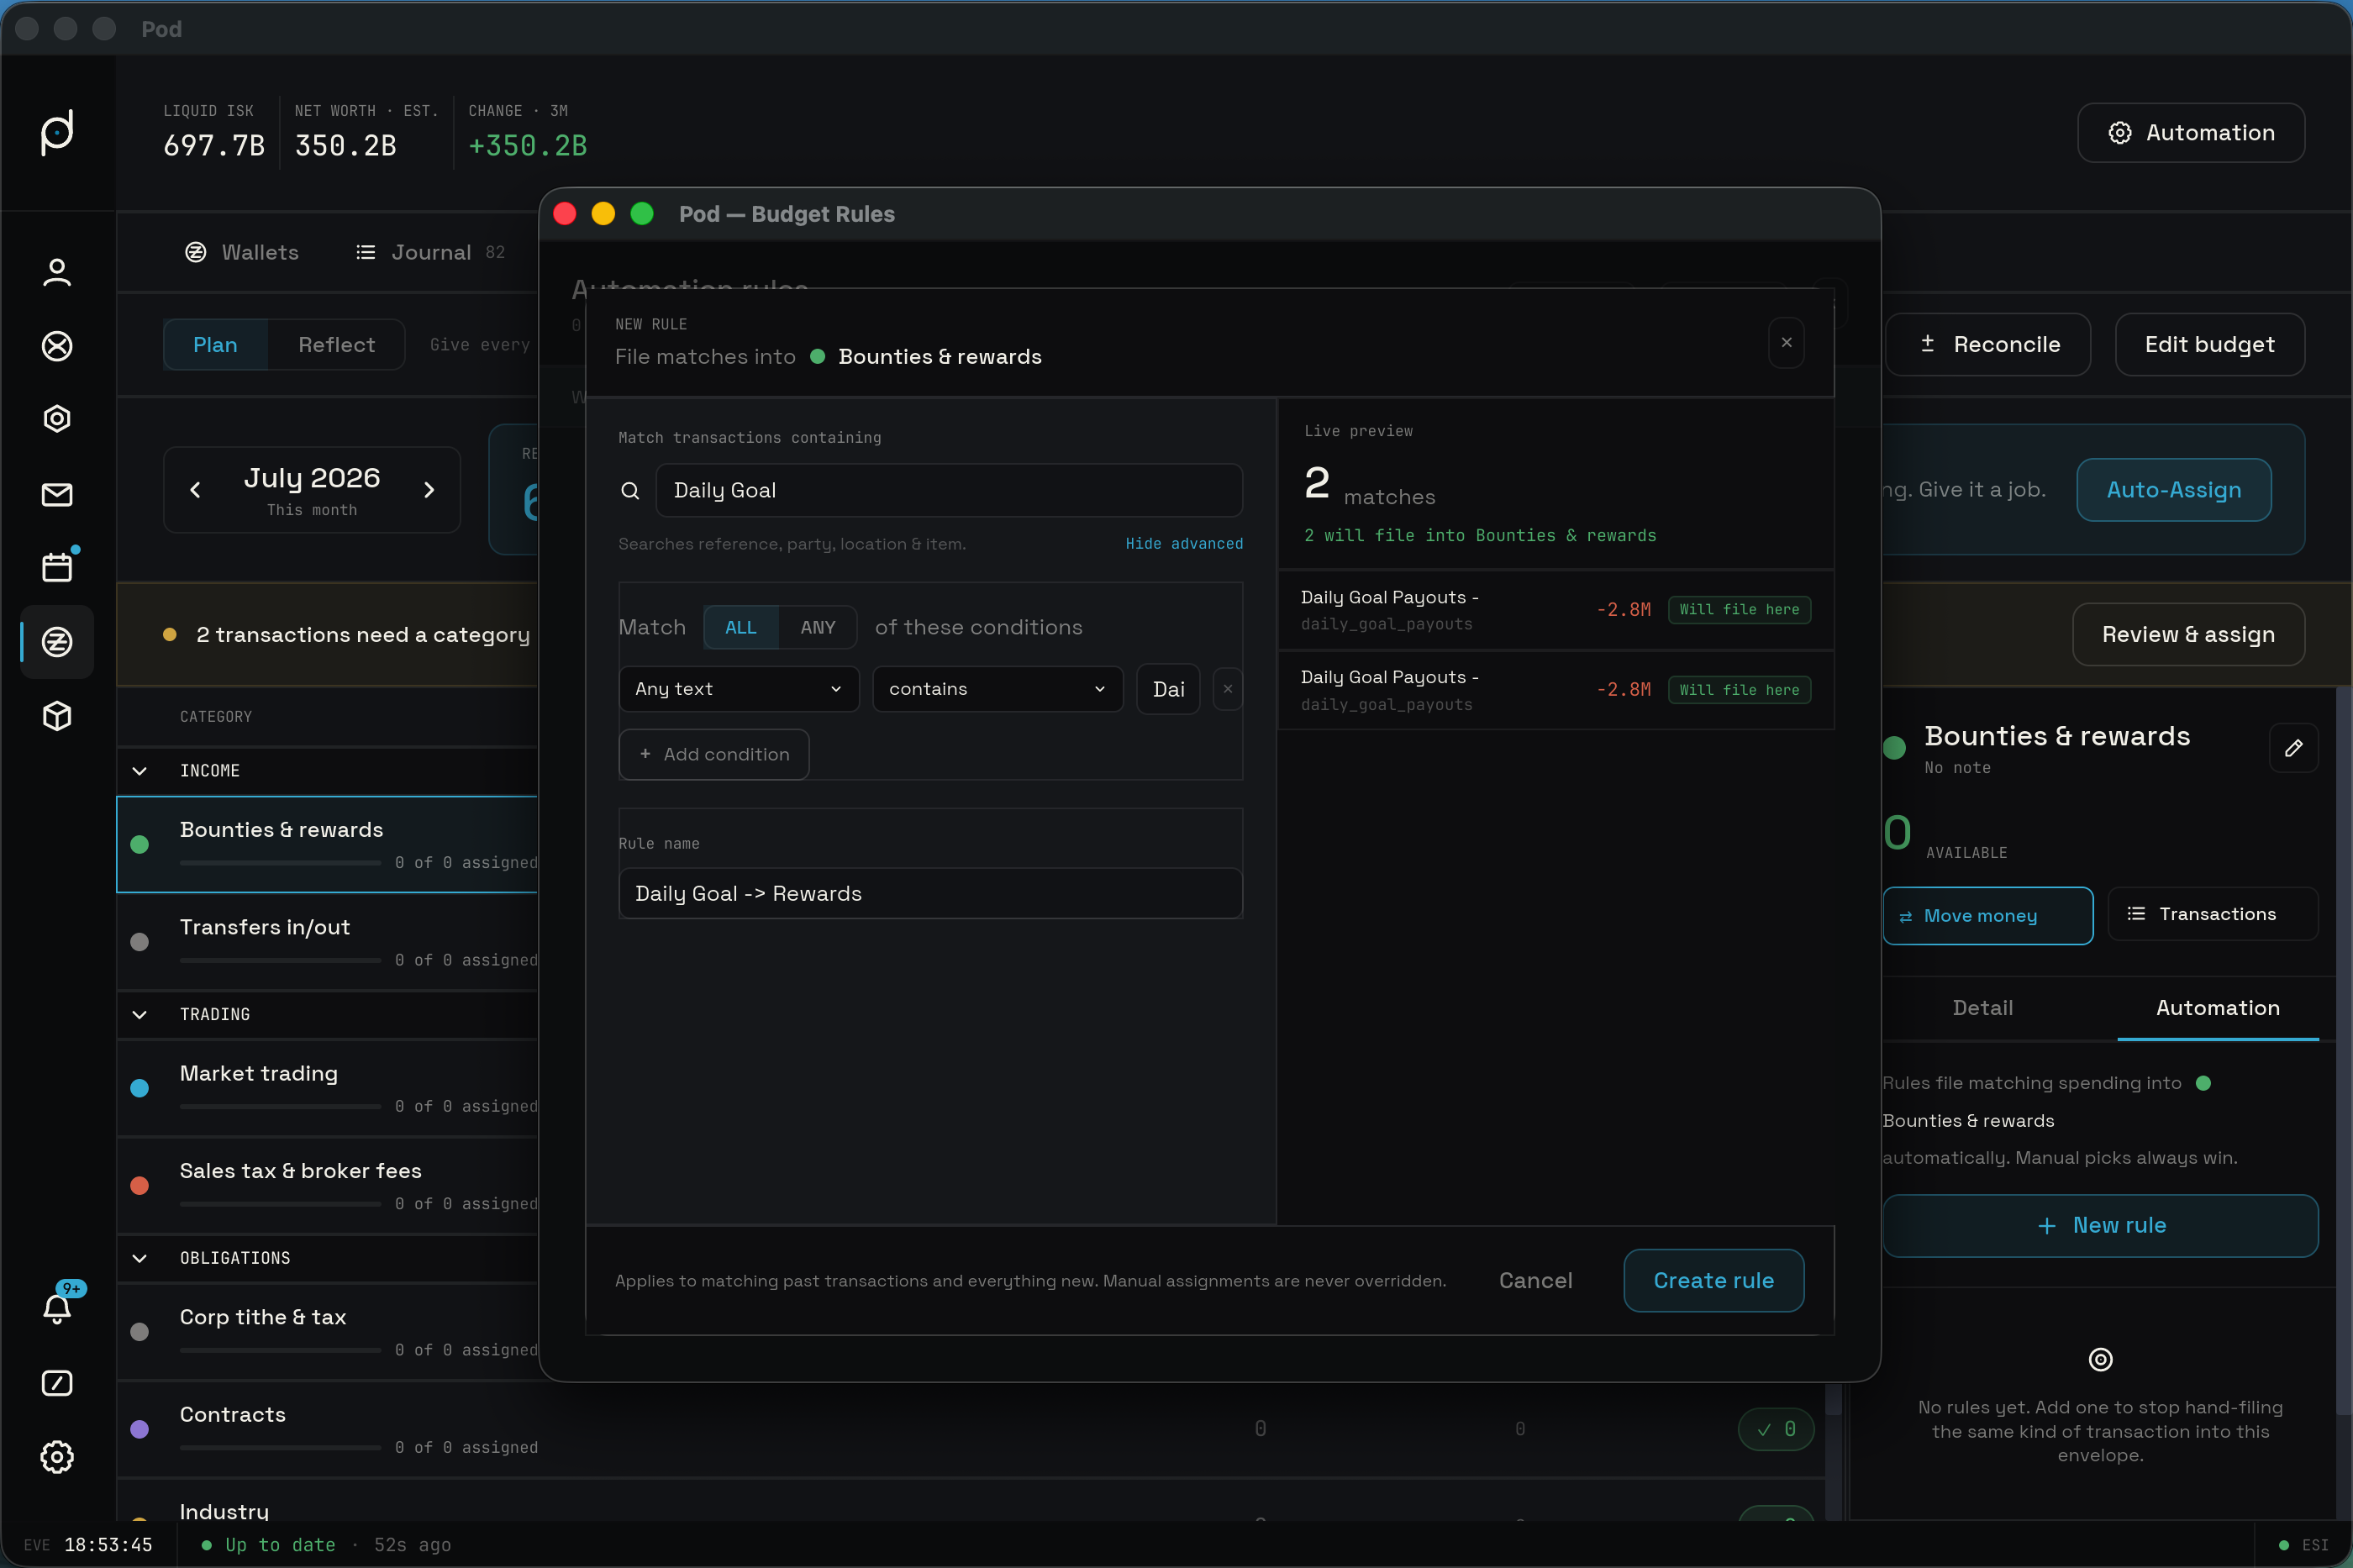
The rule editor opens inside the Automation window, its eyebrow reading "New rule" or "Edit rule" and its title "File matches into {category}".
In simple mode it shows one field, labeled "Match transactions containing", with a search input (placeholder "e.g. Cerberus, broker fee, Jita…") and the caption "Searches reference, party, location & item." An "Add conditions" toggle expands the advanced editor; once open it reads "Hide advanced".
Advanced mode lets you combine conditions. A "Match [ALL/ANY] of these conditions" selector chooses whether every condition must hold or any one suffices; the default is ALL. Below it sit condition rows, each a Field, an Operator, and a Value, with an "✕" to remove the row and a "+ Add condition" to add another.
The Field options are Any text (the default), Type, Party, Reference, Location, Item, Amount, Direction, and Character. The operators depend on the field:
- Text fields (Any text, Party, Reference, Location, Item) offer "contains" and "does not contain". Reference also offers "starts with". Party, Item, and Location also offer "is".
- Type and Character offer "is" and "is not", choosing from the ledger types sync has seen or from your roster.
- Amount offers "is over", "is under", and "is between", and accepts ISK shorthand like 100M or 1B.
- Direction offers "is", with the choices "Outflow (spend)" and "Inflow (income)".
Matching is case-insensitive, and "Any text" spans the reference, party, location, and item at once. Journal rows match against the humanized ref-type label you see in the tab, for example "Daily Goal Payouts", not the raw game code. The rule name auto-suggests from the first condition, falling back to "Untitled rule".
A live preview pane sits alongside the editor. Under the eyebrow "Live preview" it shows a large match count and, in green, "{n} will file into {category}", then the matching entries themselves, each chipped to show what would happen: "Will file here" in green, "Already here" in grey, a kept-manual chip in amber, and "Higher rule wins" in plasma. Before you have entered anything it reads "Type a search or add a condition to see which transactions this rule catches." When the search is valid but nothing matches yet it reads "No spending matches yet. It'll still file matching transactions as they arrive."
A footer note reads "Applies to matching past transactions and everything new. Manual assignments are never overridden." Cancel backs out; the confirm button reads "Create rule" or "Save rule" and stays disabled until at least one condition has a value.
Most rules target spending, and the editor's copy speaks in those terms. A rule is not limited to spending, though: the Direction condition lets you scope a rule to "Outflow (spend)" or "Inflow (income)", so a rule can file income as readily as spend.
The Automation window
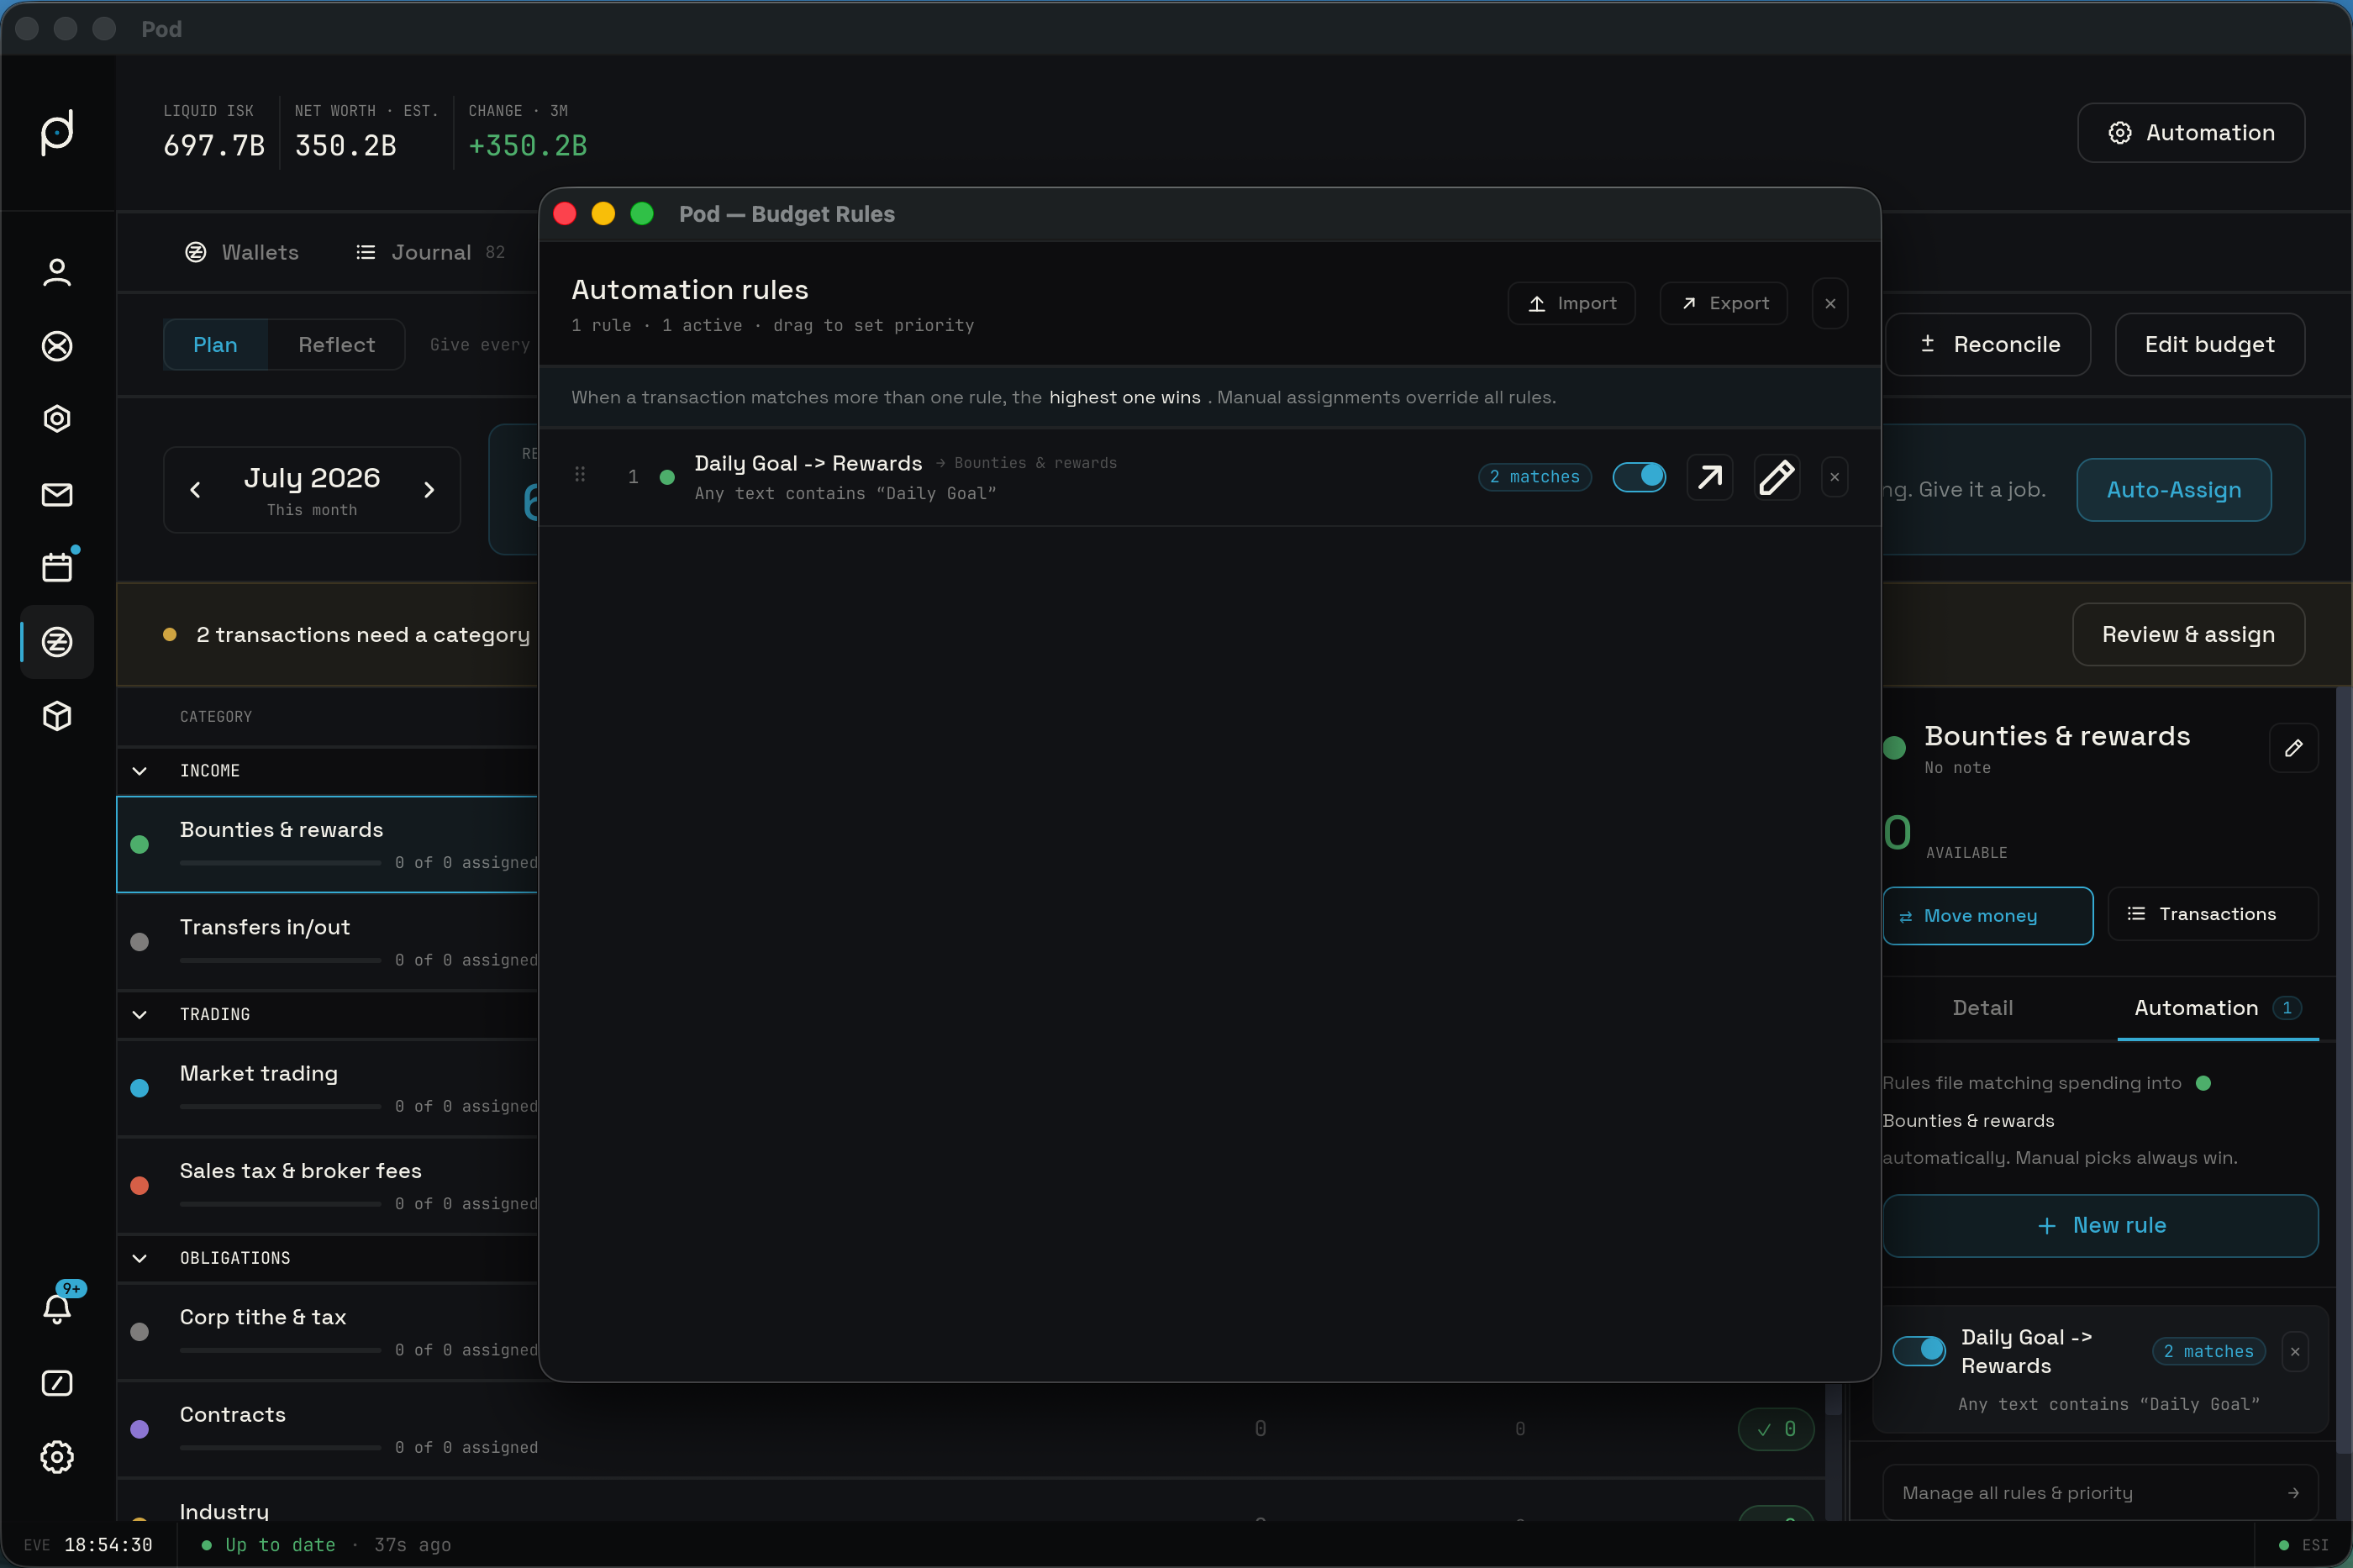
The Automation window is a detached native window whose title bar reads "Budget Rules". You open it from the Automation button in the Budget header, or from the "Manage all rules & priority" link in any category's Automation tab. Because it is its own window, you can move and resize it and keep it open beside the main window while you work.
It holds a single, flat list of every rule across every envelope, ordered by priority. The header reads "Automation rules" with an "N rules · M active · drag to set priority" summary, and a note below it explains that when a transaction matches more than one rule the highest one wins, and that manual assignments override all rules.
Each row carries a drag handle and its priority index, the category's colour dot, the rule name, its condition summary, its match count, an on/off switch, and edit and delete controls. Drag a row to a new position and the priority resets and the budget re-derives against the new order. With no rules anywhere, the list shows an empty state that points you to any envelope's Automation tab to create the first one.
Sharing rules with a rule pack
The Automation window's header carries Import and Export buttons for rule packs, saved as .pbr files. Export bundles the rules you choose into one file you can hand to your corp; the envelopes those rules file into travel with the pack and are recreated on import, so a shared pack arrives ready to run. Import reads a .pbr file, shows you which rules and categories it would create, and lets you skip any you already have or do not want before you confirm. Rules that already exist are skipped by default. Opening a .pbr file directly also routes it here, into the Import step. If a pack is empty, malformed, or from a newer version of Pod, the window explains why it cannot be read instead of importing anything.
Precedence
For any ledger entry, the order is fixed: a manual per-entry pick wins; failing that, the highest-priority enabled rule whose conditions match files it; failing that, the entry stays in Ready to Assign. Rules are retroactive: adding a rule reclaims past entries it matches as well as new ones. With no rules in place, the budget behaves exactly as the manual-only flow it replaces.
Corporation wallets
Selecting a corporation in the scope picker switches the ledger and balances tabs to that corp's books. The scope picker drives those tabs only; the Budget tab is one combined budget across every wallet, so it never narrows to a single corporation. Corporations keep their balances across seven wallet divisions, and a division selector appears as a horizontal strip of buttons. Each button shows the division name, falling back to "Division" and its number when the corp has not named it, along with that division's balance. The first division is selected by default. If no divisions have synced yet, the strip shows a note that corp wallet sync will populate them.
The All Wallets scope sits at the top of the picker and combines every character's liquid ISK into one view, with the net-worth graph and composition split across all of them. Use it for a single read on your whole financial position, then drop into a single character or a corporation division when you need the detail. For a balances-only read that lists every pilot and every corp division side by side, the Wallets tab covers all of them at once.